
Use UiPath AI Center™ to unlock automation superpowers
Share at:

Introduction
While there’s an ever-growing fascination with large language models and GPTs, good “old-fashioned” deep learning still has a significant role to play in practical business automation use cases. There have never been more tools at our disposal to create specialized models that can deliver value quickly in an observable, transparent manner.
Don’t get me wrong, LLMs and Gen AI have mind-blowing potential, but they shouldn’t be treated as a panacea. Smaller and simpler machine learning models are still very applicable to many enterprise use cases.
In this tutorial, we’ll see one example of UiPath leadership in applying AI to automation scenarios. Follow along step-by-step to train a neural network model on business-specific data, and then equip an automation to make predictions!
Why use specialized models?
Some reasons to consider a specialized machine learning model in favor of (or in tandem with…) an LLM:
Model design that is aligned to a defined business outcome. The fundamental machine learning domains like regression, classification and deep learning still have great applicability to many business objectives (e.g. capturing sentiment from reviews, predicting likelihood of customer churn, modeling buying behavior, detecting financial anomalies, etc.). Additionally, we can train or enhance these models on business-specific data.
Transparency in model performance and associated risk. Training on your data isn’t just about accuracy—but mitigating risk in autonomous operations. The targeted nature of Specialized AI allows for more nuanced risk assessments, offering businesses a clear understanding of potential vulnerabilities and the ability to address them proactively.
Simple, discrete outputs are often all that is needed to automate a decision. Generative models are overkill in some instances and require a lot of effort (and complex technical set up when considering methods like Retrieval Augmented Generation) in finding the right prompt to generate the discrete decision needed. Consistency in the generative model’s output can also add complexity.
Reduced cost. At-scale, APIs from third party LLM providers can be costly. Many of these models are extremely large (again, overkill) and can be costly to self-host as well. A tailored model built in a fit-for-purpose manner can drive cost efficiency in your AI strategy.
Deploy a custom neural network in UiPath AI Center™
Requirements
To follow along with this technical guide, you’ll need:
Introductory knowledge of Python and managing Python environments
A machine to set up a new environment with Python 3.9
IDE to create Python scripts (e.g. VS Code)
Access to UiPath AI Center™ and permissions to create a new project (start an enterprise Trial here)
UiPath Studio installed
Step 1: Train the ANN on a dataset (optional)
Our use-case for this tutorial is predicting the likelihood of customer churn at a bank. We’ll use a dataset from Kaggle to train the model.
Refer to this Jupyter Notebook that demonstrates how to use scikit-learn with TensorFlow to train the artificial neural networks on this dataset.
If you would like to train your own model, please use the notebook as a reference and clone the repository. Alternatively, you can skip to step 2 to re-use the model linked in that section.
There are several tutorials online that walk through the theory and practical implementation behind how the neural network works in this use-case — but that is not the focus of this post.
Note: The notebook exports the model as an .h5 file, along with the encodes and scaler. This way we can use them in our functions that we will write in the next section. They will be needed to parse the incoming data that we expect from the automation (JSON) and encode the data properly for the model.
Step 2: Write a predict function to call the model
Now that we have the model generated, we need to package it up for AI Center™. If we look at the documentation, we need a main.py file that contains a class with a “predict” function. We also need to include all our dependent files (models and encoders) and a requirements.txt file.
If you prefer to skip to the solution, feel free to clone the repository. It’s recommended to create a new environment with Python 3.9.
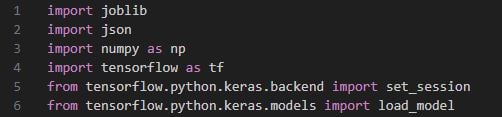
Create main.py file In our root folder, add a file called “main.py”. Define the imports:
Then we’ll define our class and constructor:
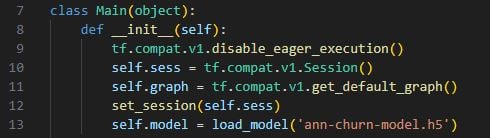
Note that the exported model (ann-churn-model.h5) should be in the root folder as well. Our model was built with Tensorflow. When using TensorFlow, UiPath AI Center™ requires using graphs, so we load the default graph and set the session for use in the predict function.
Next, define the predict function:
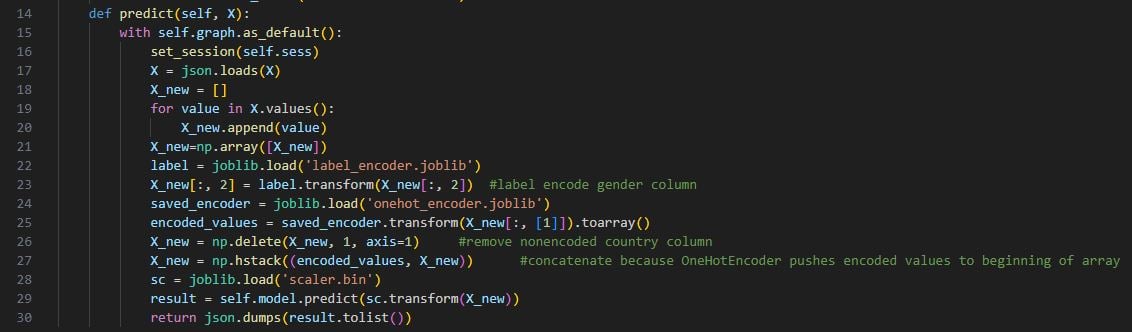
The above code parses an input JSON payload with the data about the customer. It transforms the JSON to a numpy array, and then encodes the categorical values and scales numerical values. This is necessary so that the input data is consistent with the data on which the model was trained (refer to the notebook linked in Step 1 to see more detail on how the model was trained).
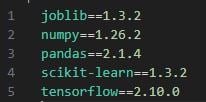
Here we need to guarantee we have our encoders and scaler file in the root directory as well. Next, we need to add a requirements.txt containing the libraries needed in main.py:
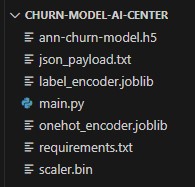
Our project folder should now look like this:
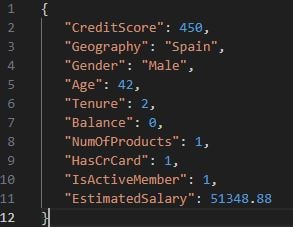
We can test the predict function before uploading it to AI Center™. In the json_payload.txt file, add the following payload:
Then add these lines of code to the end of the main.py file:
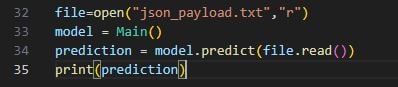
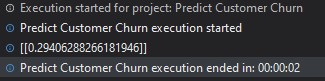
Run the main.py file and you should see the following in the console output: [[0.29406288266181946]] This means that from the input JSON, the profile of that customer generated a prediction that they have a 29% likelihood of churning! Our model works when run from our script. Now we’re ready to deploy to AI Center™.
Step 3: Upload the ML Package to AI Center™ and Deploy
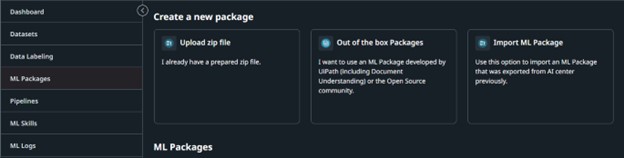
Take the folder from Step 2 and compress it to a .zip file. Log into UiPath Automation Cloud and go to AI Center™. Click Create Project and fill in the project details. Go to ML Packages and click “Upload Zip file”:
Enter a name, and upload the Zip file you created. You can leave all other settings as default. Click Create. On the ML Packages screen, wait until you see a status of “Undeployed” on the package you created:

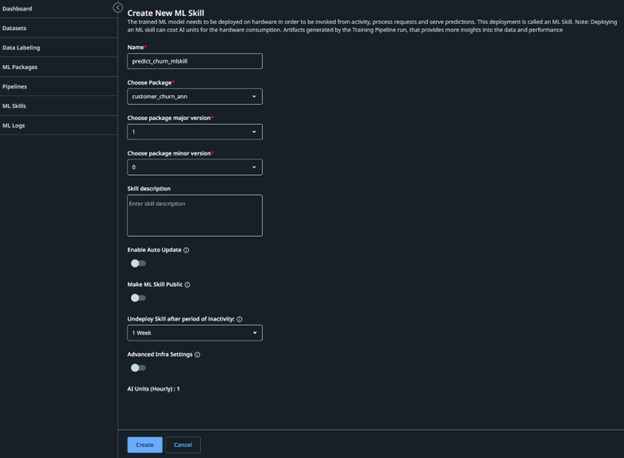
Go to “ML Skills” from the left menu and select “Create New”.

Enter a name and choose the package you just uploaded. The package version should be one and minor version zero if you have uploaded for the first time.
Important: Toggle “Make ML Skill Public” if you intend to call the ML Skill endpoint with Studio connected to a different Orchestrator tenant. Later in this tutorial, I’ll demonstrate the approach of calling a public ML Skill. You can leave all other settings as their defaults, and click “Create”.
It may take a while for the ML Skill to deploy. Wait until the ML Skill shows as “Available”.

Clicking into the ML Skill, you will find the endpoint URL and API Key (if you made it public). We can use these credentials to call the predict function that we created! This gives us the flexibility to call the model from an instance of Studio that is connected to a different Orchestrator tenant.
Step 4: Make a prediction from UiPath Studio Open UiPath Studio and create a new process. Click “Manage Packages” and add the UiPath.MLServices.Activities package.

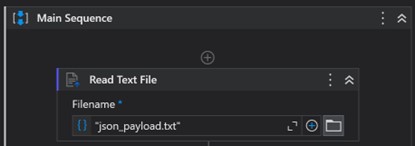
To test our deployed ML Skill easily, we can use the same JSON payload text file that we used to test the Python predict function. Add the “jsonpayload.txt” file to the Studio project directory. In the main.xaml workflow, add a Read Text file activity and point it to the jsonpayload.txt file:
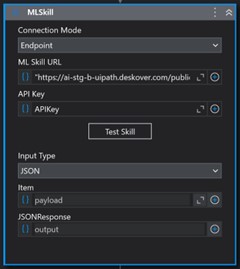
Save the output of this activity to a String variable called “Payload”. Add an MLSkill activity. If you made the ML Skill public, you can Enter the URL and API key of your deployed ML Skill. Otherwise, select “Robot” for Connection Mode if Studio is connected to the same Orchestrator Tenant where the ML Skill was deployed.
Create a string variable for the output and log that variable to the console. The simple sequence should look like this:
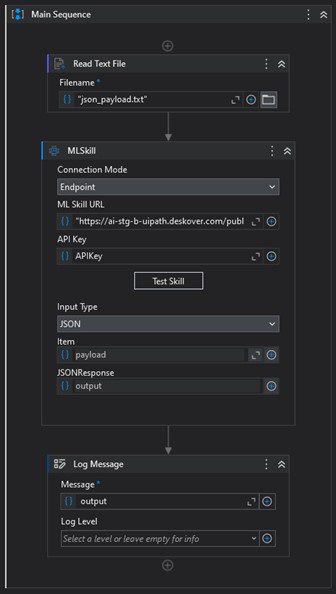
Run the process and view the output in the console. If you didn’t change any details of the json payload in the text file, you should see the same predicted likelihood as in the previous step! Go ahead and try with different values in the JSON payload file.
Conclusion
In conclusion, this step-by-step guide empowers UiPath users to harness the power of custom machine learning models within AI Center™.
With our model deployed in AI Center™, we now equip automation with a new intelligent “skill” to predict the likelihood of a customer churning. Moreover, this skill was trained on specific business data, making it specialized and tailored to the use-case. This increases accuracy and doesn’t depend on any third-party service provider.
A simple percentage score indicating a customer’s likelihood to churn can then drive business decisions and downstream automations. With AI Center™, the possibilities to augment business process automation with AI are endless!

Senior Sales Engineer, UiPath
Related articles


Get articles from automation experts in your inbox
SubscribeGet articles from automation experts in your inbox
Sign up today and we'll email you the newest articles every week.
Thank you for subscribing!
Thank you for subscribing! Each week, we'll send the best automation blog posts straight to your inbox.