
Summarize:
Introduction
This article offers insights on how you can achieve automations for Microsoft Excel. UiPath has done a fantastic job in providing activities used to automate Excel inputs. To better understand, find out more about the Excel Activities Pack offered. There are times when tackling a problem requires a combination of various activities. Take a look at the tips and tricks to help you on your way to Excel automation.
Scenario 1: Paste data dynamically in Excel
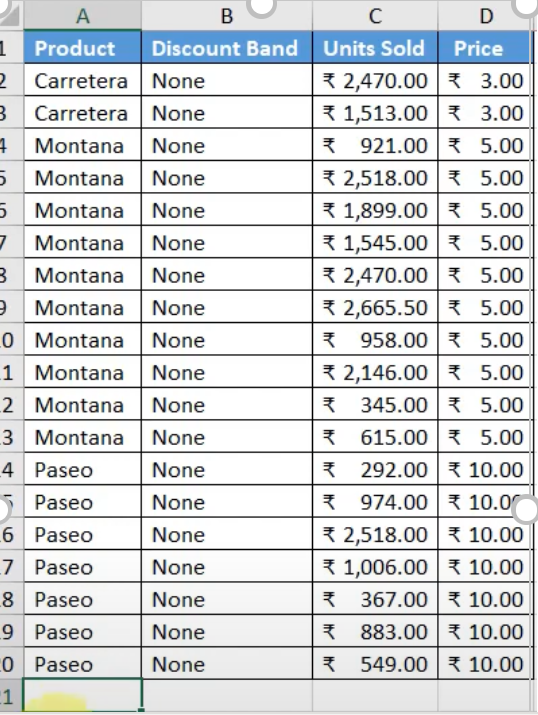
Let's imagine the below data in an Excel Tab named AppendRow. The task is to add the data from the data sheet to the end of the data in AppendRow.
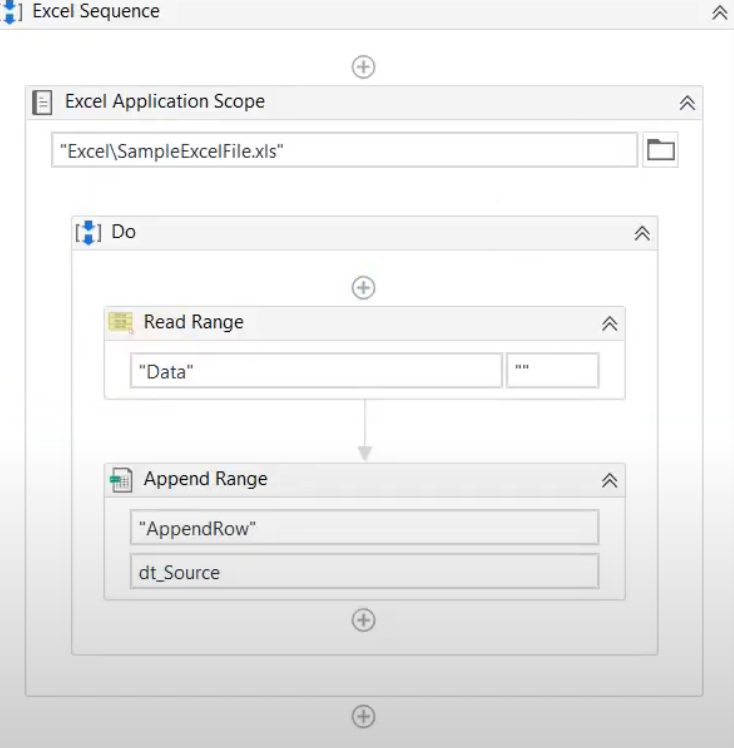
This task is simple and can be accomplished by using Read Range and Append Range Activity as shown below.
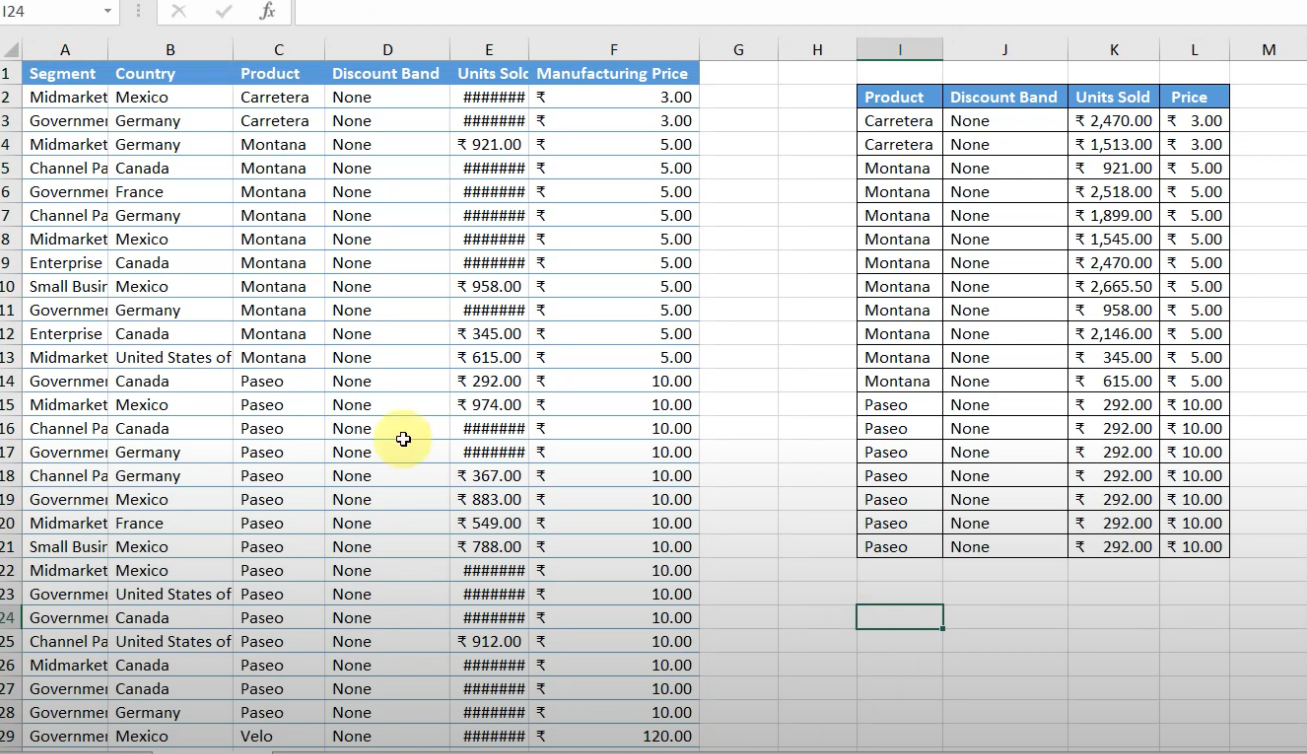
The problem with appending ranges is that it would directly append the data to existing data. Now, if there are two sets of data in the same Excel sheet as shown below, it doesn't work. If you want to append range to the data available in column I—Append Range Fails as append Range will append the data from the last cell of A.
To accomplish this correctly, follow the steps below.
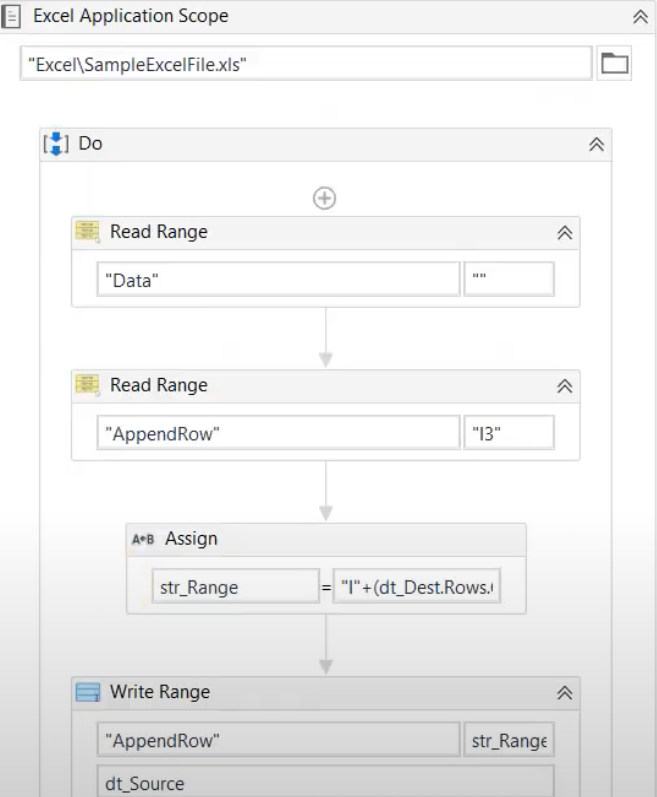
1. Read the source data from the Excel sheet data into a data table using Read Range activity.
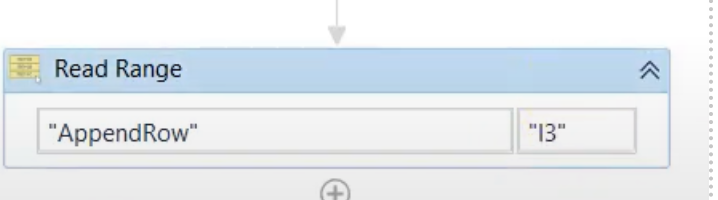
2. Next, use another Read Range Activity and Read the Destination Data (Append Row) in a data table called dt_Dest where you want to paste. In this case, from I3, as the data is starting from cell I3.
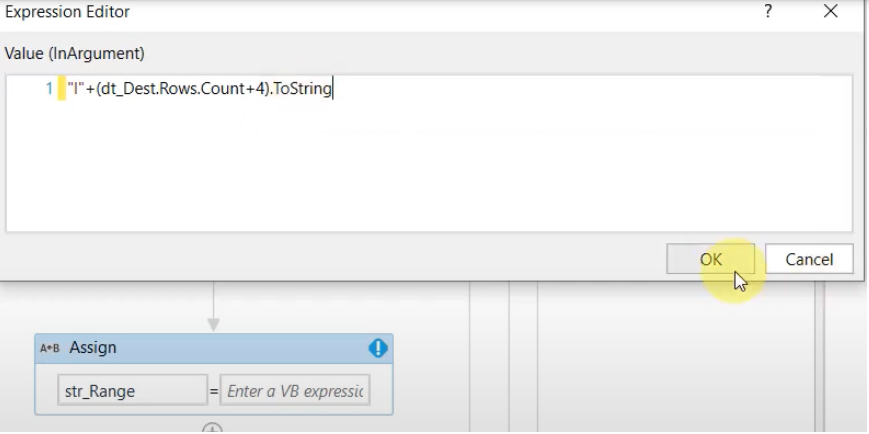
3. Create a string variable called str_Range to store the Range.
Get the last cell where data is available by counting the Rows in the dt_Dest Datatable.
Append the row count of the dt_Dest to the Column Number (I) as shown below.
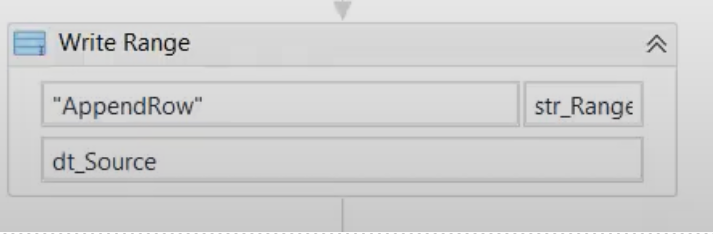
4. Now that you have the range where the data must be pasted, you can simply use a write range activity and write the source data starting from the dynamic range just evaluated.
5. Final automation looks like this:
The same steps are explained in detail in this video!
Scenario 2: Refreshing multiple pivots in an Excel sheet in three different ways
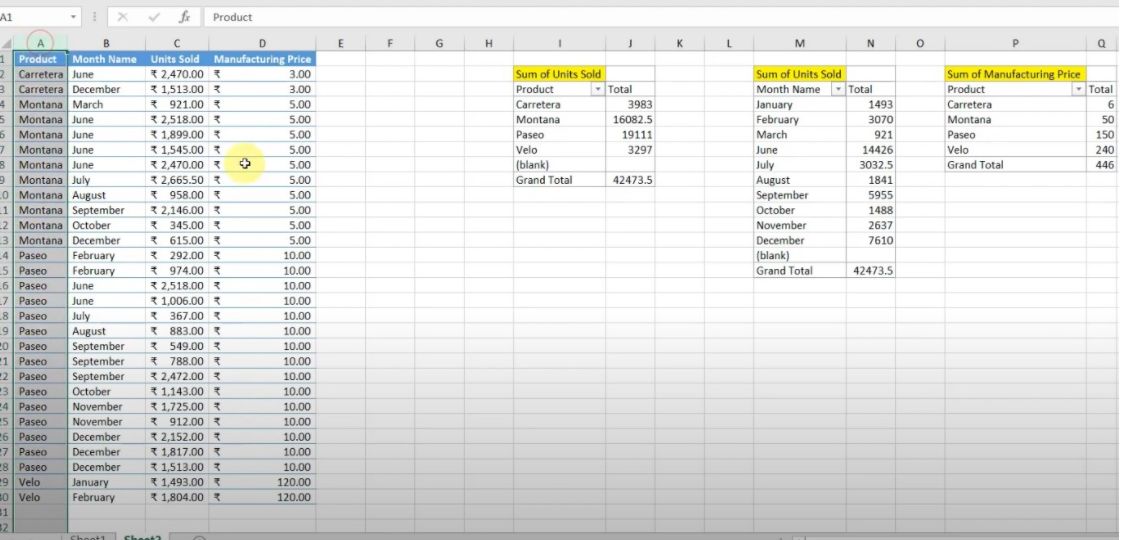
Consider a scenario where we have three pivots in an Excel sheet as shown below, starting from cell I2, M2, and P2.
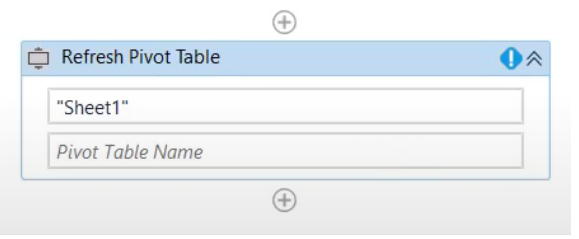
Once the data is updated in the source and there is a requirement to refresh the pivots by the robot, we have an activity called Refresh Pivot. However, the activity refreshes one pivot at a time and expects one pivot time as input as shown in the below.
Now, considering the above scenario where we have three pivots, we do not want to use the same activity Refresh Pivot three times.
To accomplish this, follow the steps below.
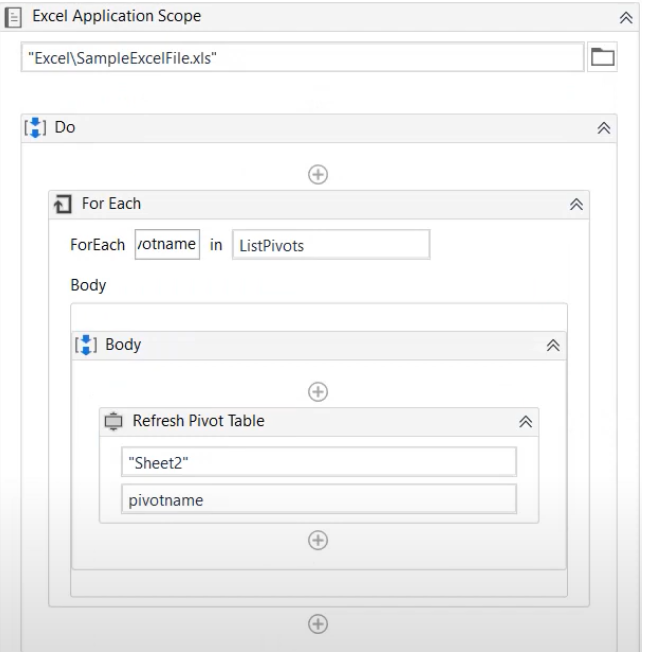
1. You can have a list of strings or array of strings and you can store all the pivots named to refresh in it as shown below.

2. Next, repeat for each activity. Iterate the list of pivots and inside the foreach you can just use a single Refresh Pivot activity instead of using it three times. Now this list can be configured in a configuration file or assets in UiPath Orchestrator.
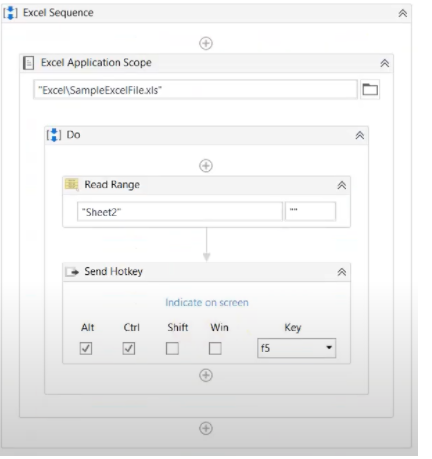
The second way of refreshing multiple pivots is using the hotkey (Ctrl + Alt + F5)— you just go to the sheet and click the send hotkey (Ctrl + Alt + F5), which is a shortcut to refresh all available pivots as shown below.
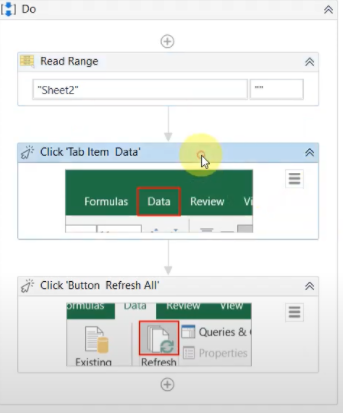
The third way of refreshing multiple pivots at the same time is using the UI (User Interface) Automation.
Click on the activity and then click on the Data tab in Excel
Once opened, click on the option which says Refresh All.
All the three ways to refresh pivots are explained in this video!
Scenario 3: Usage of Invoke VBA and the Invoke Code
Lastly, we have two especially useful activities provided by UiPath — Invoke VBA and the Invoke Code.
Invoke VBA
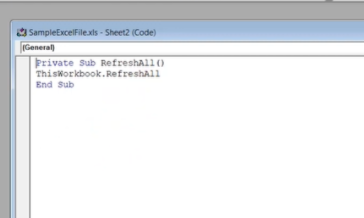
1. You can write a macro in Excel as shown below. This Macro is to Refresh All pivots from the Excel:
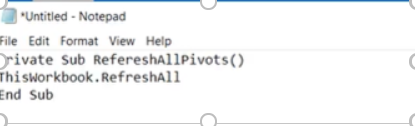
2. Once the VBA is tested, the same can be stored as a .vb file using a Notepad:
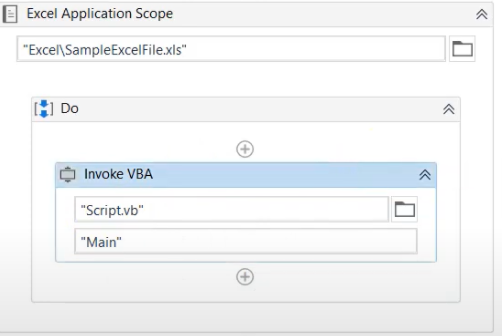
3. Lastly, you just must invoke the .vb file in UiPath Studio as shown below:
Invoke VBA is explained in detail here!
Invoke Code
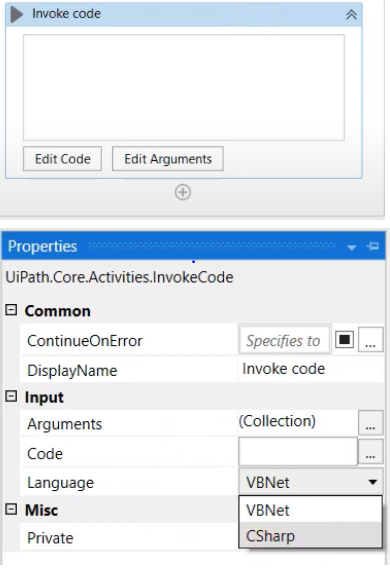
1. The below activity helps you write Vb.Net or C# code inside the UiPath Studio. You can Invoke Code and perform the Excel operations:
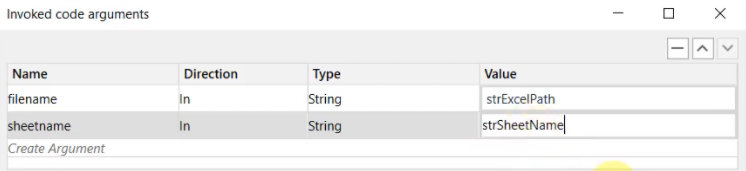
2. You have the option to pass the arguments to the code using the arguments as shown below:
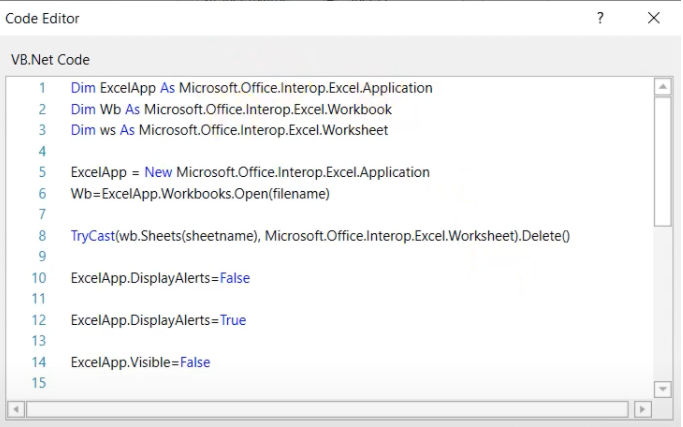
Now in the Invoke Code, you can write code. The sample code below is written to delete a sheet from Excel:
More details about Invoke Code and how it's different from Invoke VBA in this video.
Conclusion
UiPath offers a deep integration with Microsoft Excel and bring you the possibility of automating different tasks. Here you can find out more.
Starting with Studio v2021.10 and UiPath.Excel.Activities v2.11.0, a modern design experience is available to explore.
Happy Automation!
Topics:
StudioRPA Developer, NatWest Group
Related articles


Get articles from automation experts in your inbox
Sign up today and we'll email you the newest articles every week.
Thank you for subscribing!
Thank you for subscribing! Each week, we'll send the best automation blog posts straight to your inbox.
Get articles from automation experts in your inbox
Sign up today and we'll email you the newest articles every week.
Thank you for subscribing!
Thank you for subscribing! Each week, we'll send the best automation blog posts straight to your inbox.