
Summarize:
Choice Sets are a particularly useful part of the UiPath Data Services feature set that enables users to create entities with single or multi-choice attributes. I am going to exemplify what I just stated in the current context of this blog article. I am currently writing this blog, that can be an entity. And this entity can contain an attribute named category that is a multiple-choice attribute. That is because this blog can be categorized under two labels at the least—technology and robotic process automation (RPA).
Simply put, when creating the “Blog” entity, I can create an attribute named “Category” that is of type “Choice Set”. In this article, we will look at how to create Choice Sets in Data Services and work with them in UiPath Studio.
Prerequisites
Data Services is a recent and newly released feature of the UiPath Platform and there are several conditions that will need to be satisfied before you can begin working with Data Services and Choice Sets. For more information, please refer to this UiPath Forum post on the subject, particularly, the link that takes you to the excellent training course on Data Services on the UiPath Academy website. In addition, you can visit the Choice Sets documentation page to know more about this feature in general.
Once you have your working environment setup, the next step is to jump on to the Portal in Automation Cloud™, go to the Data Services tab, and create the (first) Choice Set.
Note: to avoid lengthy prose, I will be confining to illustrations and brief descriptions, switching to detailed elaborations only where necessary. I will be assuming that you’re already familiar with Data Services as this knowledge is necessary before you can begin working with Choice Sets. If you’re new to Data Services, I recommend starting with the documentation page.
Creating the Choice Set in Data Services
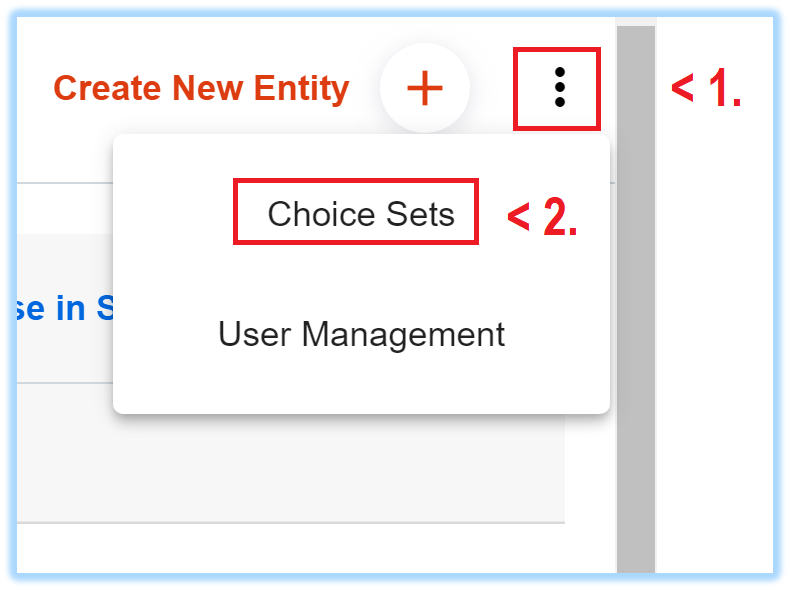
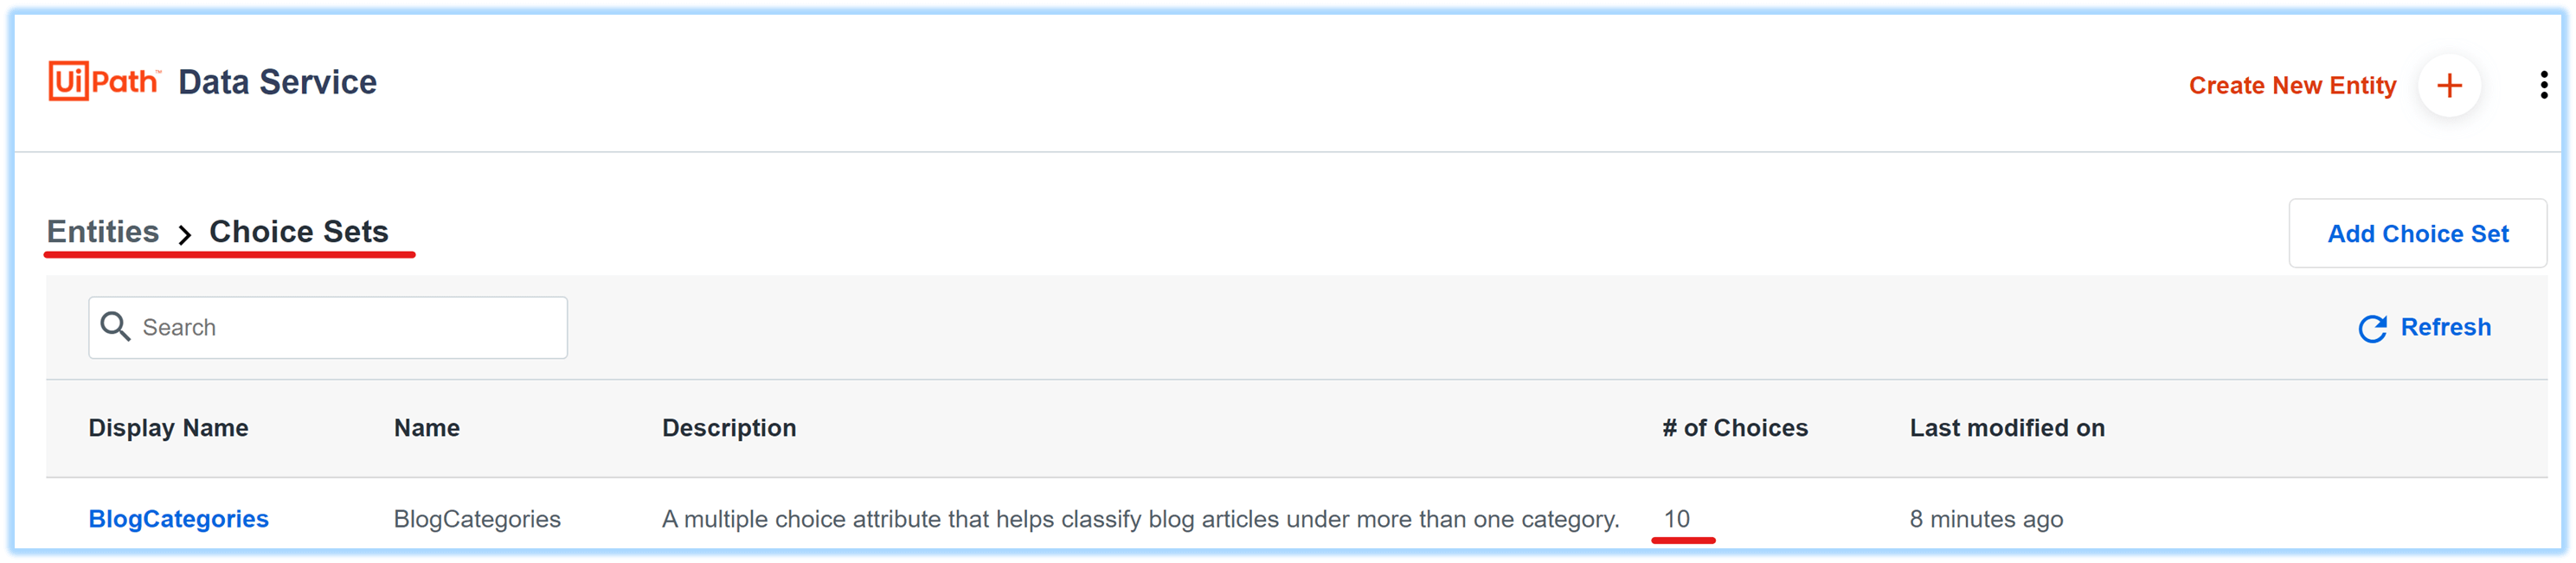
1. First, navigate to the "Choice Set" panel from the top-right corner of the Data Services page.
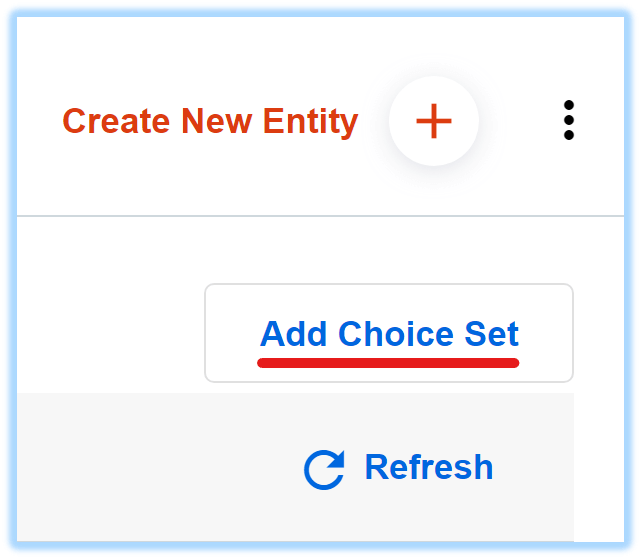
2. Click the “Add Choice Set” button to begin creating a new Choice Set.
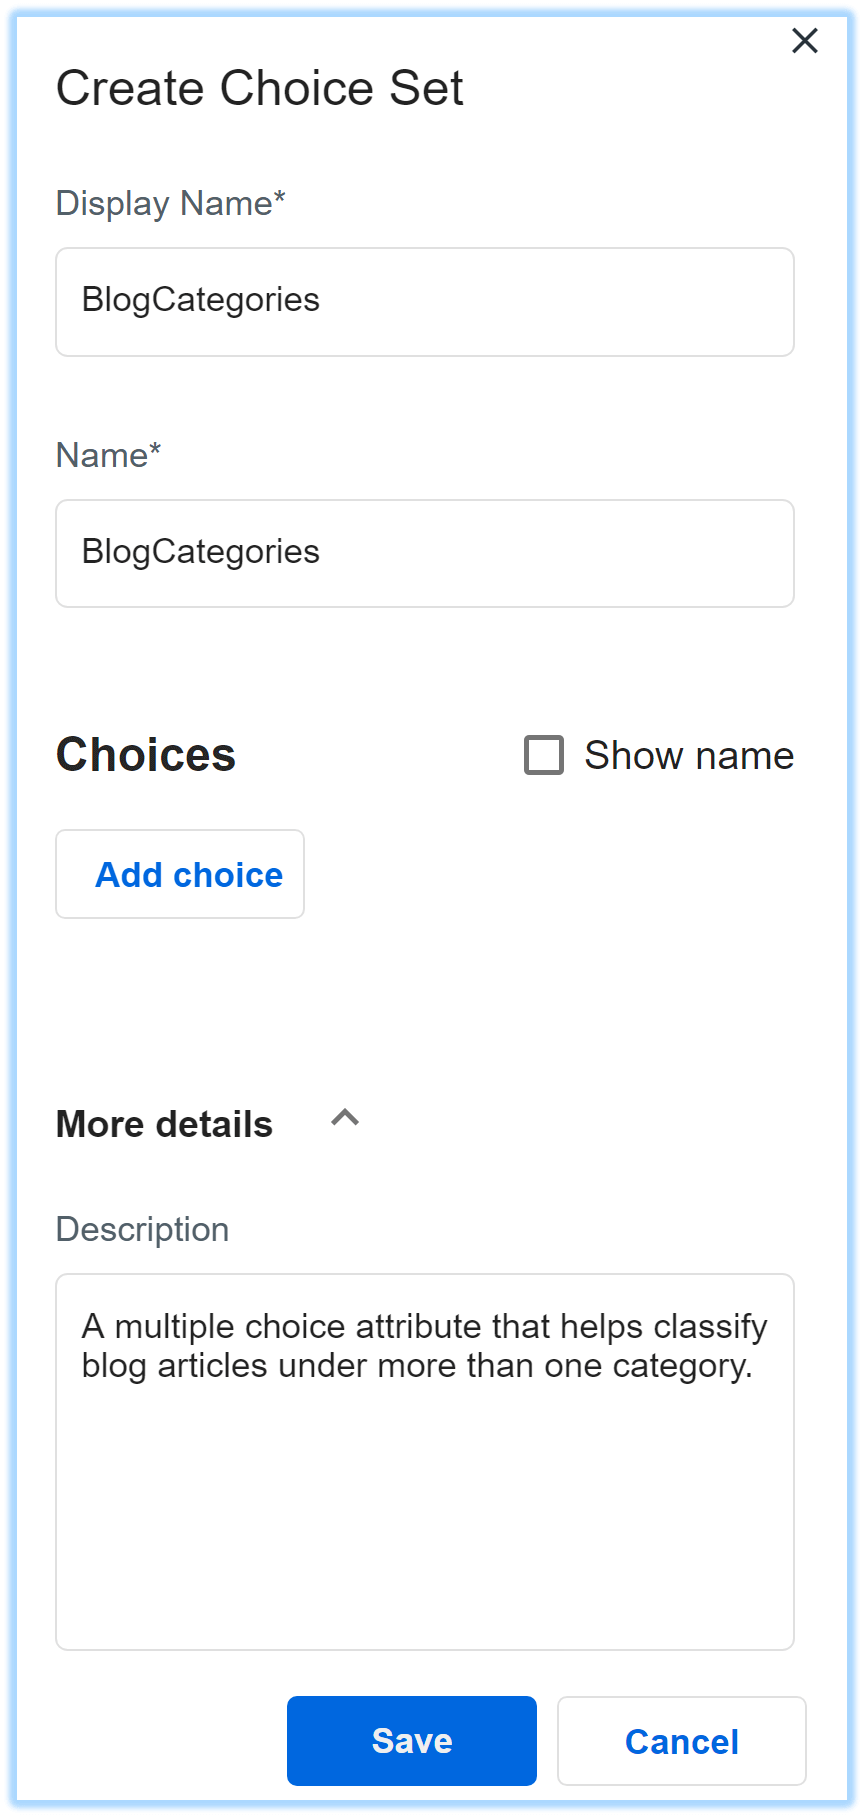
3. Name the Choice Set “BlogCategories” and provide a meaningful description to the Choice Set.
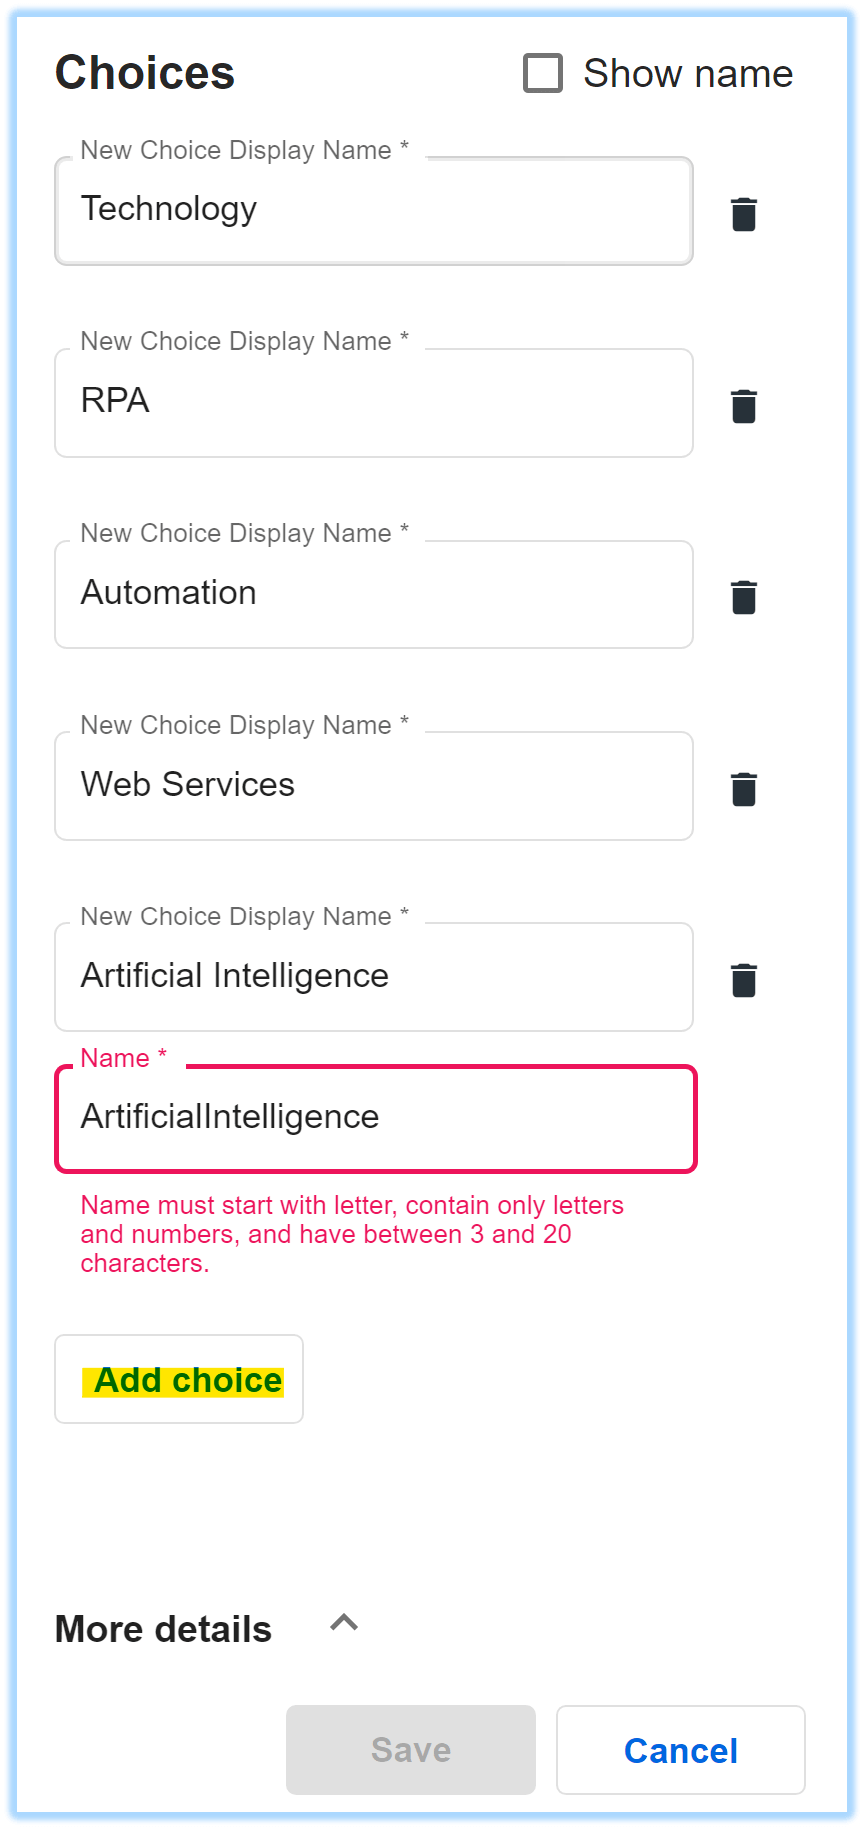
4. Click On the “Add Choice” button under the Choices section and add two or more Values to the Choice Set by repeatedly clicking on this button (highlighted in the image below). Note that the values have limits on their definition as shown by the error below.
5. Click on the Save Button once you have completed adding all the blog category choices and you should see the Choice Set created on the Choice Sets screen. In this case, I have added ten choices which are displayed on this screen.
Creating an Entity with a Choice Set Attribute in Data Services
1. Click on the Create New Entity button on the top-right of the screen and create a new Entity as shown and Click Save to complete creating the Entity.

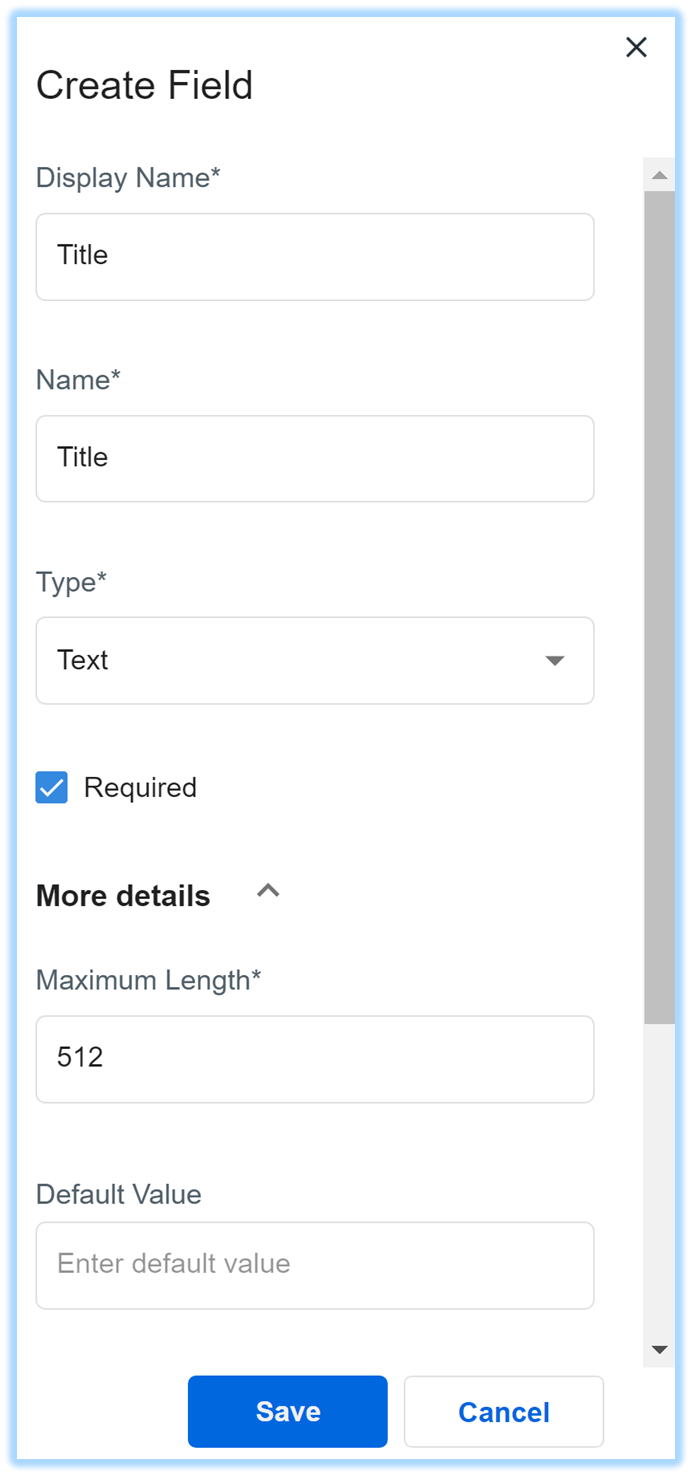
2. To keep things simple, this entity will have only two fields named “Title” and “Category”. The title field will be a simple text field. Click on the “Create New Field” button to begin creating a new field for the Blog Entity.
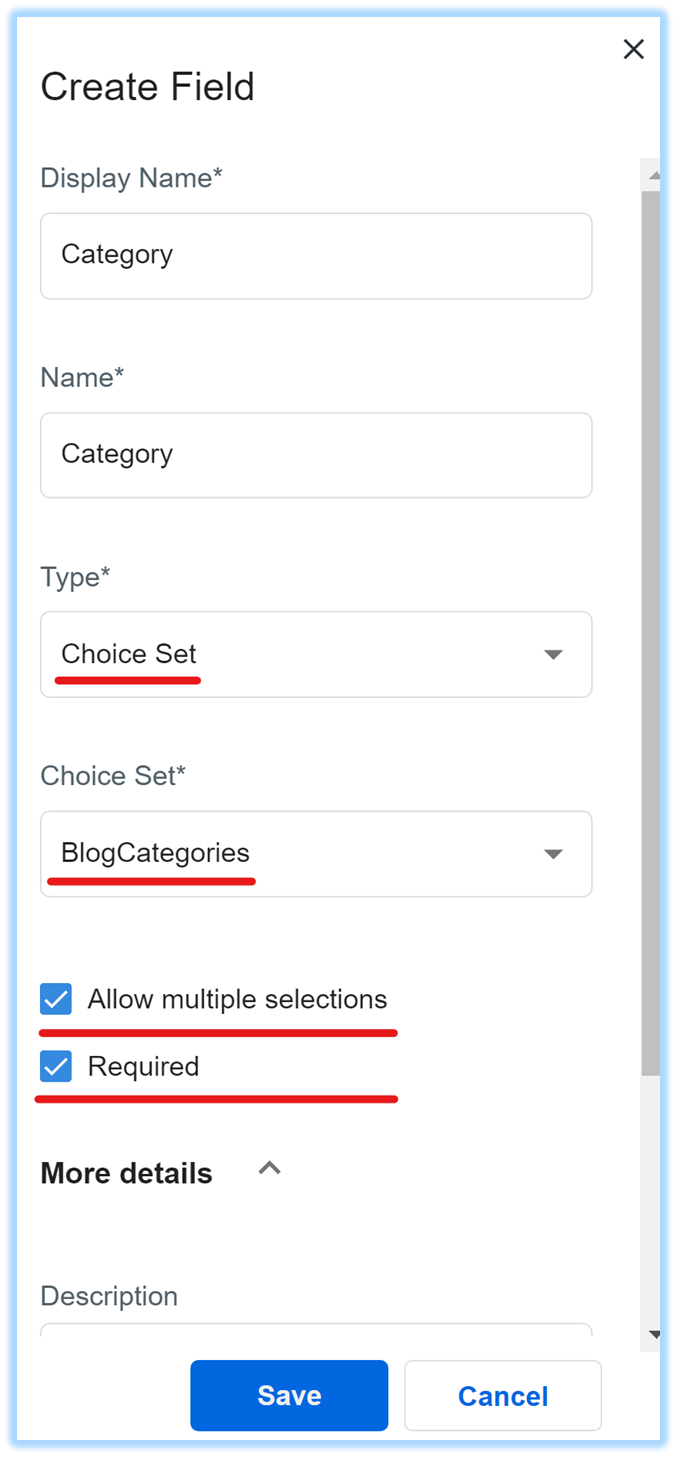
3. Create the Category field and define it as a Choice Set. Most importantly, note the following option settings:
The Type is set to “Choice Set”
Under Choice Set, the selection is set to “BlogCategories”—this is the Choice Set we created in the steps above!
Finally, make sure to enable the multiple-choice option as shown below. We will need this to demonstrate how to work with multiple selections later in this tutorial.
4. Click Save to finish creating the Category Attribute. At this point you have completed the creation of the Blog entity for this article.
Adding sample blog records to the blog Entity
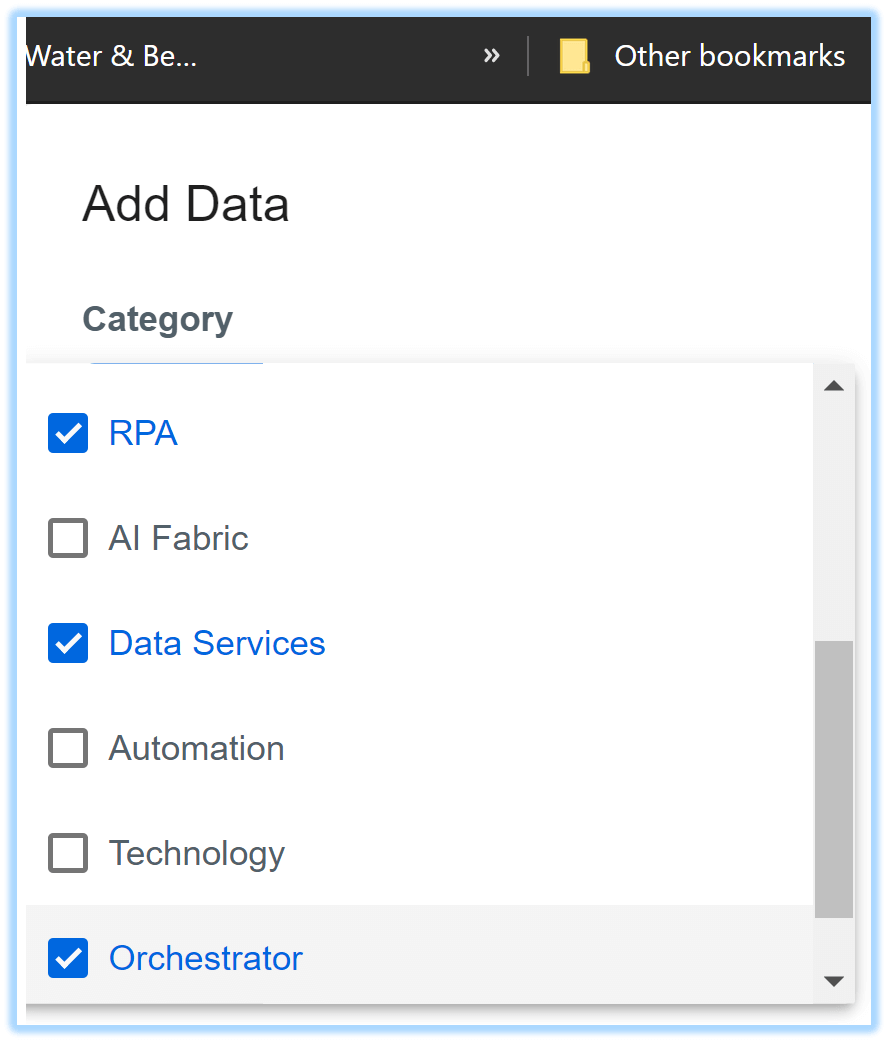
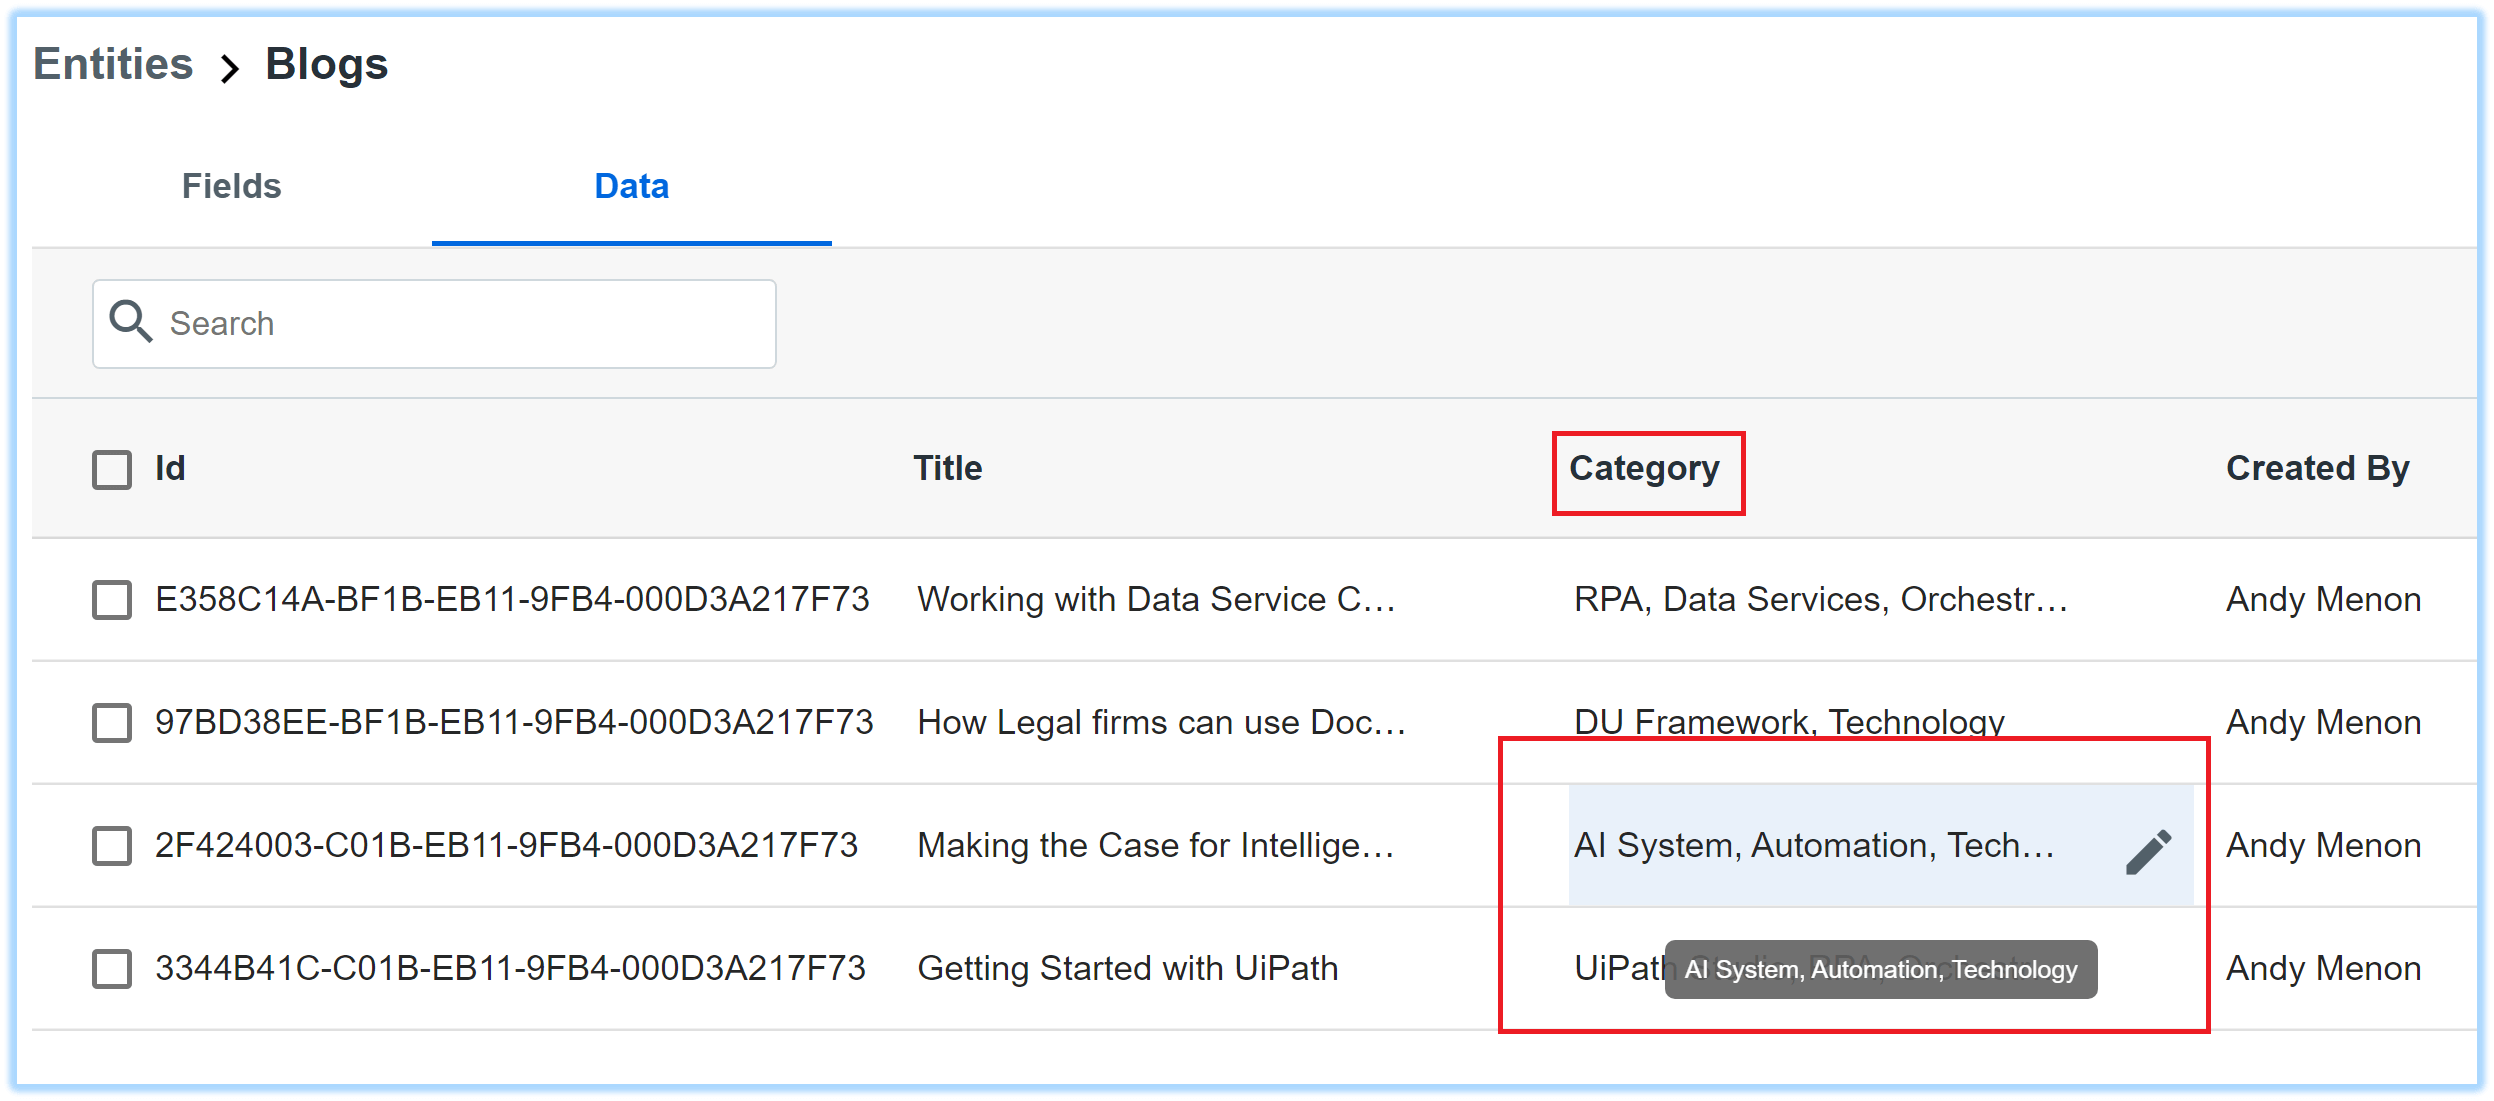
1. For this demonstration, we will be creating sample data for the Blog Entity directly in Data Services. Click on the “Add Data” button and create the first sample record as shown below.

2. Note that the Category field is presented as a multiple-choice dropdown because the multiple-choice option was enabled in the previous steps. As a result, you can classify the current blog article under two or more category labels!
3. Similarly, create a few more sample records with as many different category labels as possible so that it becomes easier to verify the results from the Studio Project later. Once you have completed creating the records, the Blog Data screen must look like the one shown below. Note that you can hover on the Category values to view the full list of categories for each of your blog articles.
Creating an RPA project in UiPath Studio
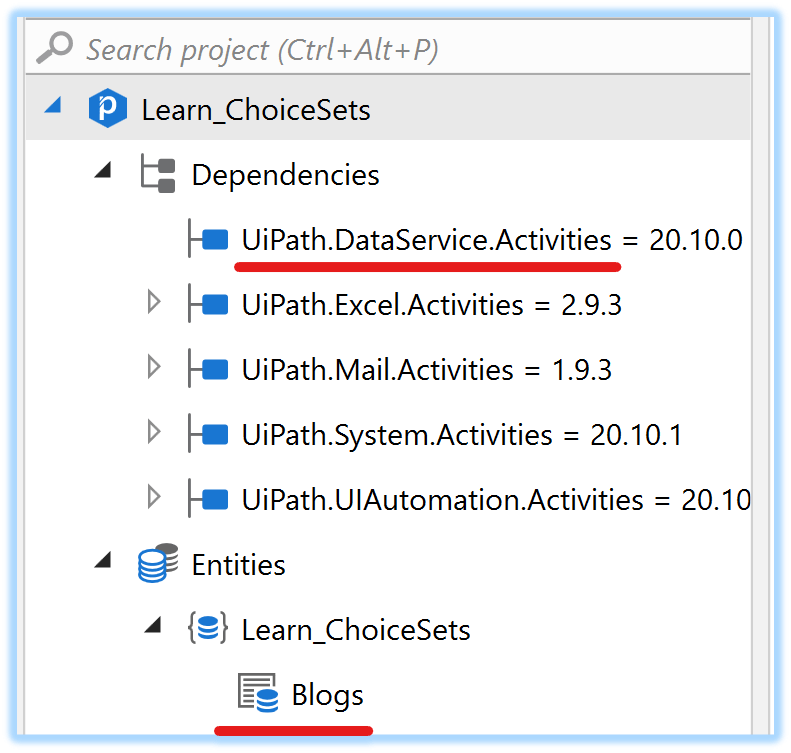
As mentioned before, you may already be familiar working with Data Services in Studio, so I am going to start with a Project aptly named “Learn_ChoiceSets”. This Studio environment is already connected to a modern folder on the same UiPath Orchestrator instance from where I have pulled in the Blog Entity into this project. In addition, the UiPath.DataServices.Activities package has been installed in the project. You will already be familiar with these steps if you have completed the Data Services course from UiPath Academy.
Sequence 1: listing all blog articles from Data Services
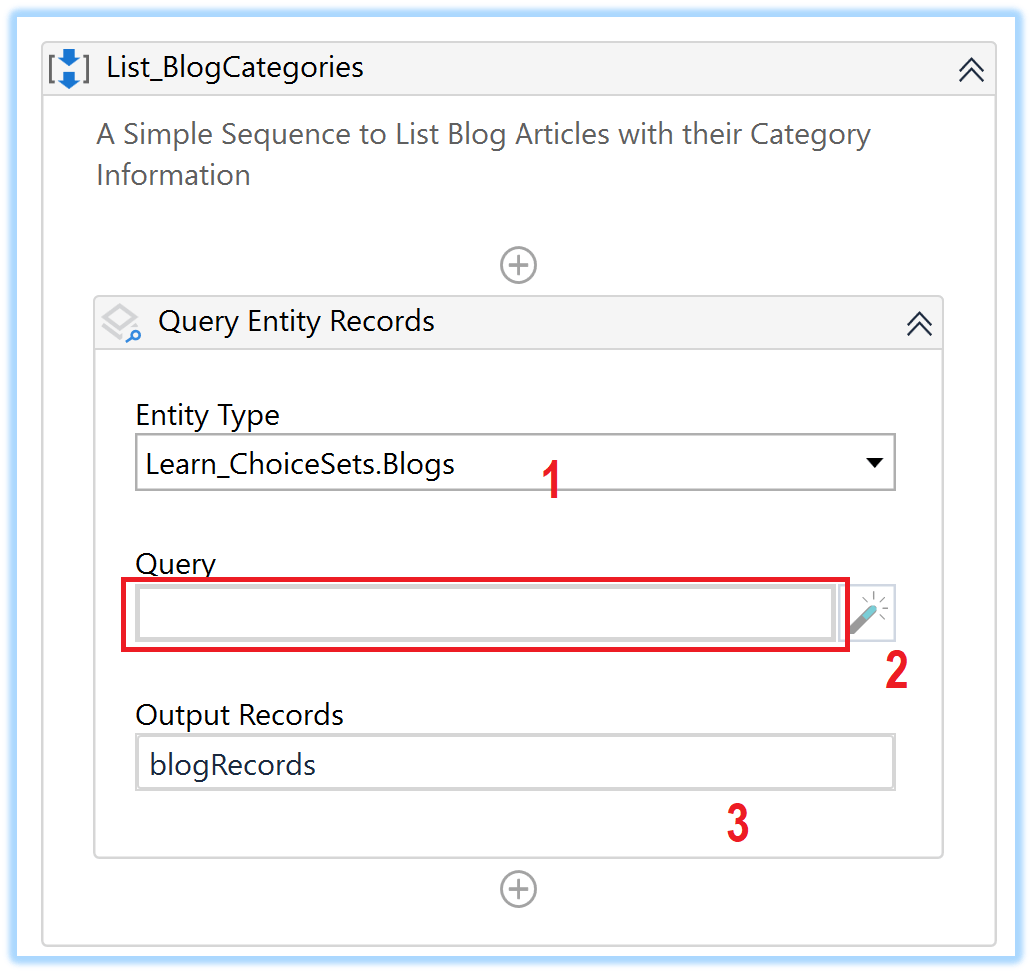
In this example sequence, we are retrieving all the Blog records from Data Services. The Query Entity Records Activity has been configured to:
Query the Blogs Entity
The Query parameter is skipped as we will need to retrieve all records–—this is not recommended, but in this case, we are making an exception because we are working with a small set of records
The output of the query has been assigned to a local collection named blogArticles that is of type IList<Blogs>
Note that the blogArticles can be created by using the Ctrl+K, or by right-clicking in the Output Records field and selecting the “Create Variable” option
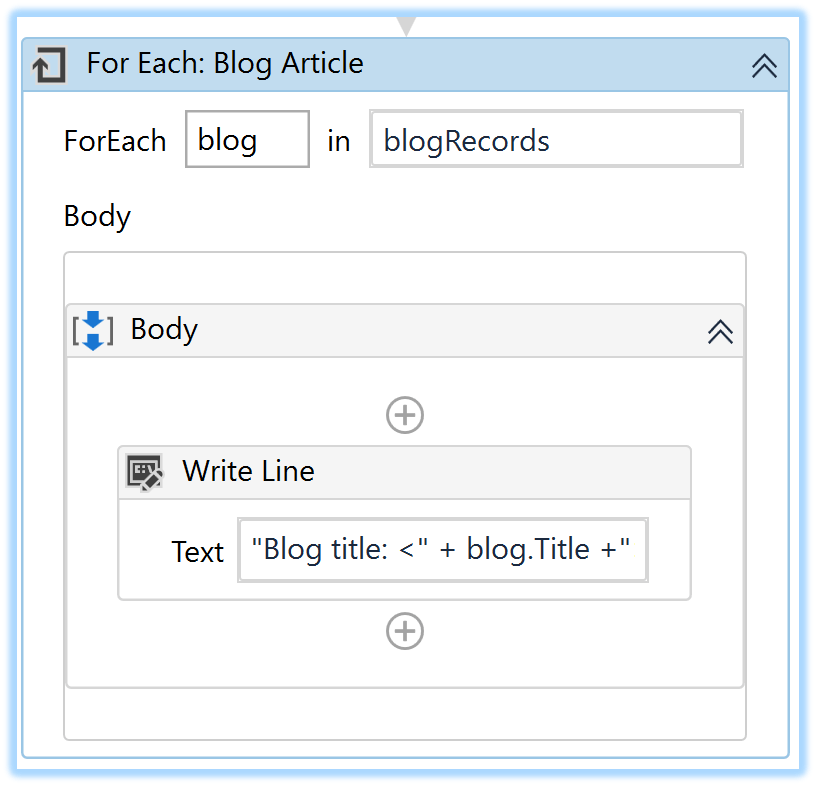
5. Obviously, the next step is to loop through the blogRecords collection with a For Each activity as shown below. The blog variable is set to type Blog to avoid additional data type conversions within the loop.
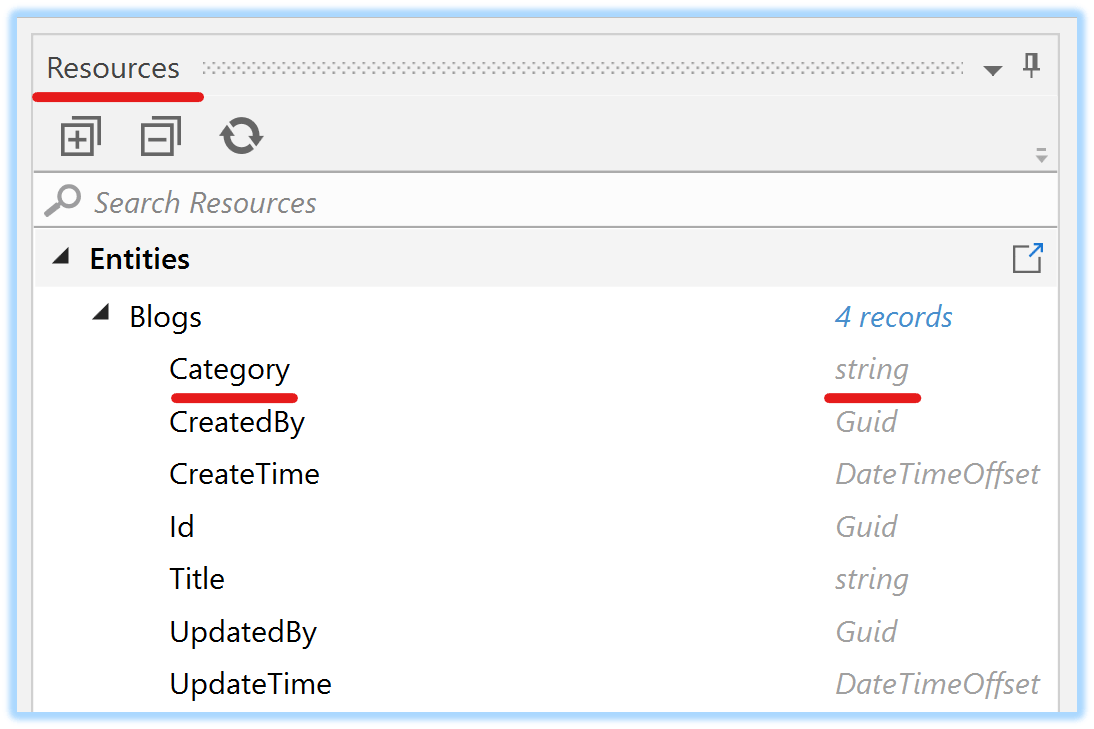
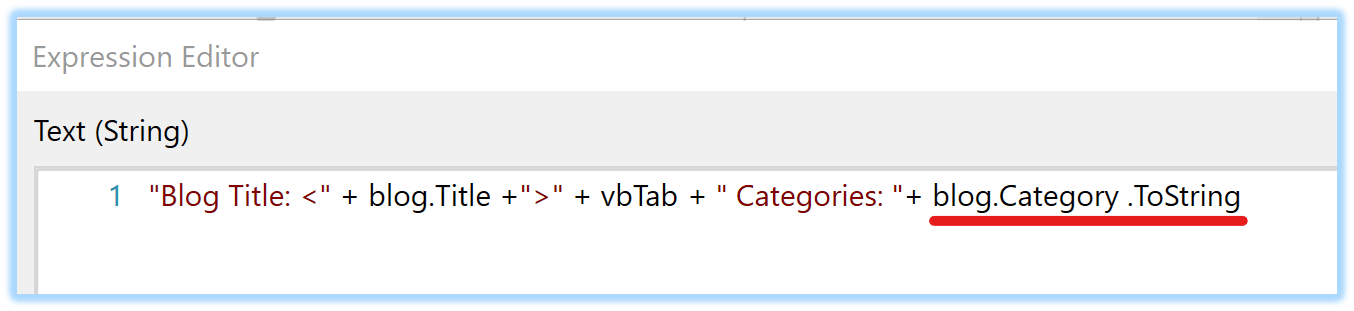
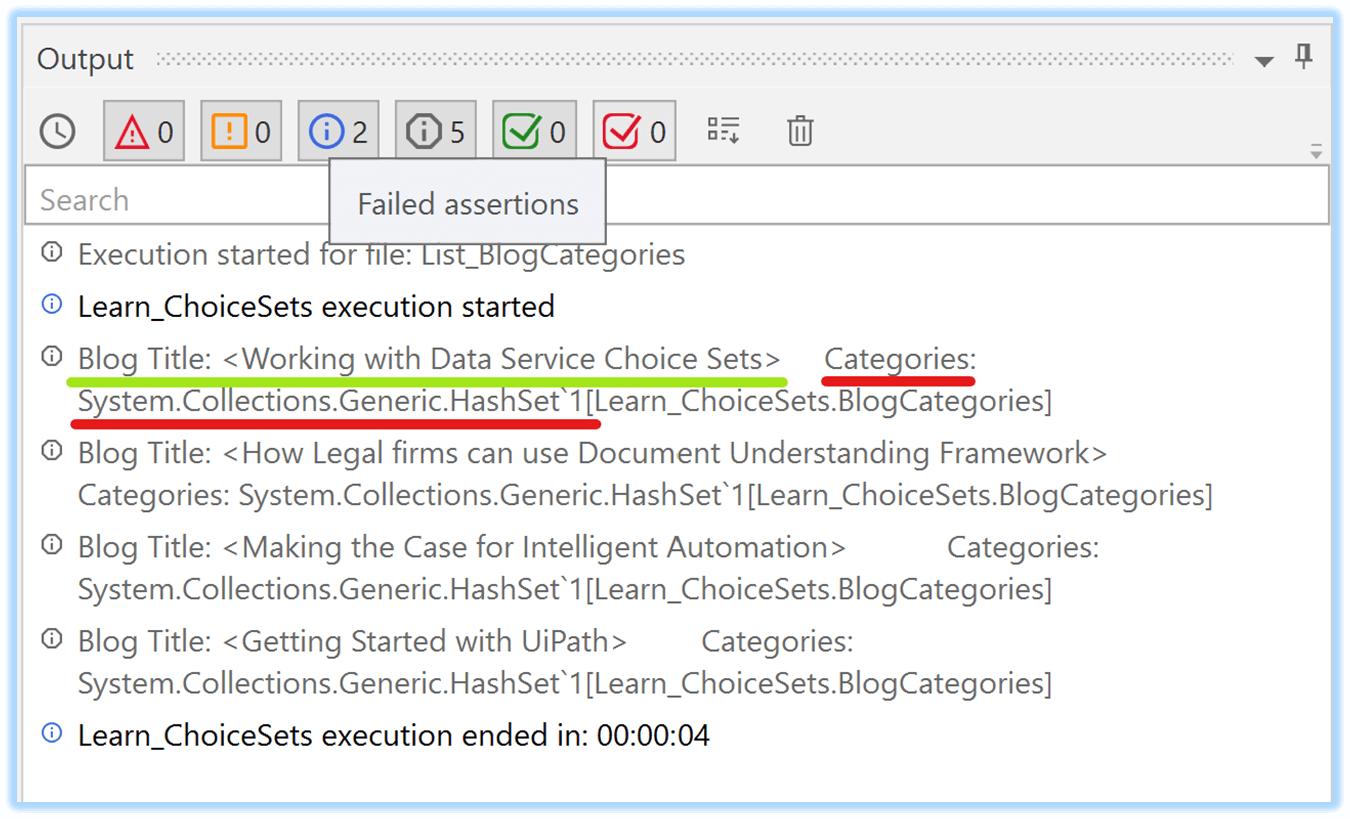
6. It is interesting to note that the Category attribute in the Resource tab appears as a string even though we defined this field as a Choice Set when creating the Blog entity. Therefore, using the ToString() conversion on the Category attribute will not return the expected results. From the output console, we can see that the list of categories has been returned as a HashSet collection whilst the Blog Ttitle is returned as expected.
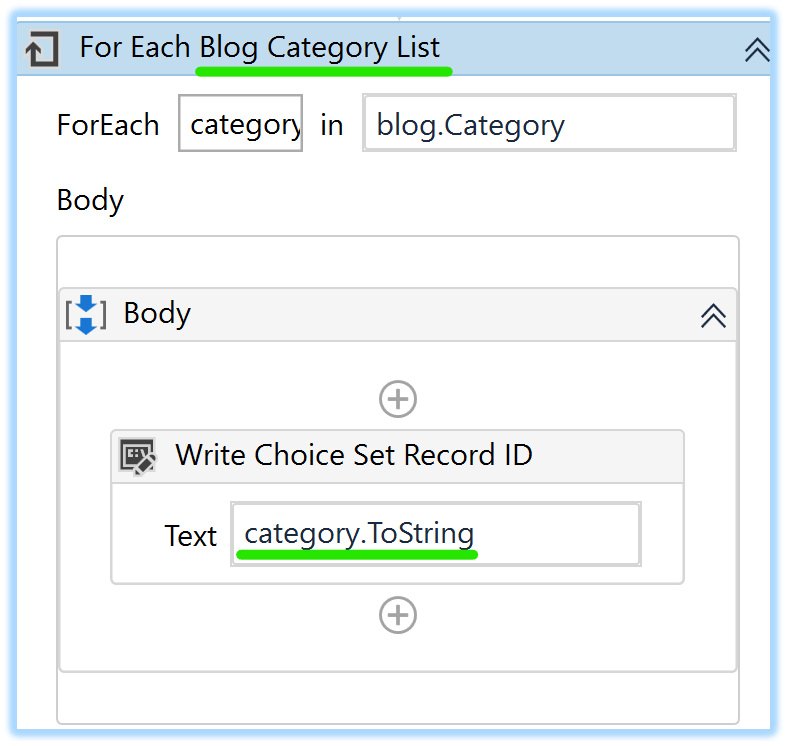
7. As the Category can contain more than one value, the simplest (but more elaborate) approach is to add a nested For Each Activity. This is to iterate through this HashSet collection and list all the category values as shown below. As we have set the blog variable to type Blog, the Category property is readily accessible as an ISet(Of BlogCategories) without additional conversions. "BlogCategories" is the name of the Choice Set created in Data Services. Consequently, we will need to set the categories variable of the For Each Activity to type BlogCategories.
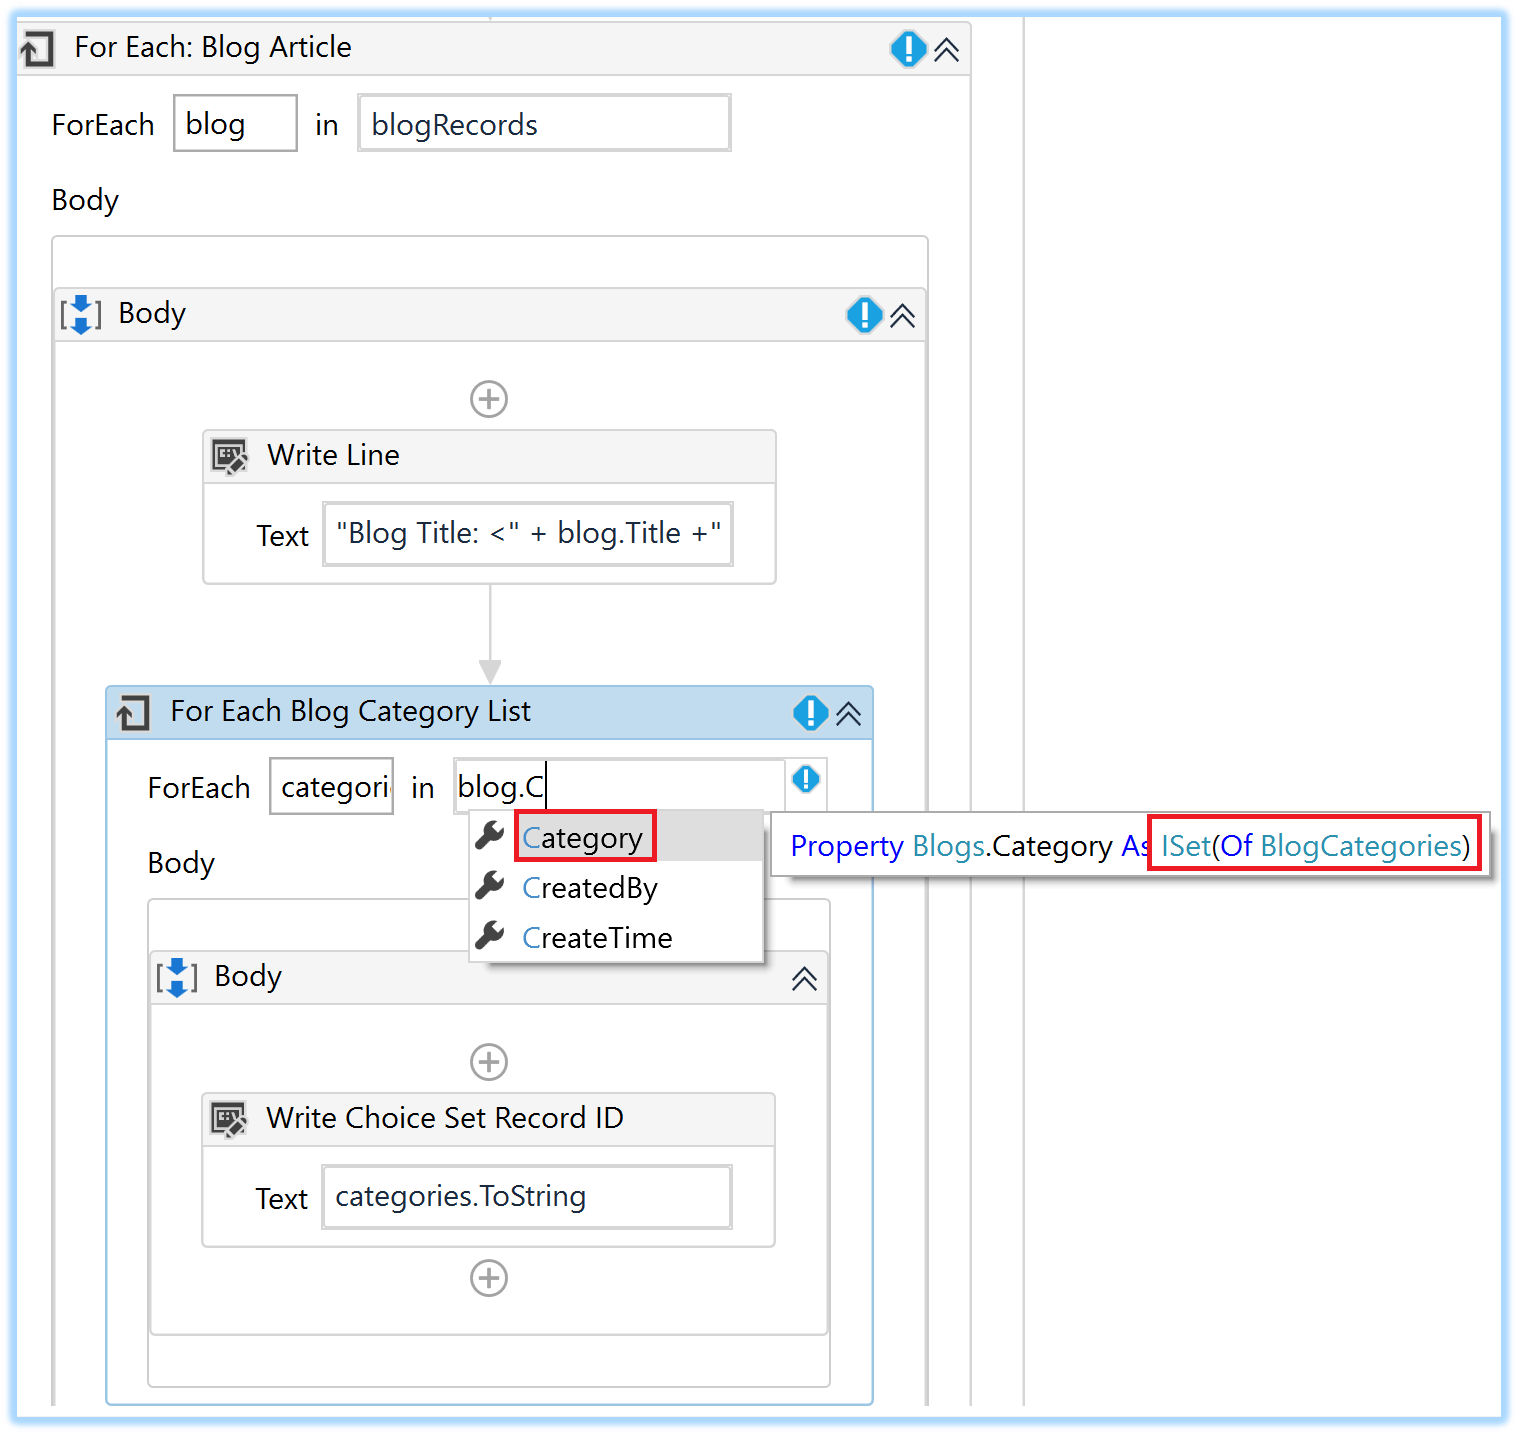
8. This time, applying the ToString on the categories variable will list all the categories assigned to a Blog Article.
9. The alternate approach is quicker and makes use of code. An Assign Activity replaces the nested For Each Activity that uses a single line of code as shown below:
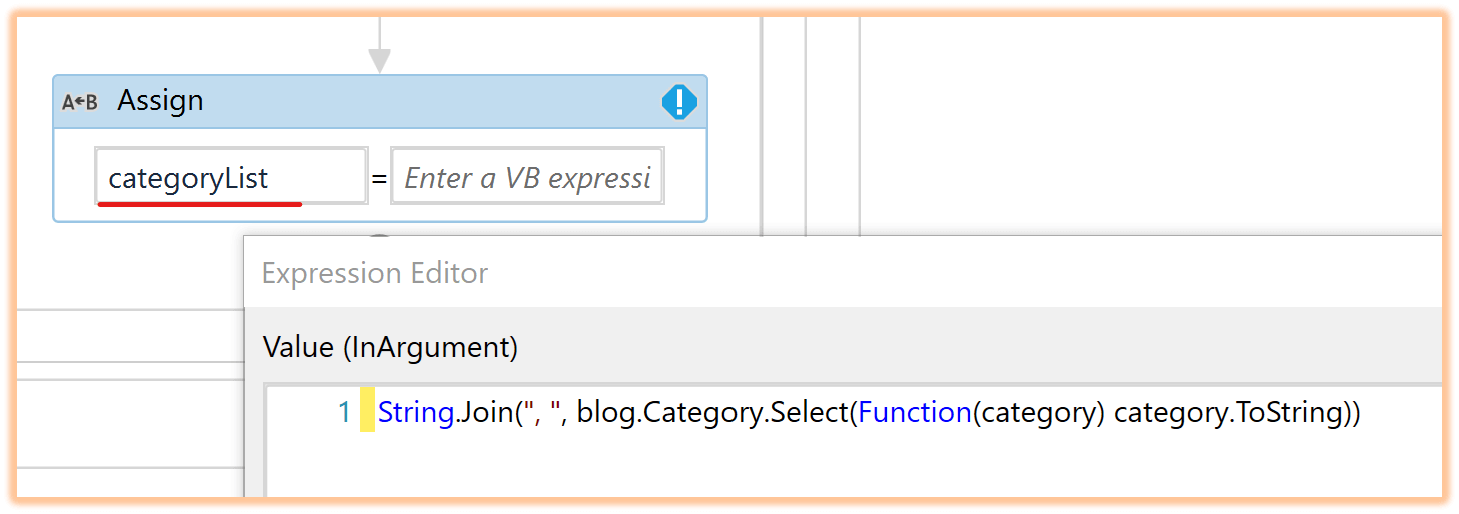
10. This single line of code builds a list of categories for the current Blog article that can then be written out as a simple string.
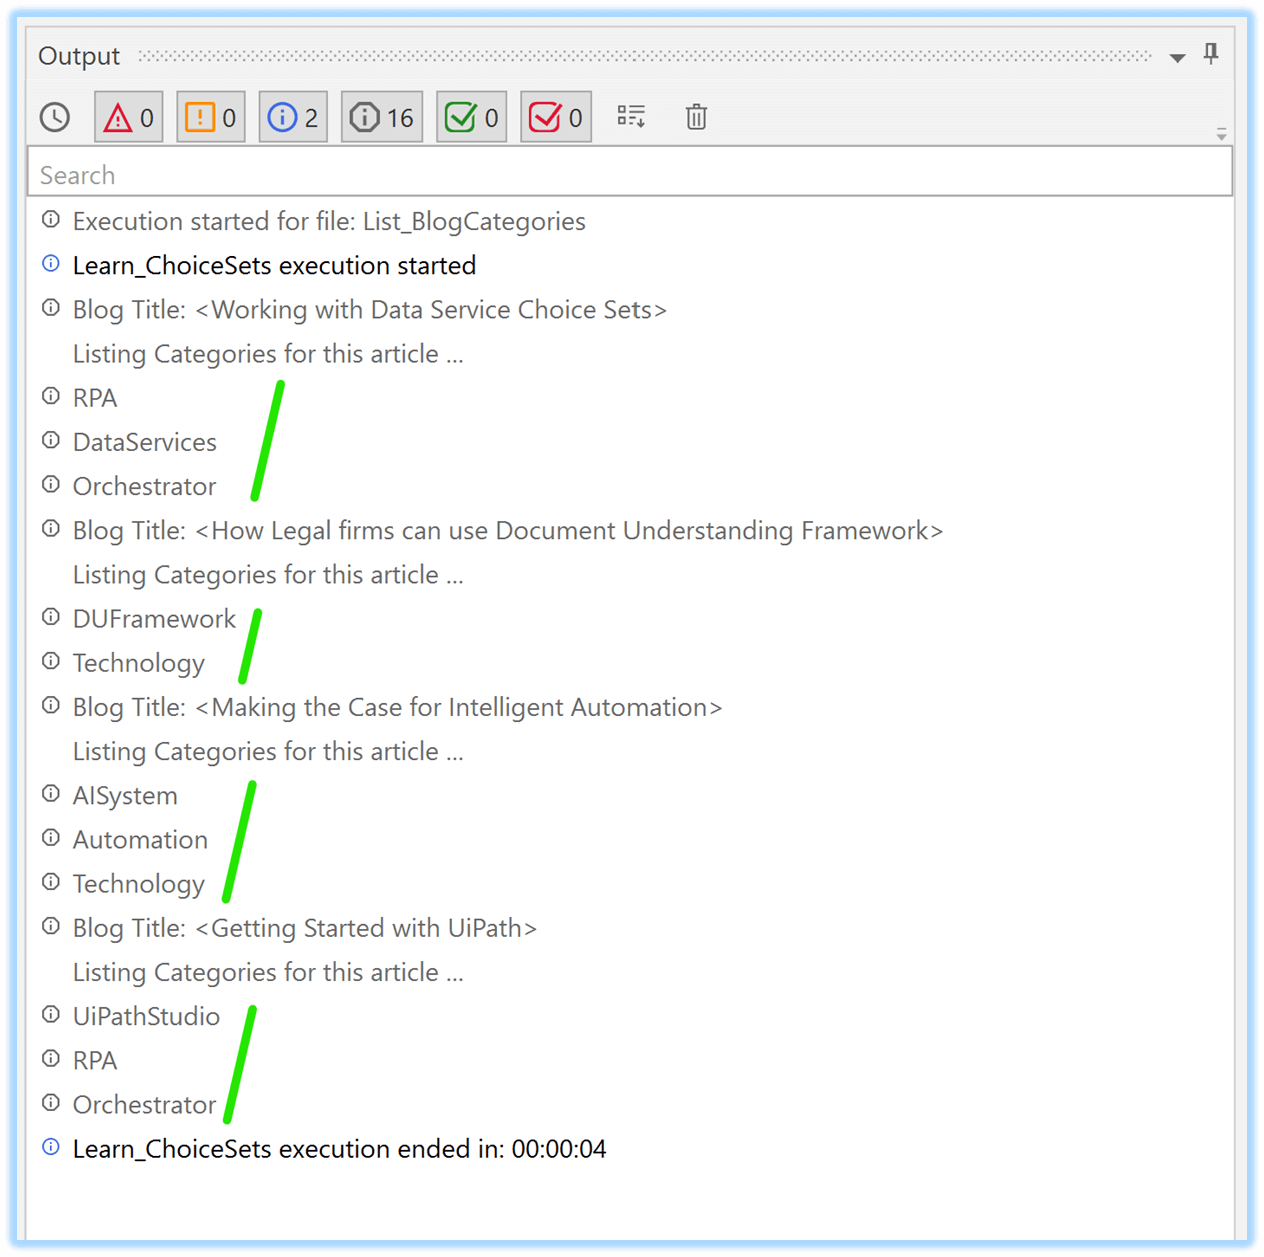
11. Irrespective of the approach, the categories are listed below its respective Blog Title.
Sequence 2: applying Filters on Choice Sets
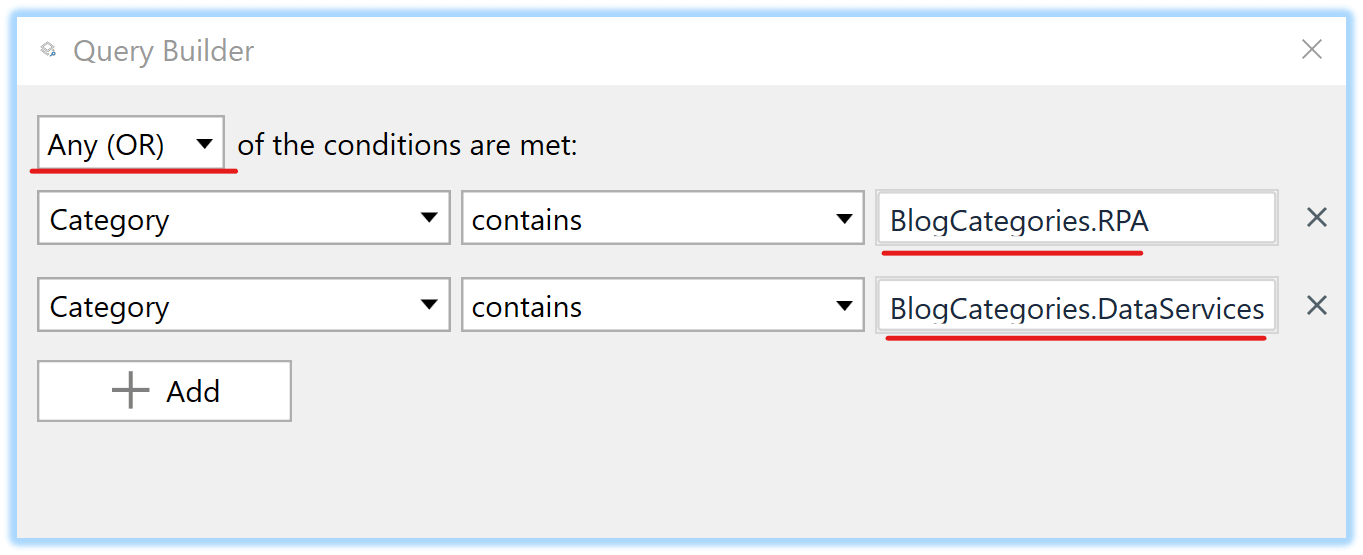
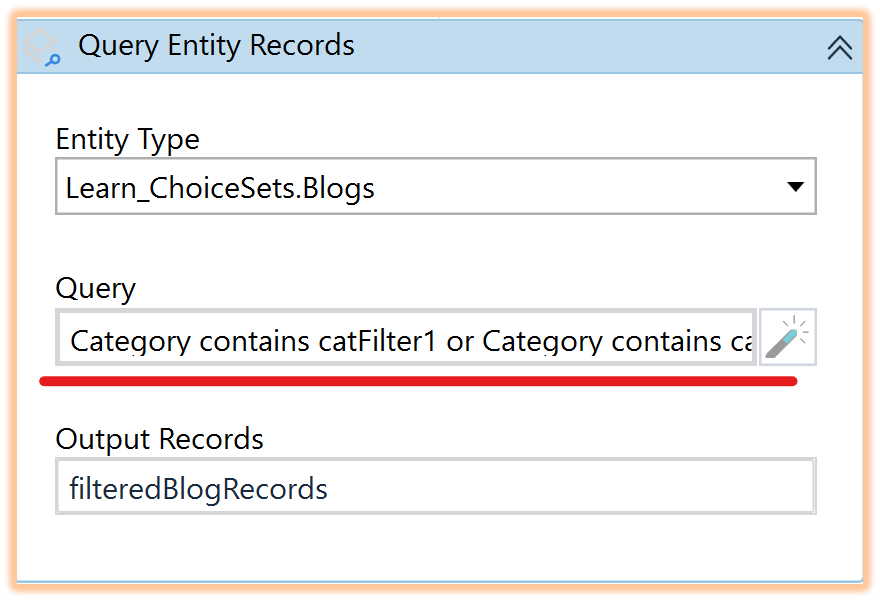
In this Sequence, we will additionally configure the Query Entity Records Activity to apply a filter on the Blog Records in Data Services. These filters will return only those Blog articles that belong to one or more Category values specified in the filter. For this example, we will pull down only those Blog articles that are classified under labels “RPA” or “DataServices”. But as we are filtering on a Choice Set, applying filters is not as straightforward as specifying a set of hard coded strings. Rather, the filter values applied to the Choice Sets have to be considered as enumerations as demonstrated below.
IMPORTANT
• Notice that the values specified for the filters are not strings like “RPA” or “DataServices”, but enumerations BlogCategories.RPA and BlogCategories.DataServices
• The filters have been set up with a contains condition and not equals as we are querying a Choice Set field that contains multiple values
• Since we want to list Blog articles that are classified in one or both categories, the filters are separated by an OR condition
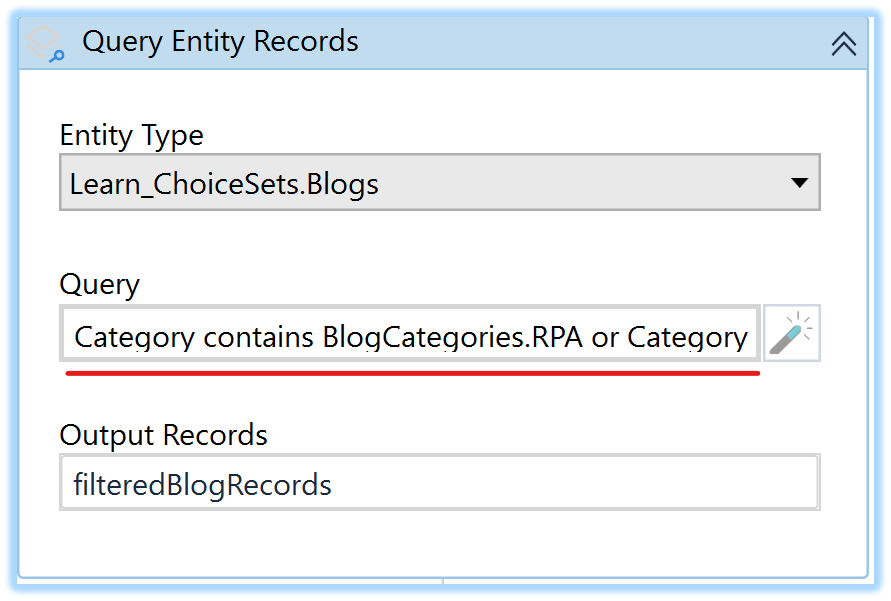
The fully configured Query Entity Records Activity will appear like so:
Passing in Choice Sets as variables or argument values
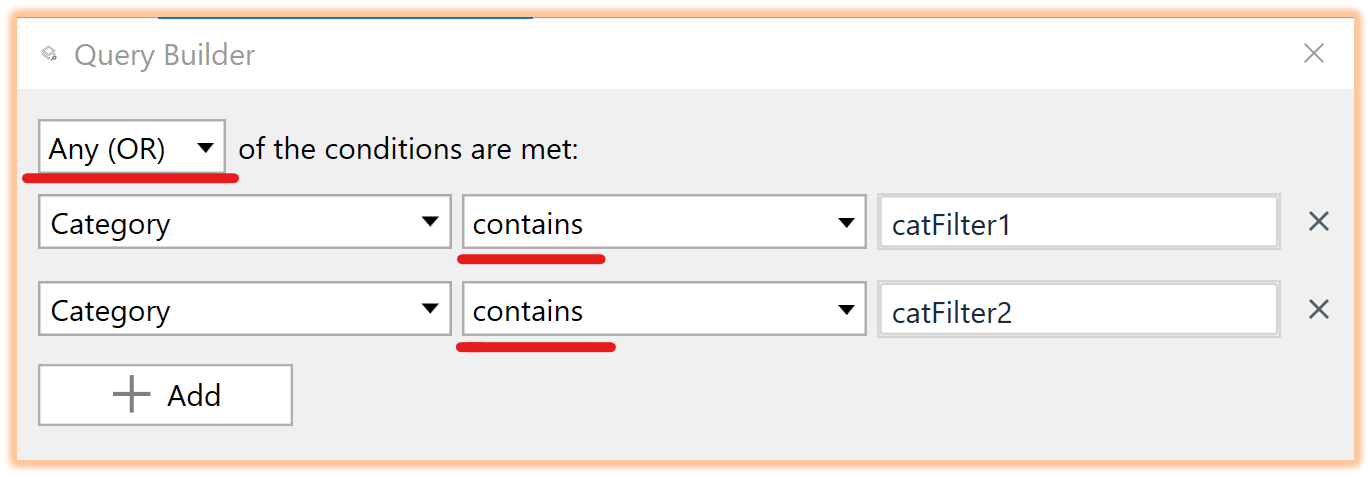
1. The above case assumes that the process knows the filter values firsthand. But in a real-world scenario, they will most likely be passed into a Sequence as variables or arguments. In which case, the above Sequence could be adjusted as exemplified with using a couple of variables named catFilter1 and catFilter2:
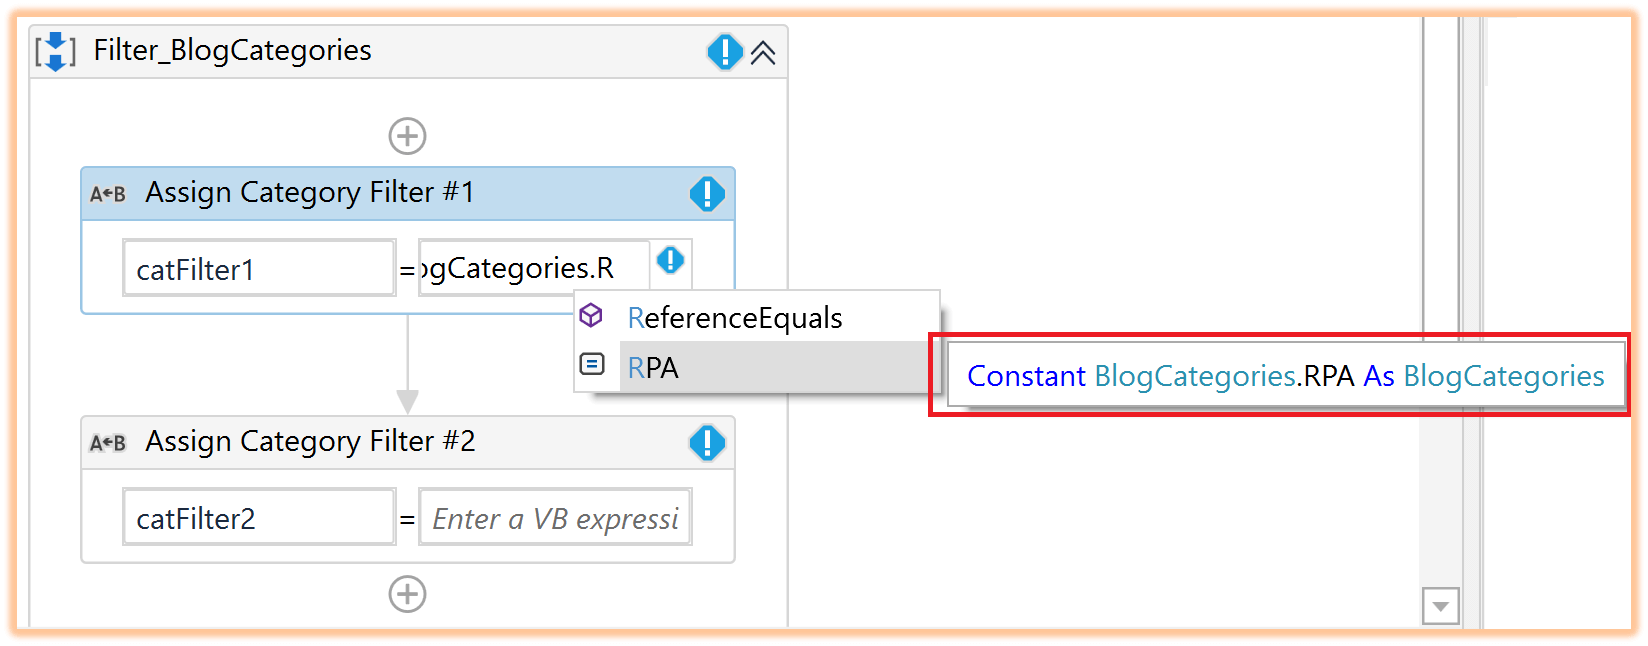
catFilter1 = BlogCategories.RPA
catFilter2 =BlogCategories.DataServices
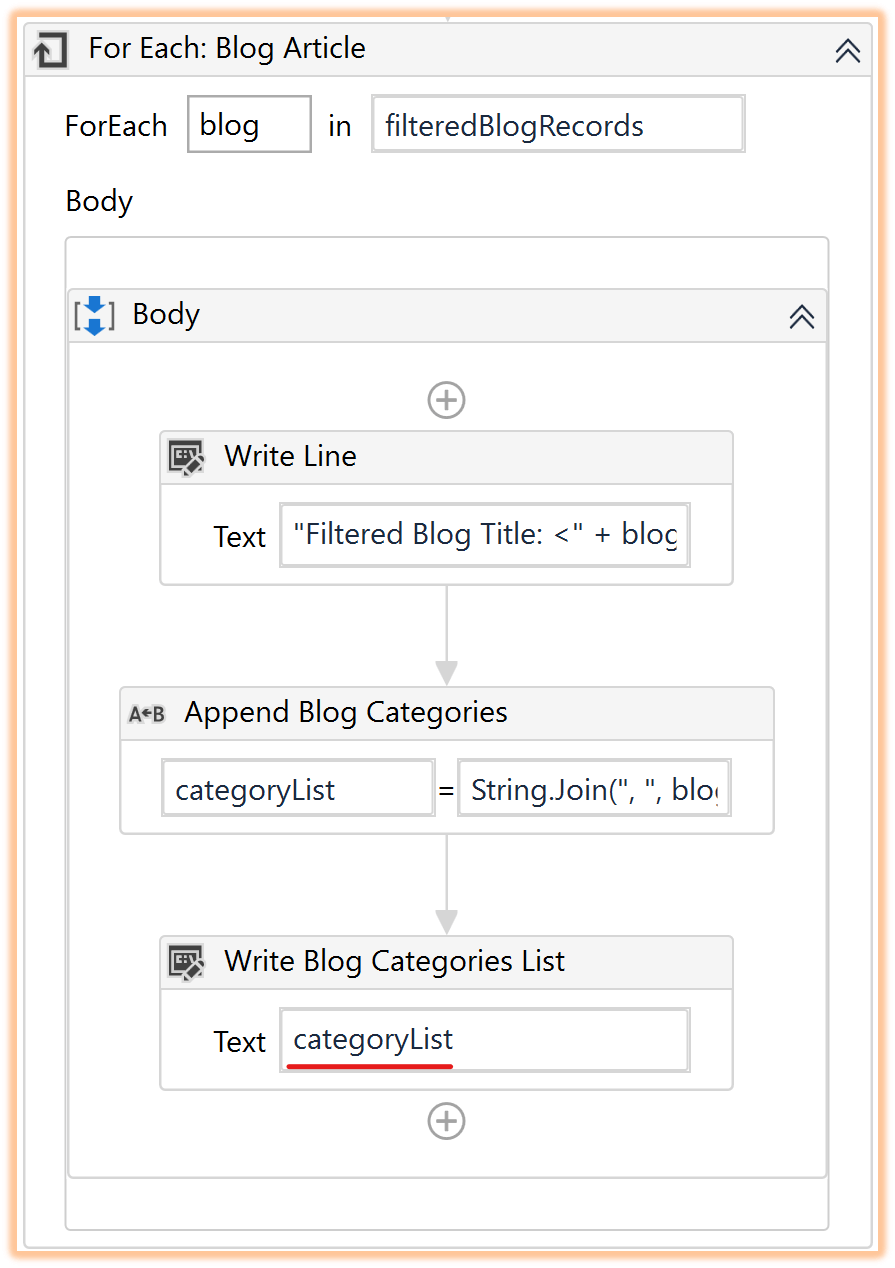
2. Regardless of the approach above, the next step is to simply iterate through the "filteredBlogRecords" output and write out the Blog and its category values just as we did in the previous example. The output of this demo is shown below:
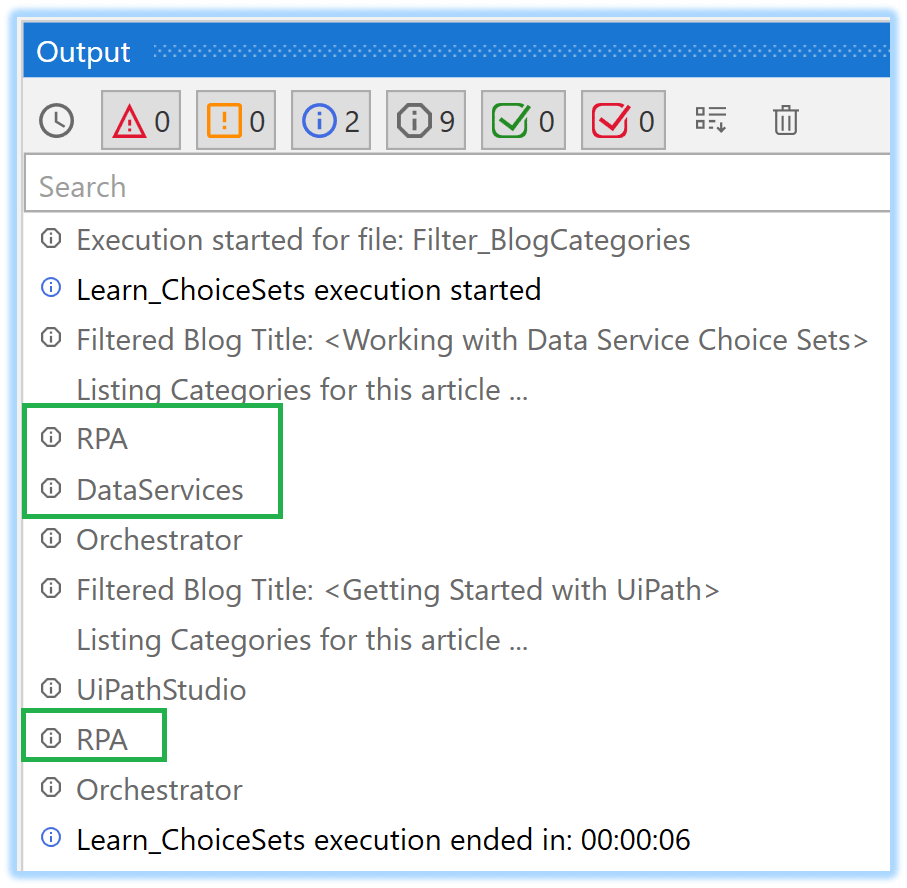
3. This time the Blog articles have been pulled in based on the filters applied. The output shows that the two articles that are categorized as "RPA", "DataServices", or both!
Sequence 3: creating new Data Service Records with Choice Set fields
1. In this Sequence, we will create a new Blog record in Data Services. This Blog will be classified using a couple of predefined Category labels. As the first step, we will create the multi-value category values by initializing an ISet collection as follows.
listCategories = new HashSet(Of BlogCategories)
The "listCategories" collection is initialized as a HashSet that implements the ISet interface.

2. The next step is to add the multiple category values that are Enumerated values of type "BlogCategories" using the "Add To Collection" activity.
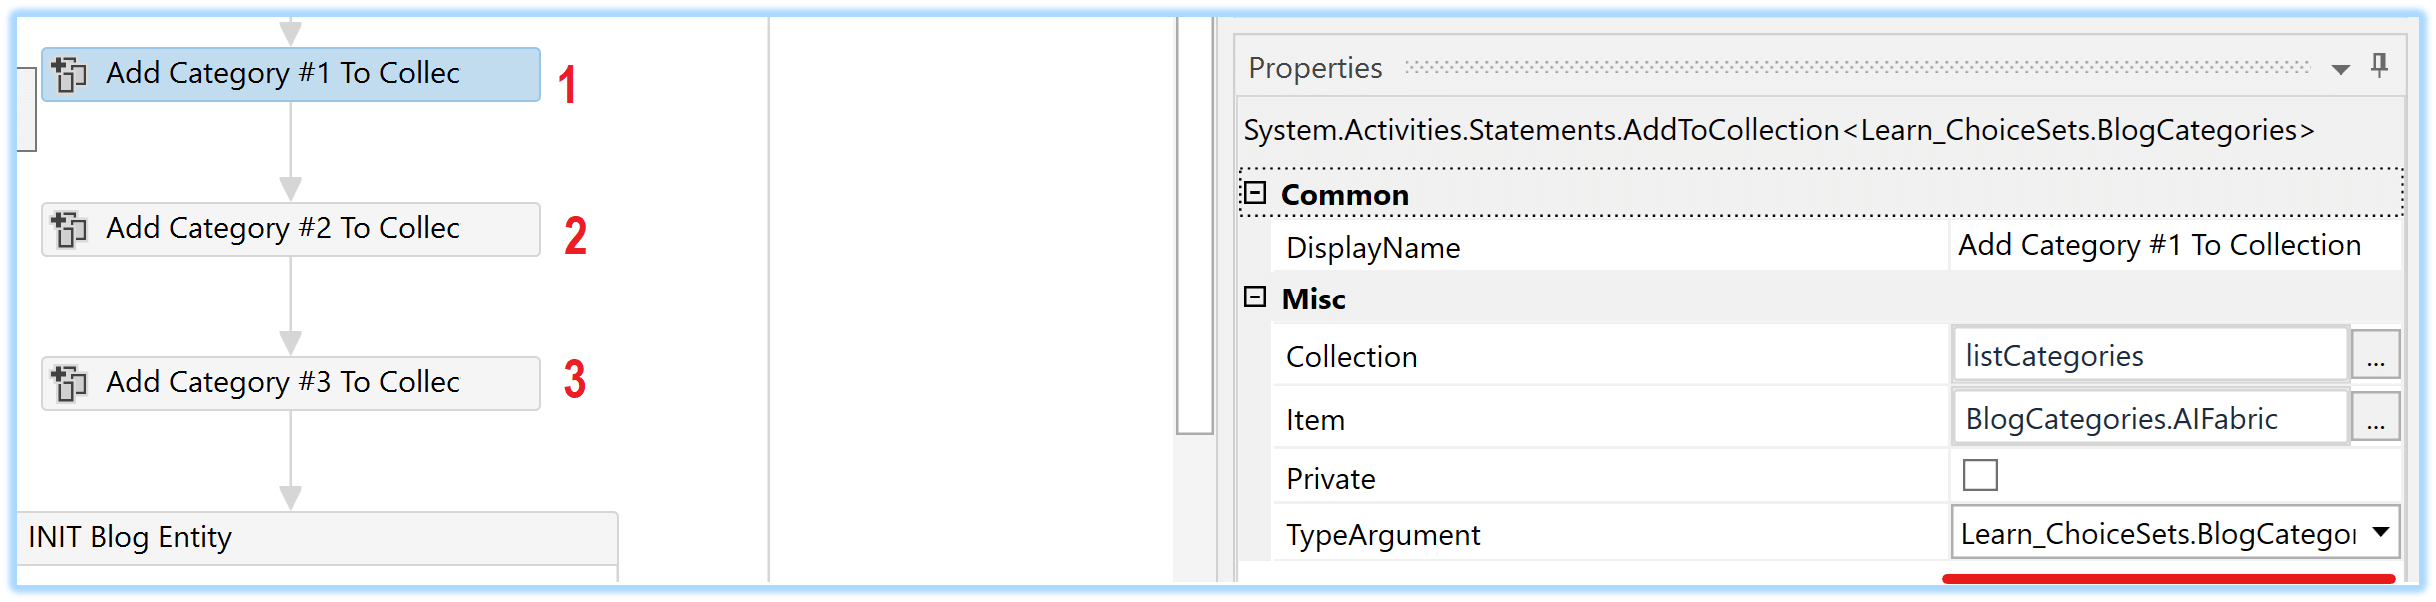
3. In this case, the Blog Article is being categorized into three labels. As a result, we will be doing this three times.
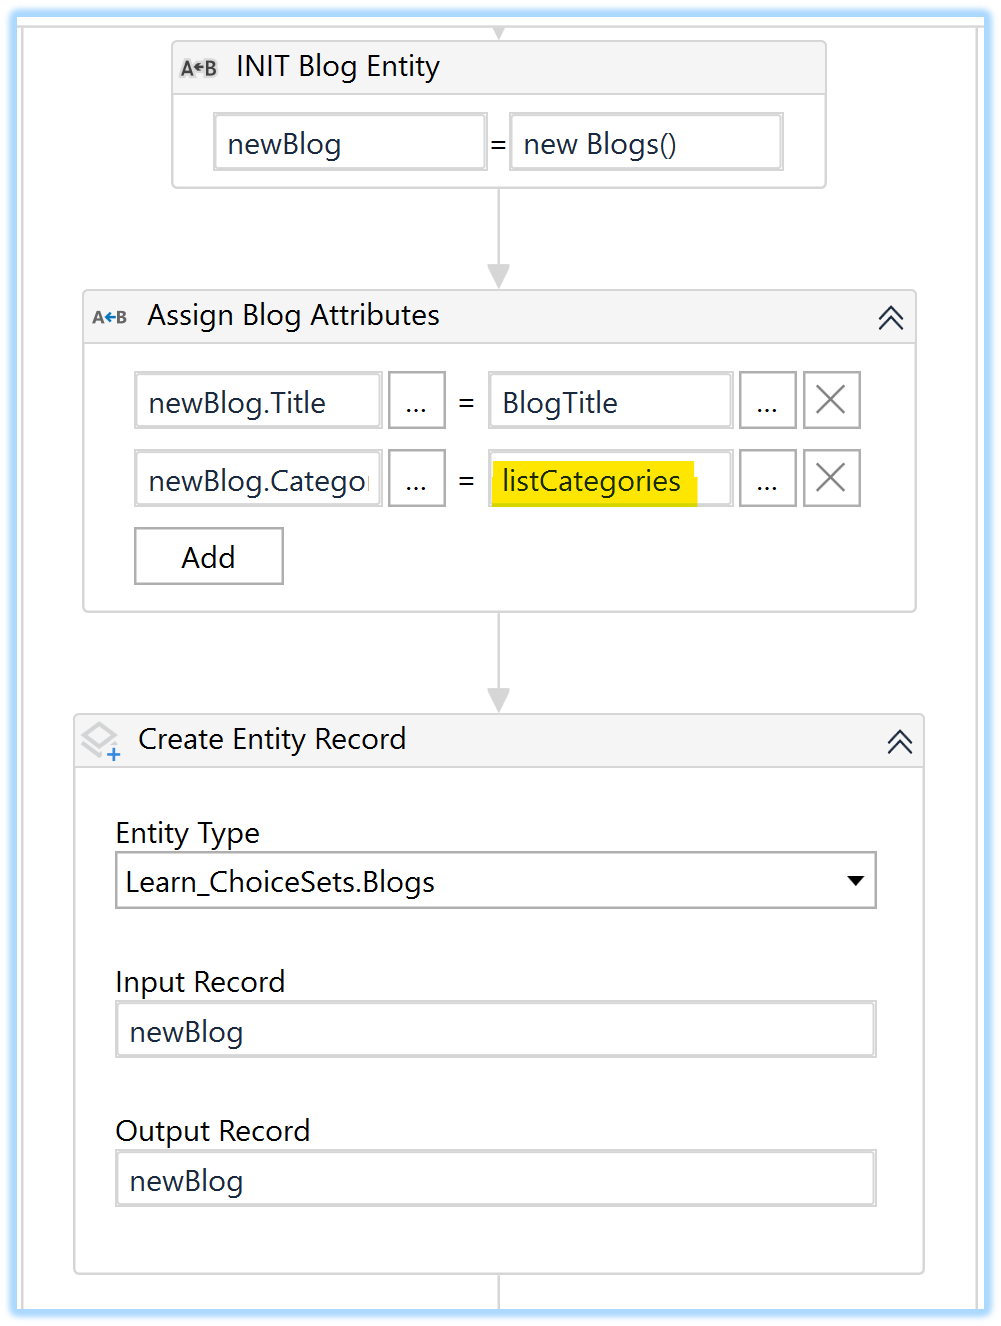
4. The next step is to initialize a Blog Entity object, assign the Title and Category attributes and create the Blog Entity Record in Data Services using the Create Entity Record Activity as shown below:
5. The final step is to write the Id of the newly created record using a simple Write Line Activity. The following outputs in Studio and Data Services in the Portal indicate the new Blog record has been created successfully. The Category column indicates that this Blog record has been assigned to three category labels as expected.


Conclusion
The examples illustrated in this article demonstrate simple use cases that help us work with Data Services and Choice Sets. These can be expanded upon to build practical functionalities for RPA processes using Data Services.
Topics:
RPAData Integrations engineer, Intralinks SS&C
Related articles


Get articles from automation experts in your inbox
Sign up today and we'll email you the newest articles every week.
Thank you for subscribing!
Thank you for subscribing! Each week, we'll send the best automation blog posts straight to your inbox.
Get articles from automation experts in your inbox
Sign up today and we'll email you the newest articles every week.
Thank you for subscribing!
Thank you for subscribing! Each week, we'll send the best automation blog posts straight to your inbox.