Invoice Processing with Document Understanding

Summarize:
Introduction
Invoice processing is an essential aspect for financial services. A small deviation could have a high impact on the organization's flows. Every day, in most working environments, a huge number of invoices are processed manually. This involves a lot of time and effort and can be automated through UiPath Document Understanding. UiPath robots can extract data from different types of invoices (Scanned, editable, TIFF, JPEG, etc.) using artificial intelligence (AI).
At times, the UiPath robot requires approvals or business input from humans to process further. With “human in the loop”, UiPath Action Center makes it easy, effectively allocating actionable items to the human and sending them back again to the robot.
Automation Scenario
Let's focus on capturing data from invoices. This will start with extracting different fields from the invoice using Intelligent Form Extractor component in Document Understanding. Then, it should be validated that all the mandatory fields were extracted. If any of the mandatory fields are missing, the process will then route that invoice to Action Center for human validation. Finally, route the output to Excel once the invoice is back from Action Center.
Concepts Overview
UiPath Studio is a tool used to design the automation, by dragging the activities.
UiPath Robot is used to run the automation developed in UiPath Studio.
UiPath Orchestrator is a web application that also acts like a centralized server through which multiple processes and robots can be managed, deployed, and tracked efficiently.
Orchestrator Queues act as a container and can hold the bulk of queue items following the FIFO (First In, First Out) mechanism
Document Understanding uses artificial intelligence (AI) and robotic process automation (RPA) for end-to-end document processing.
Intelligent Form Extractor is one type of extractor in Document Understanding used to extract data from structured types of documents, including handwritten fields (scanned, jpg, tiff, etc.) based on the positions of words.
Prerequisites
1. Install UiPath Studio
2. Grant access to Orchestrator, Action Center, connect Studio to Orchestrator
3. Need Document Understanding API key from Orchestrator
4. Create a queue in Orchestrator and search for the item with the invoice path
5. Create an empty storage bucket in Orchestrator
Step by Step Guide
Step 1: Install Packages
Open UiPath Studio and create a Transactional Process template, which is the best template for decision-based actions. Once the dependencies and workspace are created, click on Manage Packages on the Ribbon.
Now, click on All packages in the left pane and search for the package UiPath Intelligent OCR Activities in the search box. Once it appears, click Install.
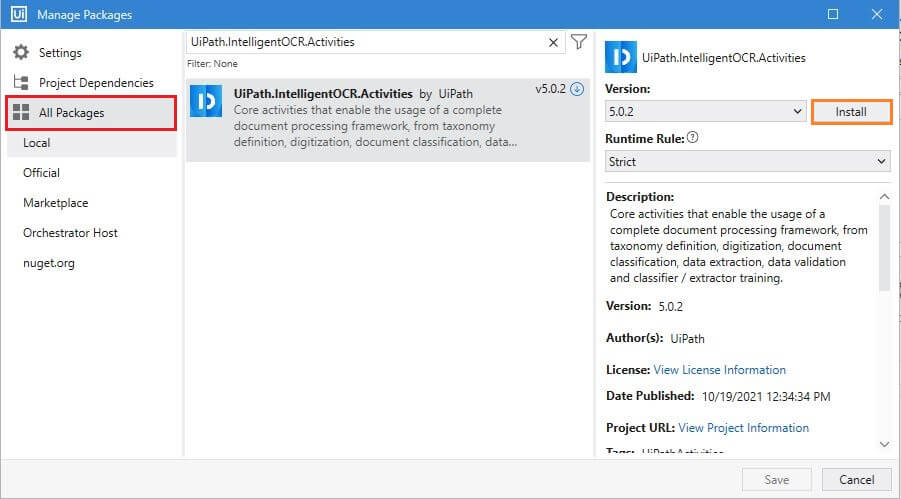
Follow the same step to install UiPath Persistence Activities
Step 2: Define Taxonomy
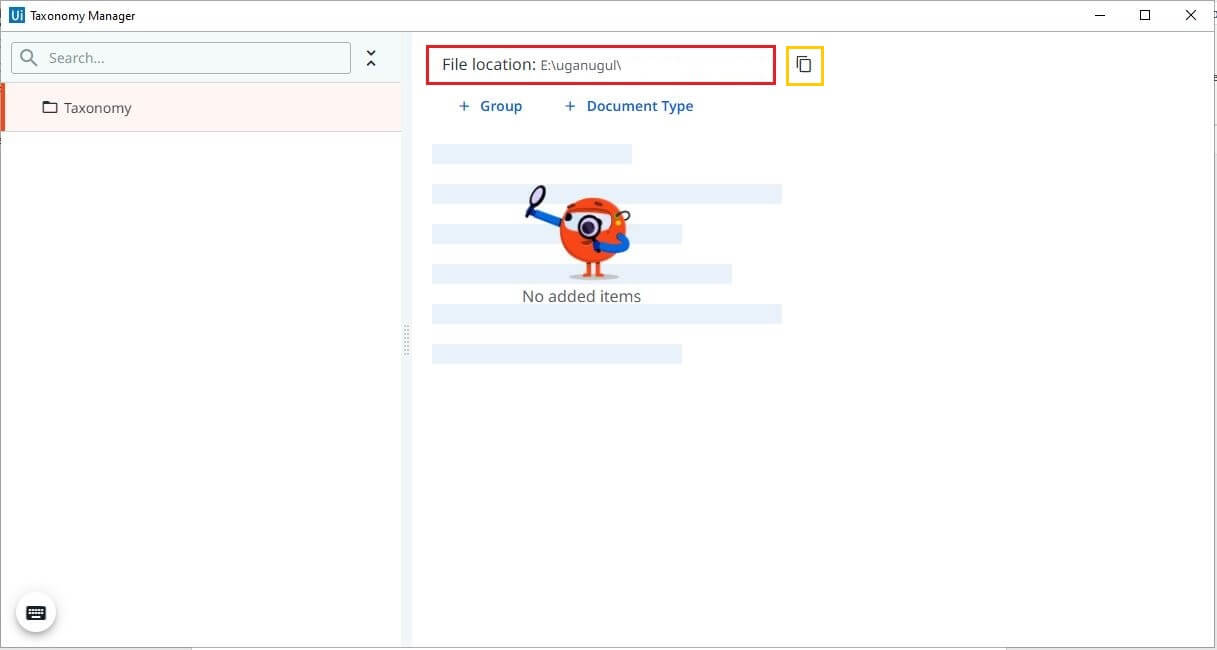
Defining the fields is an important aspect of any extraction process before the actual extraction starts. Taxonomy Manager helps to create different types of fields organized by groups and categories. Click on Taxonomy Manager on the ribbon.

When we open Taxonomy Manager for the first time, it automatically creates Taxonomy.json within the project, in the Document Understanding folder. The file location can be viewed also copied to the clipboard. The JSON file contains the details that you define in the Taxonomy.
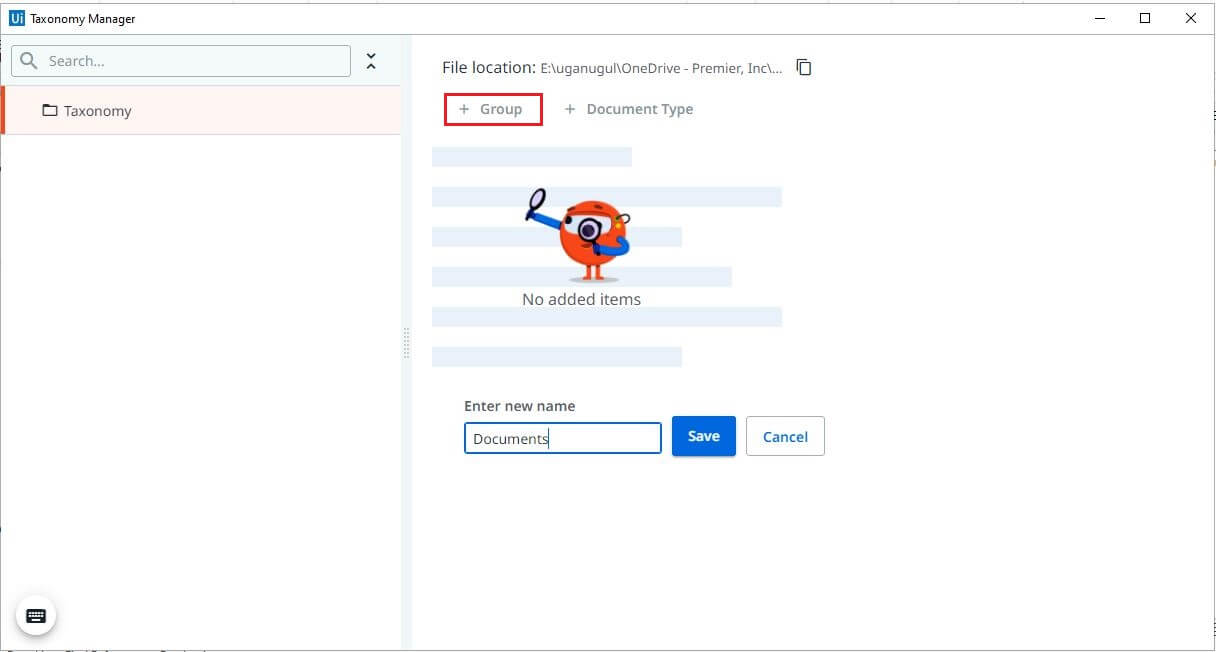
Creating a Group
Create a group name specific to your automation and save changes.
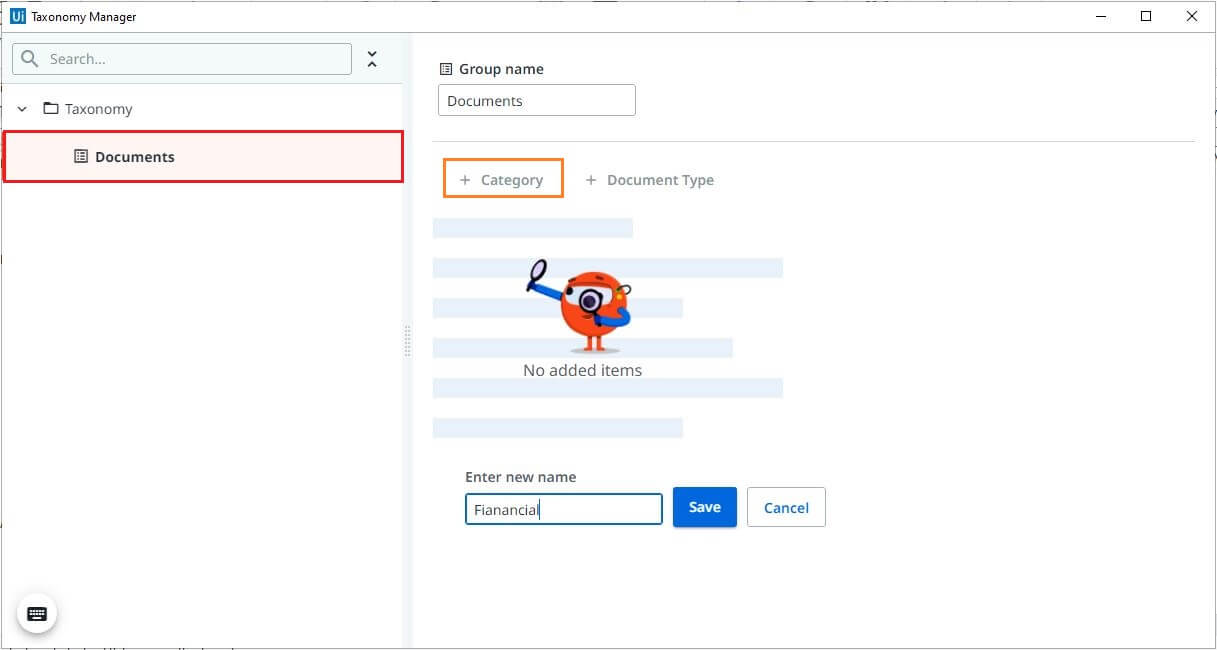
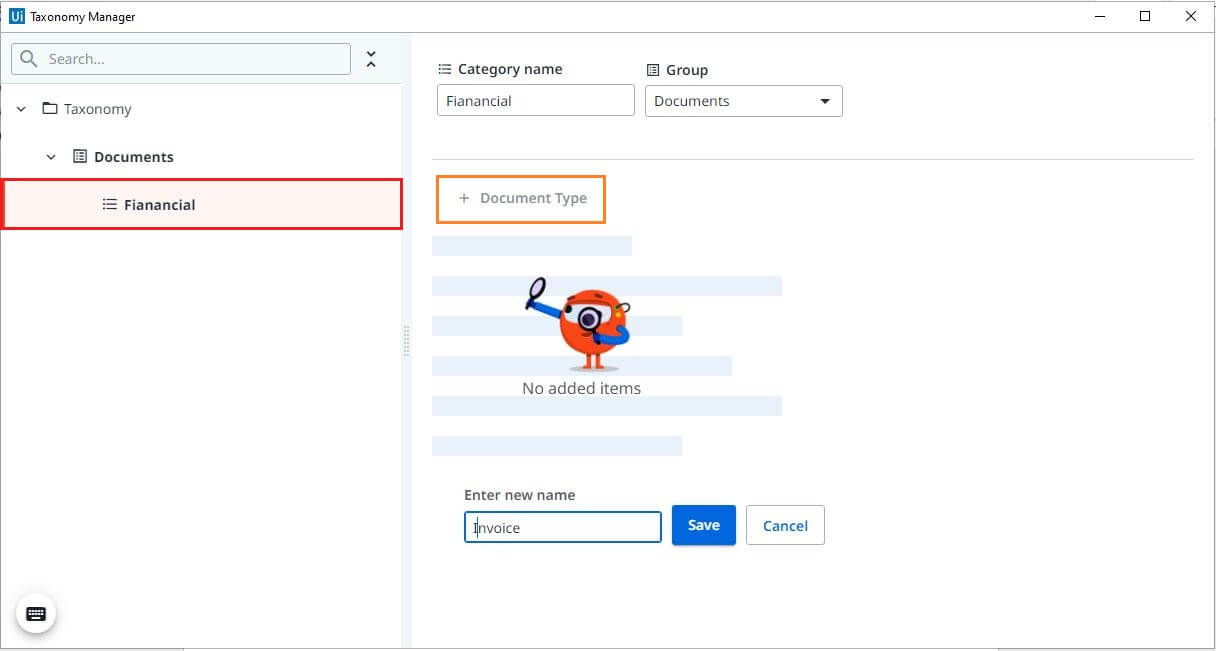
Creating a Category
Define a category of the documents that you are trying to process. Click on the group name in the left pane. Click on category, Enter the category name, and save changes.
Creating a Document Type
Define the type of documents that you are planning to train
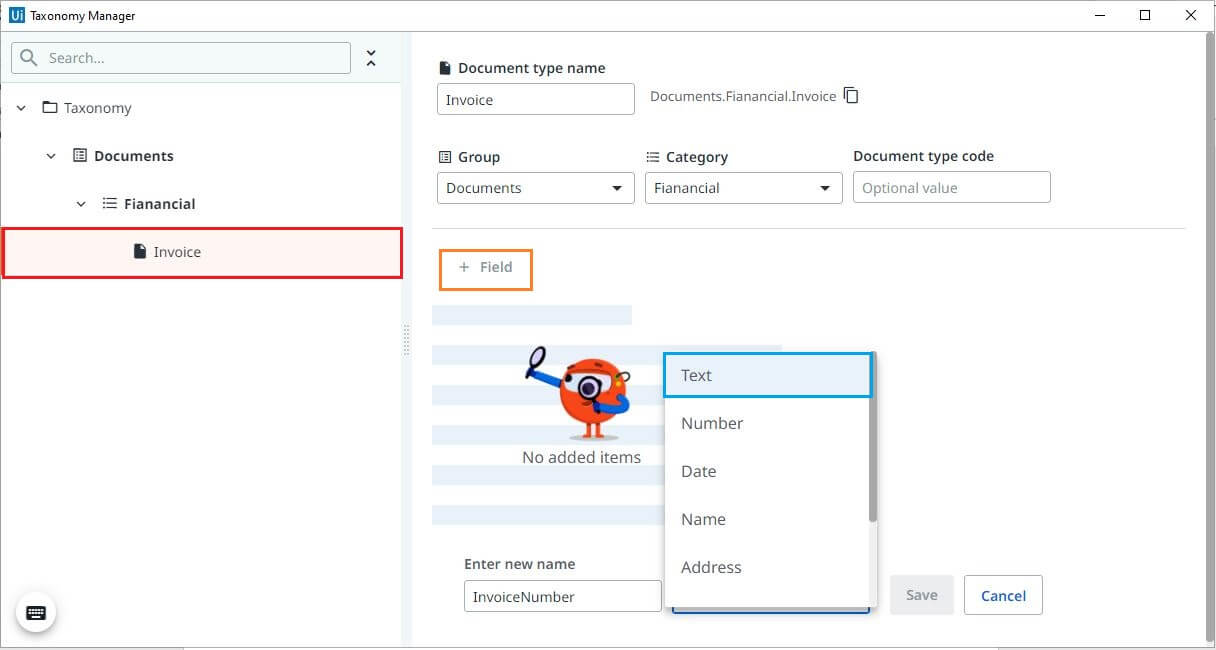
Creating Field
Click on the document type in the left pane, click on field and start defining the fields. Enter the name of the field, and choose the related type from the drop-down, save changes. Follow the same steps to create the other fields.
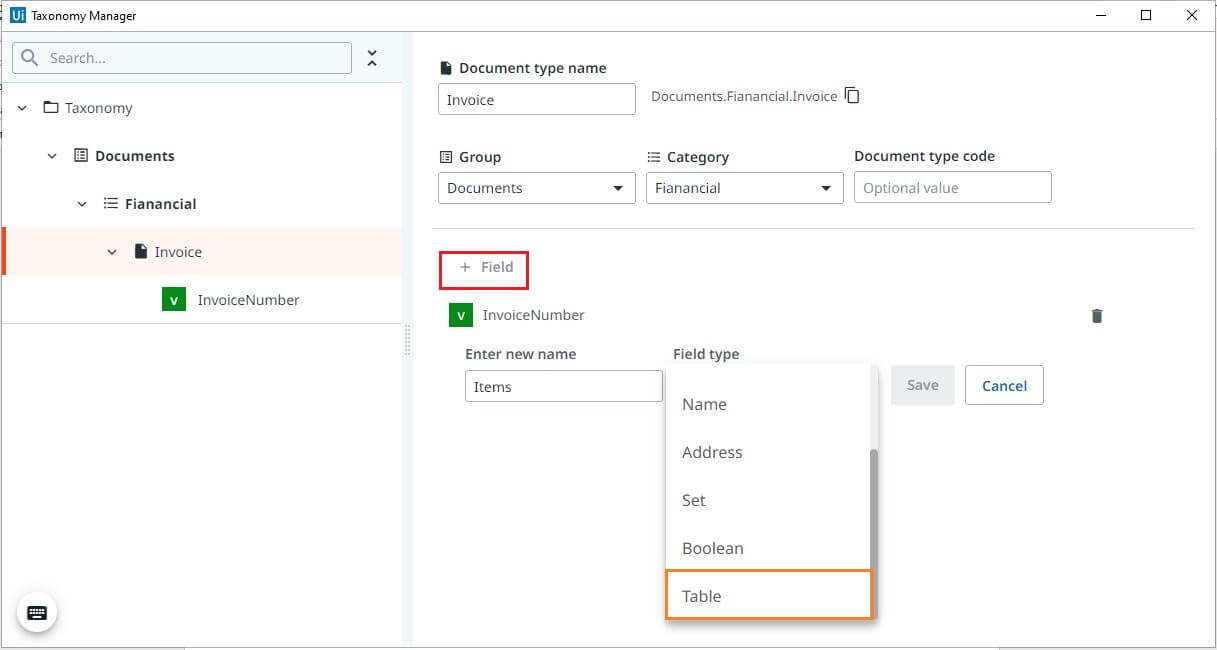
Creating Table Field
Table with line items present for most of the invoices. Let's see how to define table fields. Click on field, Enter the name, and choose the related type from the drop-down as table. Save changes.
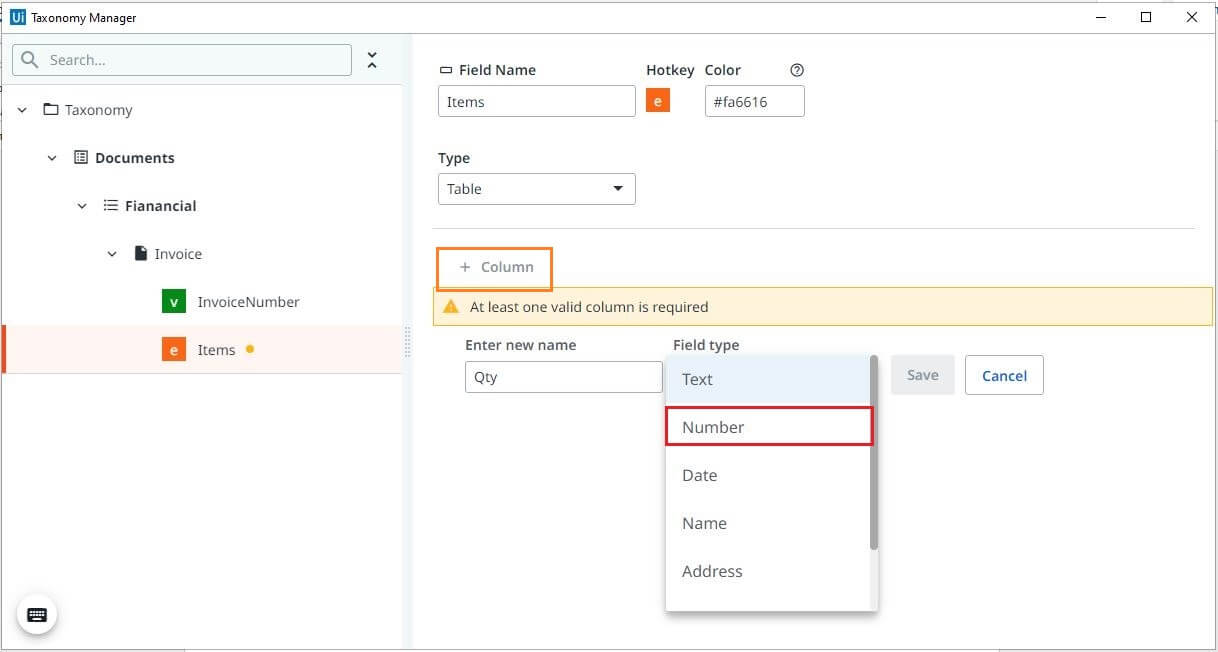
It is mandatory to define at least one column field. Click on Column, Enter field name and related field type, similar to how we defined for other fields, save changes. Repeat the same step to define other column fields.
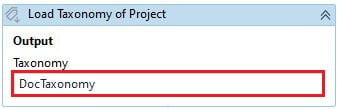
Step 3: Load Taxonomy
Load JSON data to the other variable of type Document Taxonomy. This variable can be later used in the classification and extraction phases.
Step 4: Digitize Document
Digitize documents, using OCR is where the incoming data converts into the format that the UiPath robot can understand and act accordingly. Use any OCR engine which suits your automation, get the document path from the Orchestrator queues. This step has two outputs:
Converting the invoice to the text version and stored in a string variable.
Document Object Model (DOM) of that invoice, will be used in further steps.
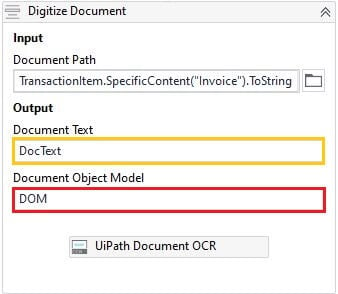
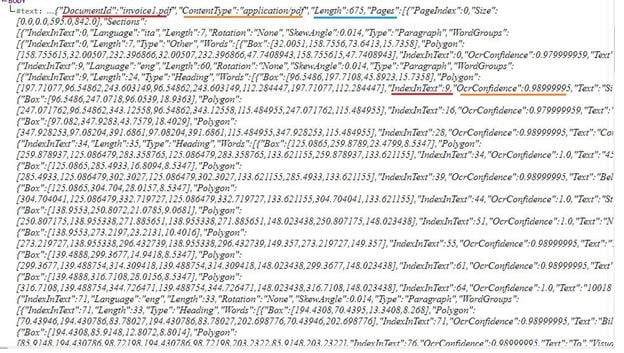
Document Object Model (DOM) represents more detailed information about the document structure, style, content, language, coordinates, and OCR confidence of each word.
Step 5: Classify Document
It is important to identify the type of the document before the extraction starts, which is defined as classification in Document Understanding. The classification can be done using two types of classifiers:
Keyword-based Classifier: classifies the document based on the keywords provided. Test with single or multiple keywords for better classification results. For multiple keywords, it finds the best matching one and classifies accordingly.
Intelligent Keyword Classifier: classifies based on the word vectors (series of words) that it learns during pre-training. Similar to the Keyword-based Classifier, the Intelligent Keyword Classifier finds the best word vector that is closest to the document and classifies accordingly.
Apart from these, there are other classifiers available in different packages. For this automation scenario, let's use Keyword-based Classifier and this is valid inside Classify Document Scope. The output of step 3 and step 4 will be the input for classification and stores the classification results in a variable.

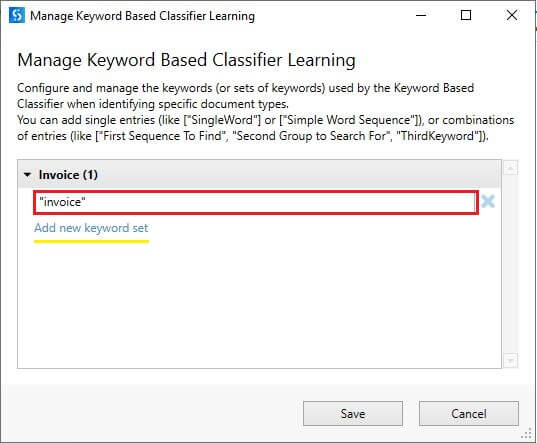
Manage Learning
It's time to configure keyword sets to classify the document. Click on Manage Learning to open the wizard. Configure entries and save changes.
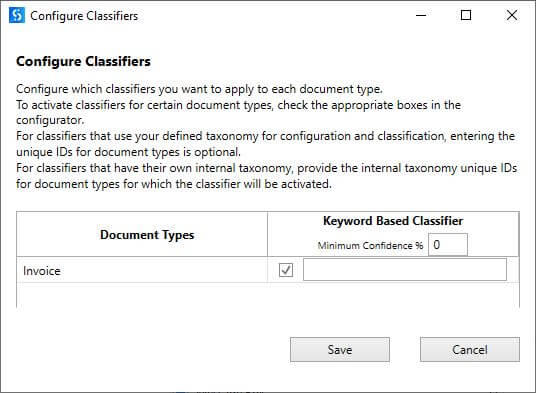
Configure Classifier
Select the classifier you want to apply to the document type by enabling the check box.
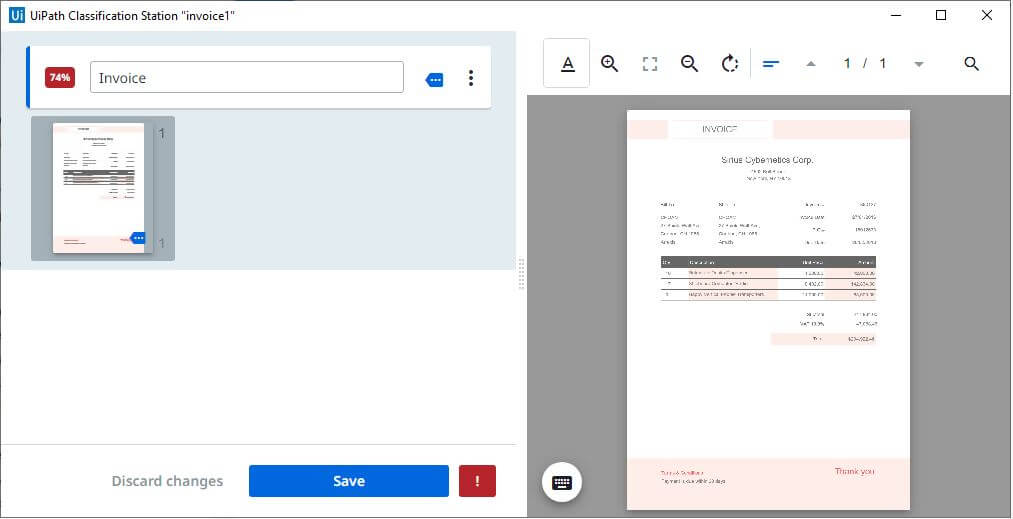
Step 6: Classification Station
Manually validate the document classification and map the correct one if needed. This is a step that should be avoided when doing unattended automation. The output of step 3 and step 4 are the inputs and the automatic classification results saved in a variable.
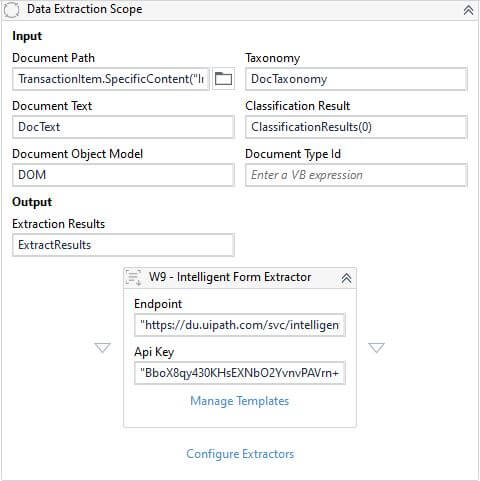
Step 7: Data Extraction
Train the bot to identify and extract different field values. Extraction can be done using different extractors available in the UiPath Intelligent OCR Activities package. These extractors are valid inside the Data Extraction Scope.
Form Extractor: used to extract the data from non-variable types of documents. In other words, the alignment of the data or layout of the documents should always be the same. A small variation in the document leads to extraction failure.
Intelligent Form Extractor: similar to the Form Extractor but with a few more capabilities, such as recognizing handwriting, and signatures in the documents.
Regex Based Extractor: best suited to small and simple use cases and can extract the data based on the regular expressions defined.
For the current scenario, let's use Intelligent Form Extractor. Make sure to provide the Document Understanding API key from the Orchestrator, endpoint as https://du.uipath.com/svc/intelligentforms. The outputs of step 3, step 4, and step 5 will be the inputs for Data Extraction Scope and extraction results saved in a variable.
Manage Templates
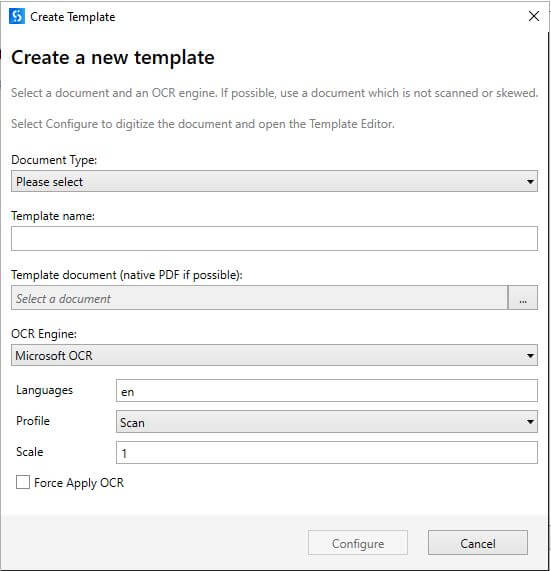
Click on Manage Templates to train the UiPath robot to identify and extract the field values. This opens the Template Manager window.

Click on Create Template and select document type from the dropdown, provide template name, related document, and choose the OCR that you want to apply to the document.
Note: OCR engine applies to all types of documents if Force Apply OCR is enabled.
Click on configure, read the instructions in the wizard, and click OK. It opens a template editor which allows capturing the values for the fields that have already been created in the Taxonomy.
Selection Modes
Click on the Selection mode that appears in the top middle of the template editor. It gives the list of selection modes
Tokens: identifies the series of data in a chosen area
Custom Area: identifies as a single value in a selected or chosen area.
Choice on Selection: the choice of both Tokens and Custom Area. Apply any one of them to the document.
Anchor: identifies the values by making another field or value as an anchor, which helps to extract the values properly even if the alignment of the field changes in the document.
Page Matching Info
Select a minimum of five words for each page in the document using ctrl-click. This selection helps to identify which page of the document it is currently referring to. Click on the plus button to assign the selected values to the field on the left side.
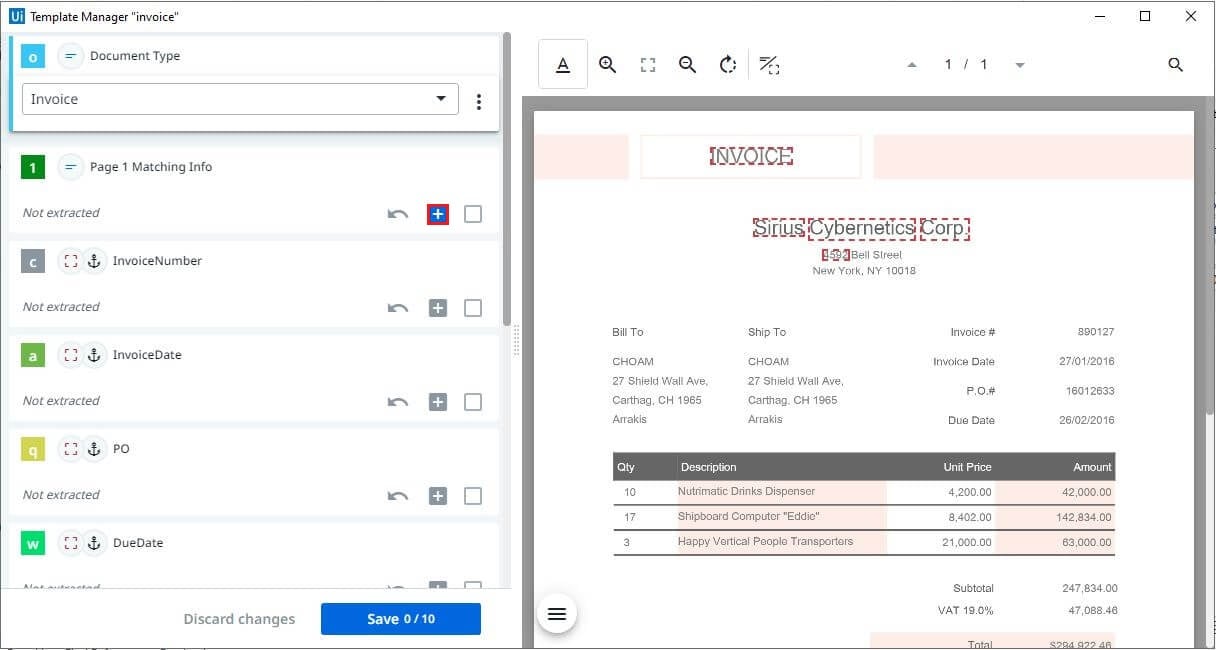
Configuring Fields
Choose the selection mode which suits the document—for the current scenario let's use Anchor. Draw a box around the value you want to extract (highlights with blue color) and the related anchor (highlights with green color). Make sure the anchor is close to the value for better extraction. Click on the plus button to assign the selected values to the field on the left side. Click on the text area of another field and repeat the same process.

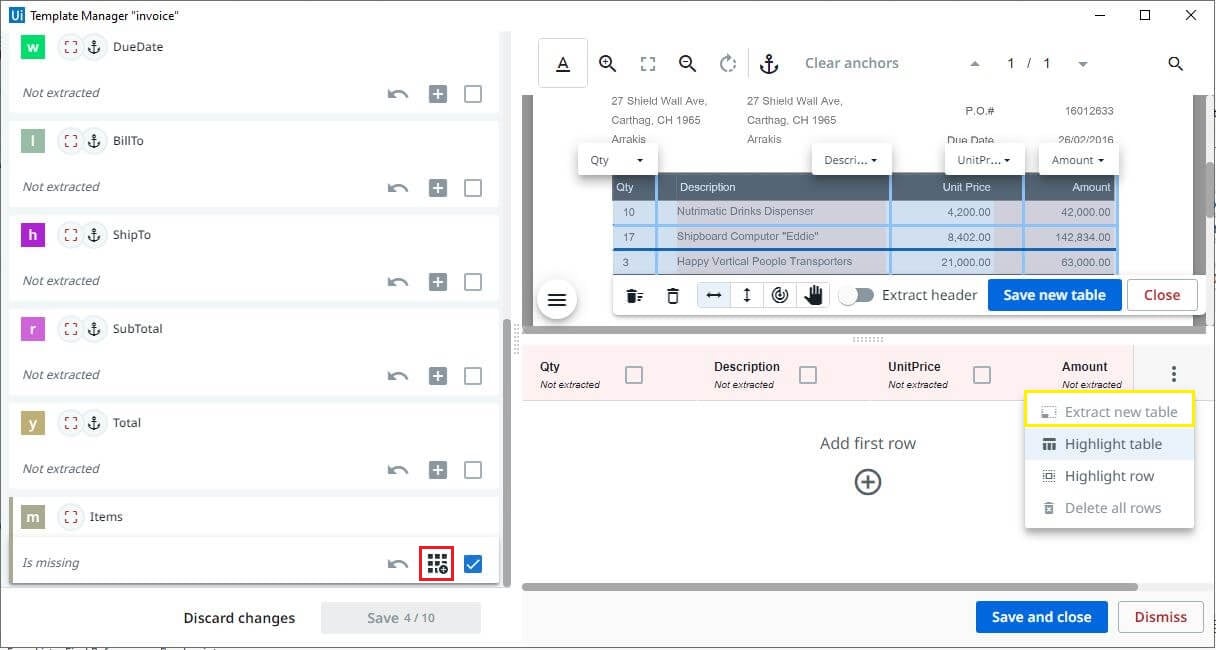
Configuring table Fields
Click on the icon that appears on the left side, which gives an empty table with the columns created from the Taxonomy. Click on the three dots that appear toward the extreme right and select Extract new table. Select the whole table, and map the columns separated by a vertical line, define rows separated by a horizontal line. Click on Save new table.
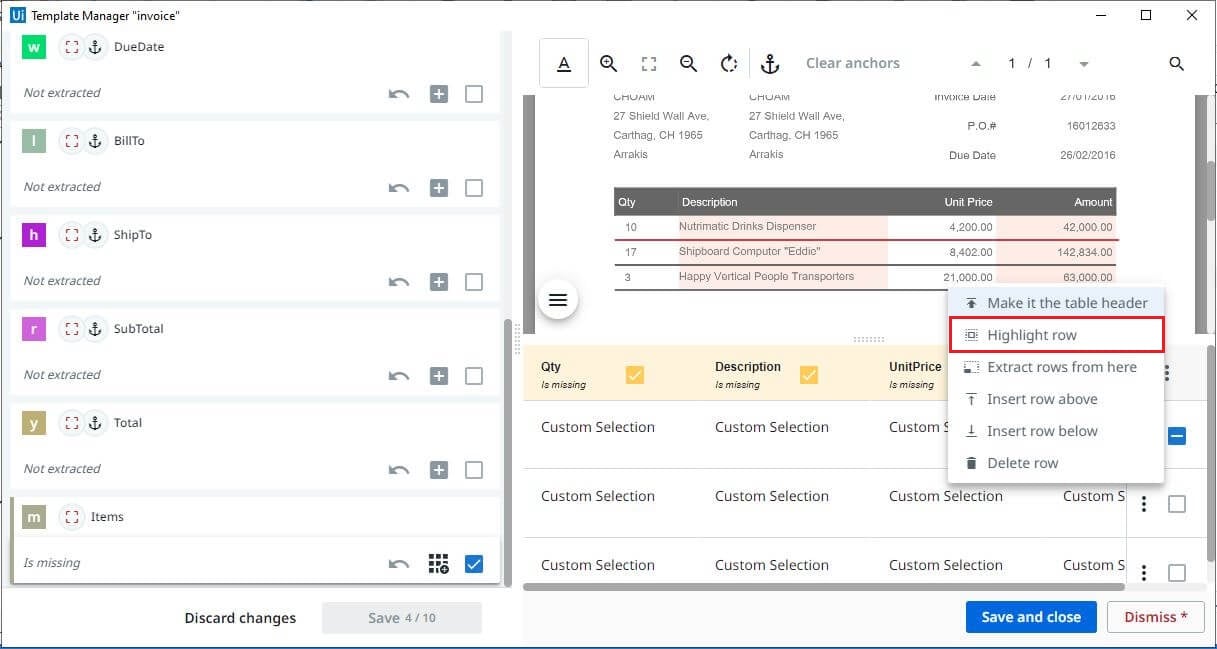
Three rows were extracted, and you can also highlight each row by choosing the highlight row option. For better table extraction it is recommended to train the document with a maximum number of rows. Finally, save changes.
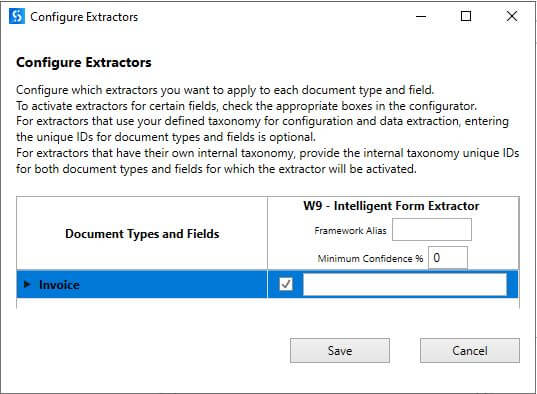
Configure Extractor
Select the extractor you want to apply to the document type by enabling the check box.
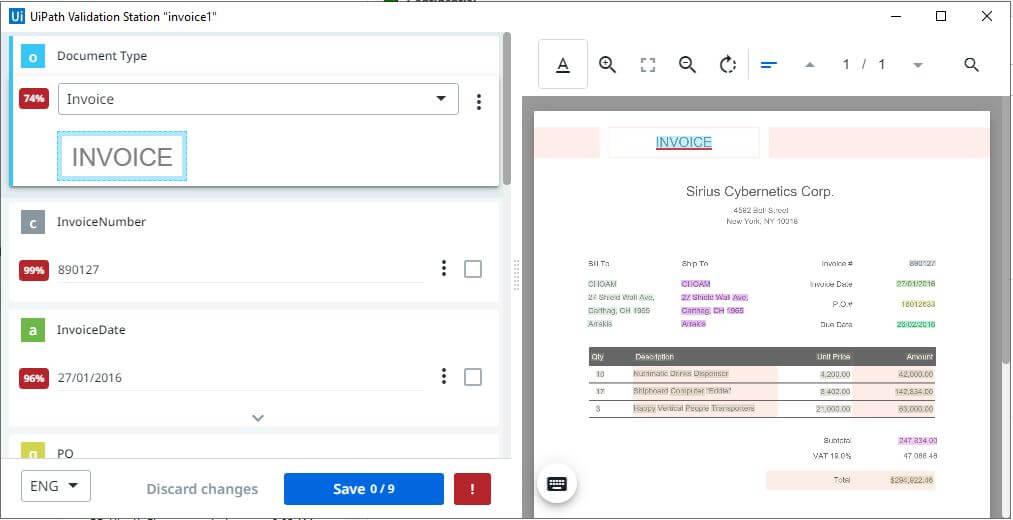
Step 8: Validation Station
Manually go through the bot-extracted values and, again, this step should be avoided when doing unattended automation. The output of step 3, step 4, step 5 are the inputs and the automatic extraction results saved in a variable.
Step 9: Mandatory Fields Check
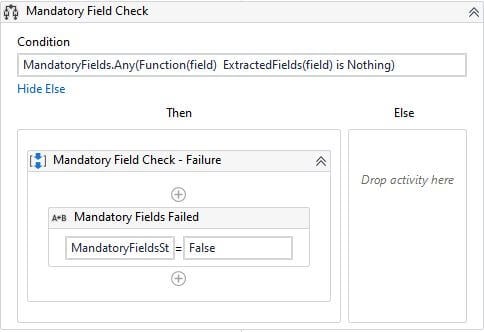
This step is to make sure all the mandatory fields are extracted. Mandatory Fields is a list variable with all the mandatory fields and Extracted Fields in a dictionary variable that contains mandatory field values. The variable is set to false if any of the mandatory fields are missing.
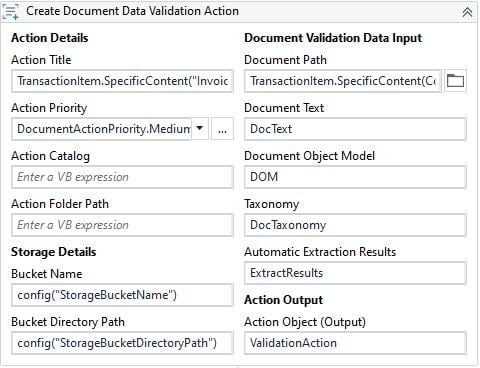
Step 10: Action Center
It's time to send the invoice to Action Center for human review, to see if any of the mandatory fields are missing. Action Priority can be set to Medium, High or Low, and details of the current action are stored in a storage bucket.
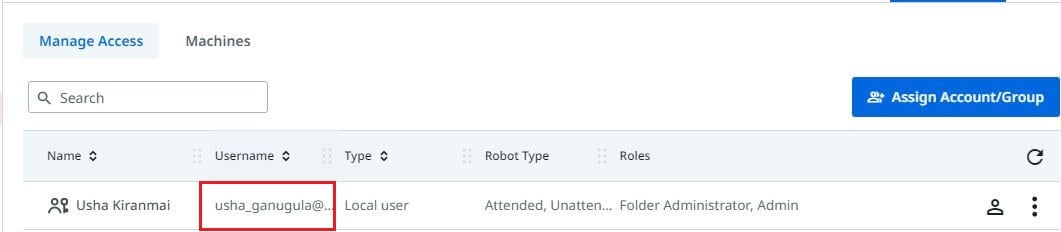
Assign Action to a specific user
Assign current action to a user by using the registered email address or username in Orchestrator. Sign in to Orchestrator and click on Users.

Use the registered username to assign the actions
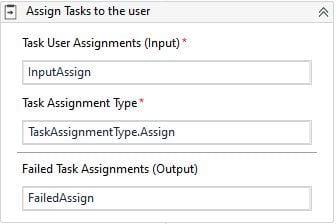
Input Assign is a list variable that contains the user’s list to assign the actions.
Task Assignment Type by default set to assign, you can also reassign the tasks.
Failed Assign is a list variable that contains the exception details when the action fails to assign to a user.
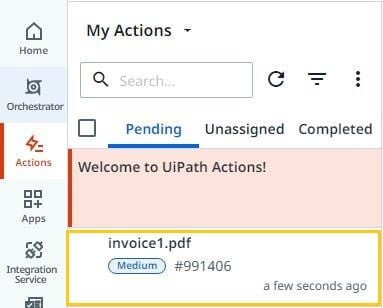
Sign in to Orchestrator and click on the Actions tab in the left panel. Then you can see Pending, Unassigned, and Completed actions.
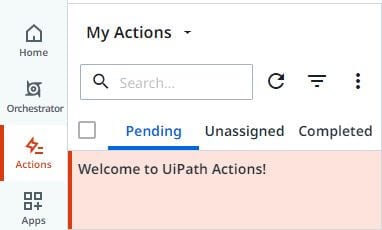
Click on the Pending tab and check the actions that were assigned to the user. Actions will be unassigned if you don't assign actions to a user. That means any user who has access to Orchestrator can work on those invoices.
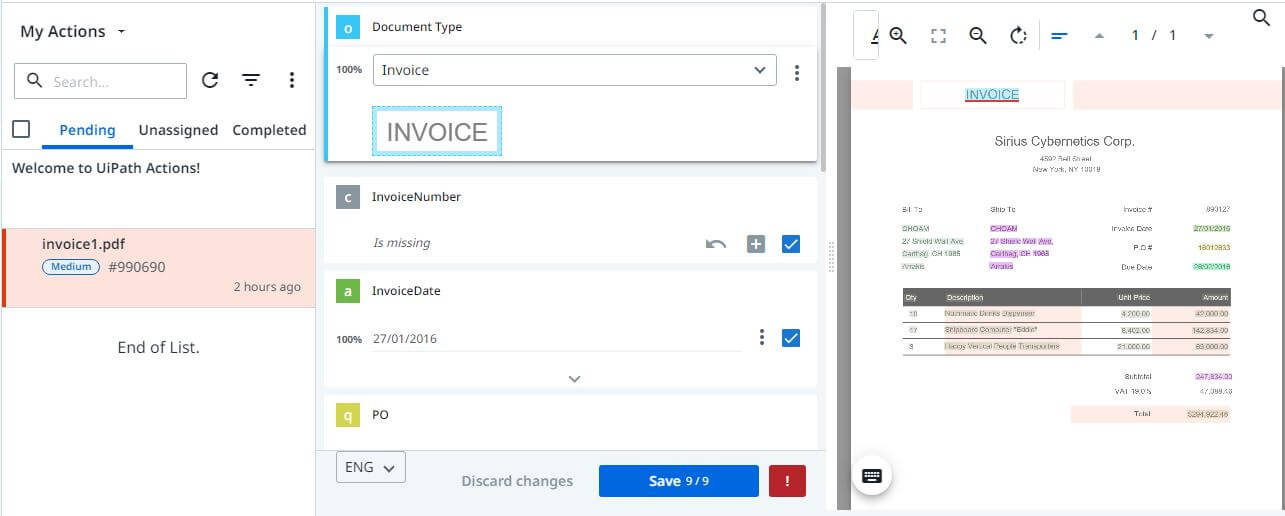
Click on the invoice, start validating and capture the values if any required, finally save changes.
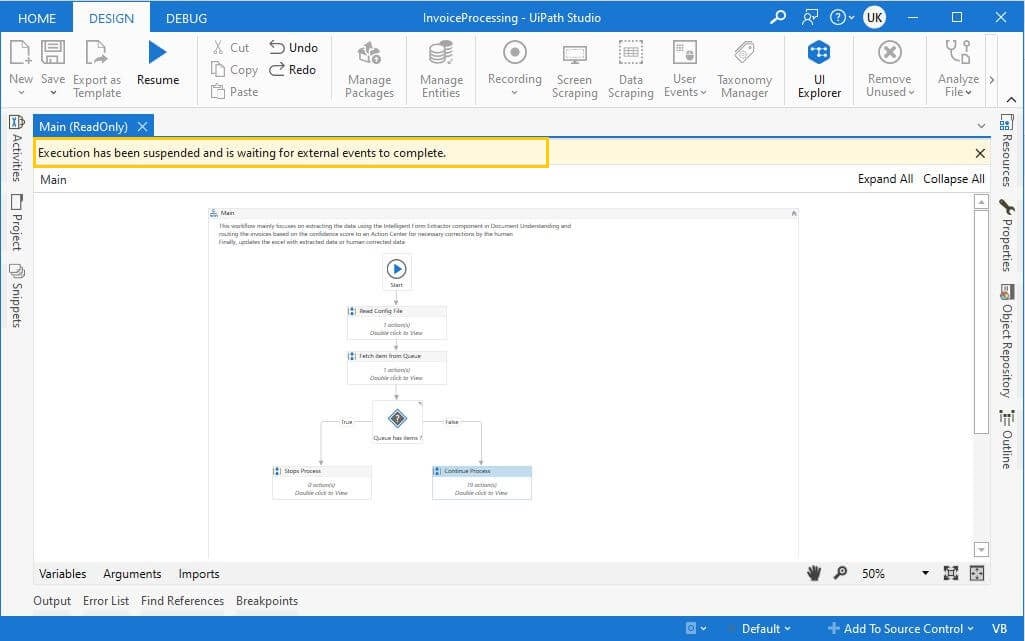
Wait for the invoice from Action Center
Until the robot receives the invoice back from Action Center, the state of the robot will be Suspended. Once it receives the invoice, it will continue from the step where it left off. Once the changes are saved in Action Center, for:
Attended Automation - manually click on the Resume button in UiPath Studio.
Unattended Automation - robot will automatically trigger the process.
Step 11: Write-Output
Write the human-validated output to Excel or use for further processing.

Conclusion
In this article you learned how robots collaboratively work with humans using Document Understanding enabled by AI.
If you want to keep yourself updated with other use cases, deep dive into the Forum use case repository.

RPA developer, Miracle Software Systems, Inc
Related articles


Get articles from automation experts in your inbox
Sign up today and we'll email you the newest articles every week.
Thank you for subscribing!
Thank you for subscribing! Each week, we'll send the best automation blog posts straight to your inbox.
Get articles from automation experts in your inbox
Sign up today and we'll email you the newest articles every week.
Thank you for subscribing!
Thank you for subscribing! Each week, we'll send the best automation blog posts straight to your inbox.