
UiPath Automation Ops pipelines integration with change management (Community Blog)
UiPath Automation Ops Pipelines integration with change management
Share at:

Introduction
In most organizations, change management processes and systems provide consistency and oversight of changes to business systems. They provide structure for approval flows, traceability, and accountability of actions made by users, as well as a place for multiple teams to collaborate.
Many UiPath customers already have proven approaches to change management and often extend their existing frameworks for deploying UiPath automation projects. Historically, this has been a manual task where a release manager approves the change, and then the operations team copies packages and project entities from one UiPath environment (e.g. development or test) to another (e.g. production).
More mature teams have automated continuous integration and continuous delivery (CI/CD) pipelines in place with systems like Azure DevOps and GitHub Actions. However, this often requires advanced or specialized knowledge of these concepts and toolsets in addition to dedicated infrastructure, licensing, and so on. By utilizing UiPath Automation Ops Source Control and Pipelines in combination with UiPath Integration Service, it is possible to integrate seamlessly into existing change practices without the manual overhead and need for new tools, skills, and infrastructure.
Tutorial overview
This post will guide you through an example design of automating code deployment all the way from a GitHub commit, through to a production UiPath Orchestrator. The example also uses ServiceNow for approving deployments to simulate change management processes you may find in your own organization.
The best part is you can try this yourself using familiar UiPath products: Studio, Orchestrator, Integration Service, and Robot.
The stages and steps are fully customizable, allowing you to add or remove the number of environments, the approvals needed, steps performed, etc. to suit your organization’s systems and processes.
Assumptions and pre-requisites
What you will need:
Access to a UiPath Automation Cloud™ instance
Access to a GitHub account and permission to connect it to UiPath Automation Ops Source Control. Read more in the UiPath Automation Ops - Source Control documentation.
Access to and configure a “Pipelines Runtime environment” (think of this as an agent or runner if you’ve used other applications for CI/CD in the past). Read about how to get set up in the UiPath Automation Ops – Pipelines (preview) documentation.
Access to build projects in UiPath Studio, publish them in UiPath Orchestrator, and configure connections in UiPath Integration Service. The example here uses ServiceNow for change management, but you are free to use any system you have access to (including UiPath Action Center forms!).
Challenge accepted! Let’s imagine you work for a company called “Fantastic Co.” and you’ve been tasked with automating the tedious manual deployment processes you have today, migrating UiPath packages and libraries from one environment to another, performing testing, static code analysis with Workflow Analyzer, and seeking approvals.
Define the process and steps for deployment
You start by planning what steps are needed for deployment. This is called a “Pipeline Process” and is built the same way you would build any other UiPath automation project. If you are familiar with CI/CD concepts, a Pipeline Process is like a Pipeline definition (e.g. defined in a YAML file) which outlines what steps are executed when the pipeline is triggered.
You keep in mind you want to keep the dev team as productive as possible and need to find a balance between governance, approvals, and delivery speed. In line with the “Fantastic Co.” change management and code deployment guidelines, you decide the following steps would be right for your Pipeline Process:
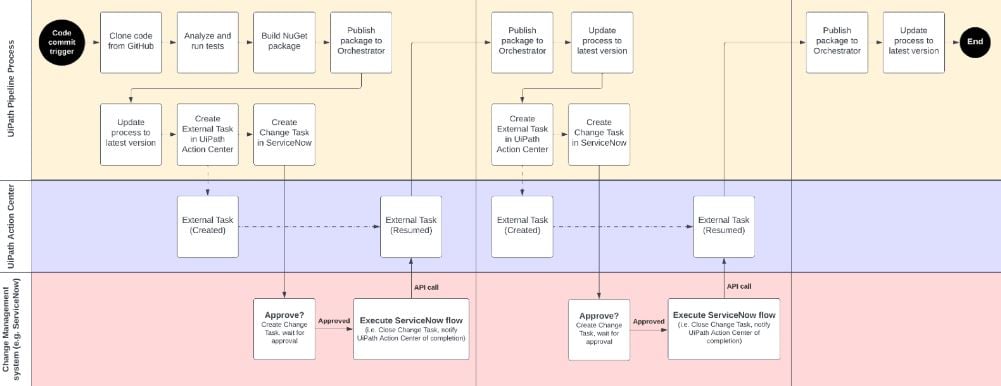
Each time a developer commits code to GitHub, fetch a copy of the latest code.
Analyze the code using Workflow Analyzer.
Run unit tests against the code.
Build a NuGet package and publish it to “DEV.”
Create a “Change Task” in ServiceNow requesting approval.
Once approved, publish the package to “TEST”.
In “TEST”, update the process to use the latest version.
Create another “Change Task” in ServiceNow requesting approval.
Once approved, publish the package to “PROD”.
In “PROD”, update the process to use the latest version.
Sit back, relax, and watch the automations fly!
Having been a developer in the past, you determine that having packages published, analyzed, and tested in DEV without approval will be great for developers, allowing them to get fast feedback of any breaking changes that may have been introduced since they last committed code.
For TEST and PROD, you conclude that approvals are needed in line with your company’s change management guidelines. This allows for more control over environments and the flow of code, while providing a good separation of duties for security.
Create a solution design that has all systems and interactions
At a high level, we know we need to be able to interact with the Fantastic Co. change management system — ServiceNow. We need to be able to do this from UiPath, and conversely, ServiceNow must also be able to send information about approval status back to UiPath. We also need to have our overarching Pipeline process executing throughout.
Considerations
UiPath to ServiceNow: UiPath Integration Service makes interacting with ServiceNow easy and as such we will use it for our solution, inside our Pipeline process. Read more about the Connector in ServiceNow Connector documentation.
ServiceNow to UiPath: Any ServiceNow option that allows it to send outbound API calls will be suitable here. For this example, you decide to use ServiceNow Flows, which are triggered on the creation of a Change Task with a specific description.
As you don’t want to have a robot sitting there waiting for an approval and wasting time, you decide to use UiPath Action Center and the “External Task” functionality. By creating an “External Task”, the Pipeline process enters a “Suspended” state while waiting for approval, freeing up the robot to continue working on other things. Once the approval is received from ServiceNow, the robot can continue executing the Pipeline Process.
Since multiple systems are in use, you decide that tracking communication between the systems will need some unique identifiers. When creating an “External Task”, the Task ID generated in UiPath Action Center would work well. This can be mapped to the ServiceNow CorrelationId field against the Change Task records being created. Having this mapping then allows ServiceNow to call an API back to UiPath and pass through the right ID so that the correct task can be closed in UiPath Action Center.
Build: It’s all coming together
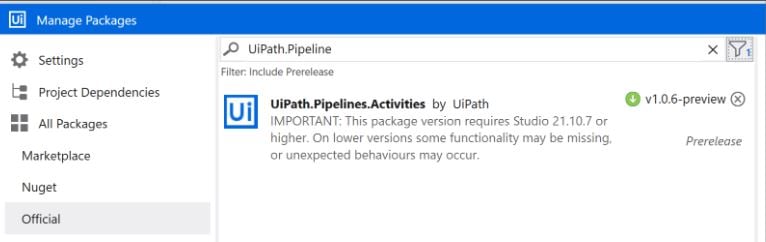
As the design doesn’t require any User Interface (UI) components, you decide to build the Pipeline Process using “Cross-Platform” compatibility so it can be executed on any machine type. For specifics on compatibility, see About Automation Ops Pipelines documentation. Once you’ve created the project in Studio Desktop, you can import the UiPath.Pipelines.Activities pack via “Manage Packages”. This gives you access to activities such as cloning, building, publishing, and analyzing, among others.
Using the solution design as a foundation, you create multiple stages, each which house different activities and logic to perform the steps you need. If you’re unsure where to start, try using one of the Pipeline Templates available in UiPath Studio. Just make sure to have the “Preview” checkbox enabled when looking for them.

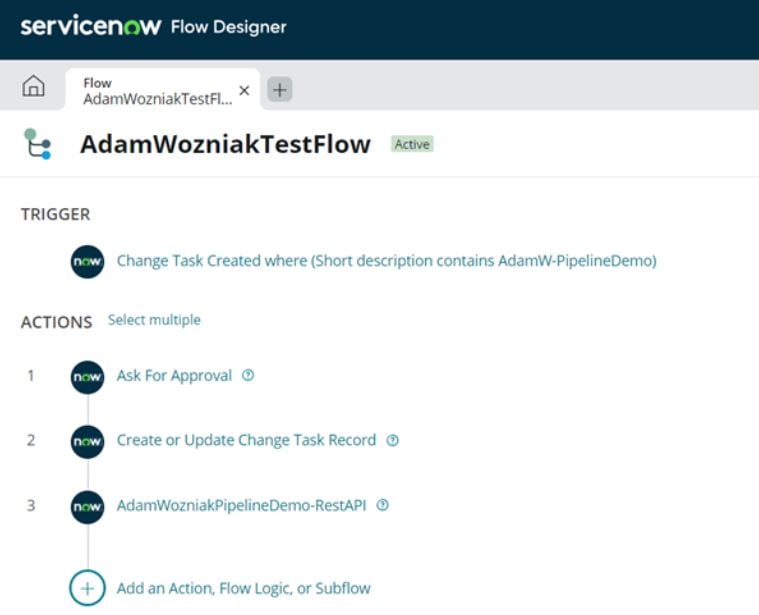
For the ServiceNow flow, you can create a new flow that triggers based on the creation of a Change Task with a certain attribute (like a short description containing “Deployment” text). After that, add any approvals required and configure the REST API call to finalize the Change Task after approval is granted. Remember, this is just an example, and you can create or use flows already present in your change management systems.
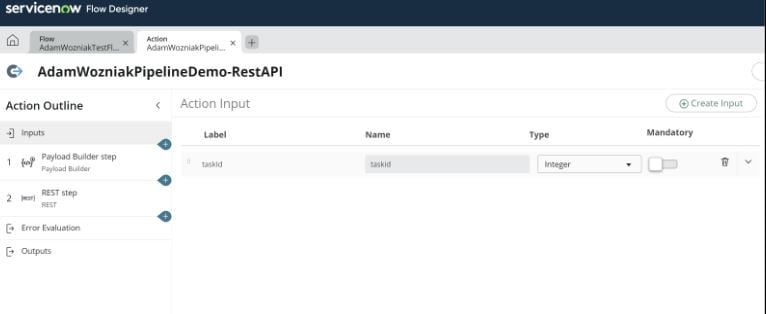
To create the REST API action in Flow designer, you can use the following screenshot as an example. The input argument will be the task ID that corresponds to the “External Task” in UiPath Action Center.
We can then build the required payload in a JSON format, so it is accepted and understood by UiPath Action Center. Check out the Orchestrator API documentation to see the expected format and data required when calling the API.
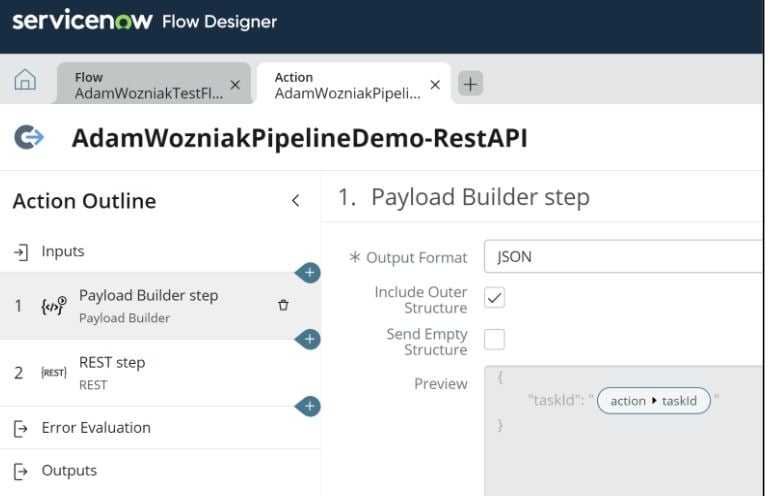
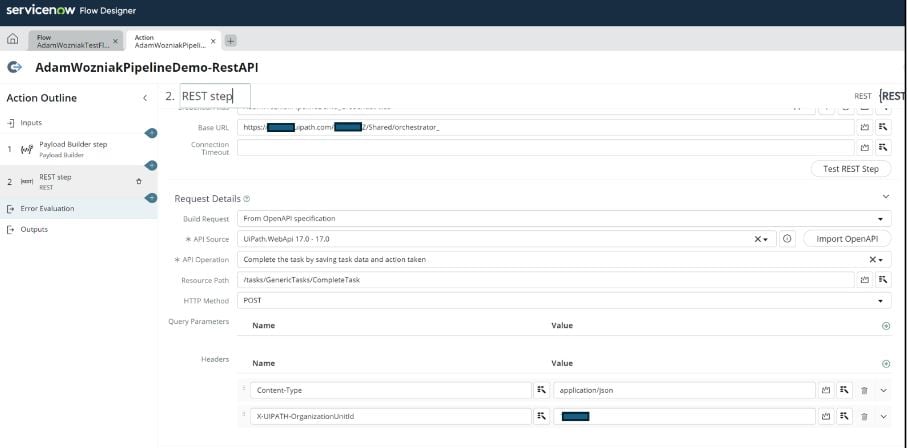
Once the payload is ready, use a “REST step” to perform the API call and finalize the “External Task” in UiPath Action Center. Note, the endpoint to complete a task is “/tasks/GenericTasks/CompleteTask”.
Run: Go Pipelines go!
Once you’ve developed your Pipeline process, you then publish it (like any other project) to the same “Pipelines” folder you set up as part of the “Pipelines runtime environment”. After that, head to Automation Ops—Pipelines (preview) in Automation Cloud™ and create a Pipeline based off your newly created Pipeline Process. Try triggering it manually to see if it behaves the way you want and if it doesn’t, head back to Studio and make the necessary changes. Happy deploying!
Topics:
Automation Ops
Technical Account Manager, UiPath
Related articles


Get articles from automation experts in your inbox
SubscribeGet articles from automation experts in your inbox
Sign up today and we'll email you the newest articles every week.
Thank you for subscribing!
Thank you for subscribing! Each week, we'll send the best automation blog posts straight to your inbox.