
How to Connect UiPath Assistant with Orchestrator
Share at:

Introduction
UiPath Orchestrator is the heart of the automation platform that allows you to orchestrate process deployment, license management, robot allocation, user management, and many more. The concepts around the Orchestrator improved in time to provide the best architecture for modern automation solutions. One of the approaches that changed was the methods to connect UiPath Assistant and UiPath Studio with Orchestrator. This article explains how the modern concept works around creating a connection between Assistant and Orchestrator.
Requirements
To get started, you need the following:
Basic understanding of the UiPath Assistant
Overview of the UiPath Orchestrator
Already available (newly created cloud platform community, trial, or enterprise)
Scenario
Sometimes technical topics can be explained easier when we relate concepts to our day-to-day lives. Let's explore the features of the Orchestrator from this perspective. As per the prerequisites, you already have a cloud platform account created. Let's build our story and see how each part of the scenario relates to different components in Orchestrator.
Imagine that the UiPath Platform is an organization where the UiPath Automation Cloud is the entrance or gate. The Orchestrator is the building block of the organization. The organization has defined the roles and how many people they need to accomplish the goals (Orchestrator License Allocation). The company hires you and today is your first working day. As the plot is in place, let's see how the incidents unfold and how each relates to a feature in Automation Cloud or Orchestrator.
What do you do on your first day at work? You arrive at the entrance (Automation Cloud), and you are asked to provide your identification information. The identity information is your username, password, and user group (group assigned in the Automation Cloud). This information decides who you are and what you can do within the organization, such as accessing Orchestrator.
The Automation Cloud “building” has many floors. One of them is the Orchestrator. Once you are in the Orchestrator, you first connect with the HR department to complete your enrollment (Tenant -> Manage access). In the meantime, the IT team will set up a new laptop (Tenant -> Machines) for you to work on it.
How will you accomplish your daily tasks? Is someone assigning you different tasks manually? (Attended Robot). Or, are you going to perform specific tasks based on a schedule? (Unattended Robot). If you are working as Attended, you will not need a machine as you will be working on the machine for employees.
However, if you are going to perform unattended activities, you need an extra machine to take care of the tasks. At this moment, you have your machine, the role in the organization, and the type of work to perform.
Where do you work? Each working environment contains different departments where different roles express. At this point, you get assigned to your department (Orchestrator folder).
Imagine an environment where you need to get access to enter in any department found in the building. When you enter is mandatory to have your machine with you. In this sense, access is given to you and to the machine to join the department (folder user and machine access configuration). Now, you are ready to perform your work. Let's sign in and start (UiPath Assistant Sign in).
Figuring out where and what to configure seems easier when mirroring in a real-life scenario. Now, let's dive into the steps to set up Orchestrator connectivity. Keep the above scenario in mind and follow the steps.
Review UiPath and earn gift cards. Join us and help other professionals learn from your experience with UiPath. Your review can be anonymous.
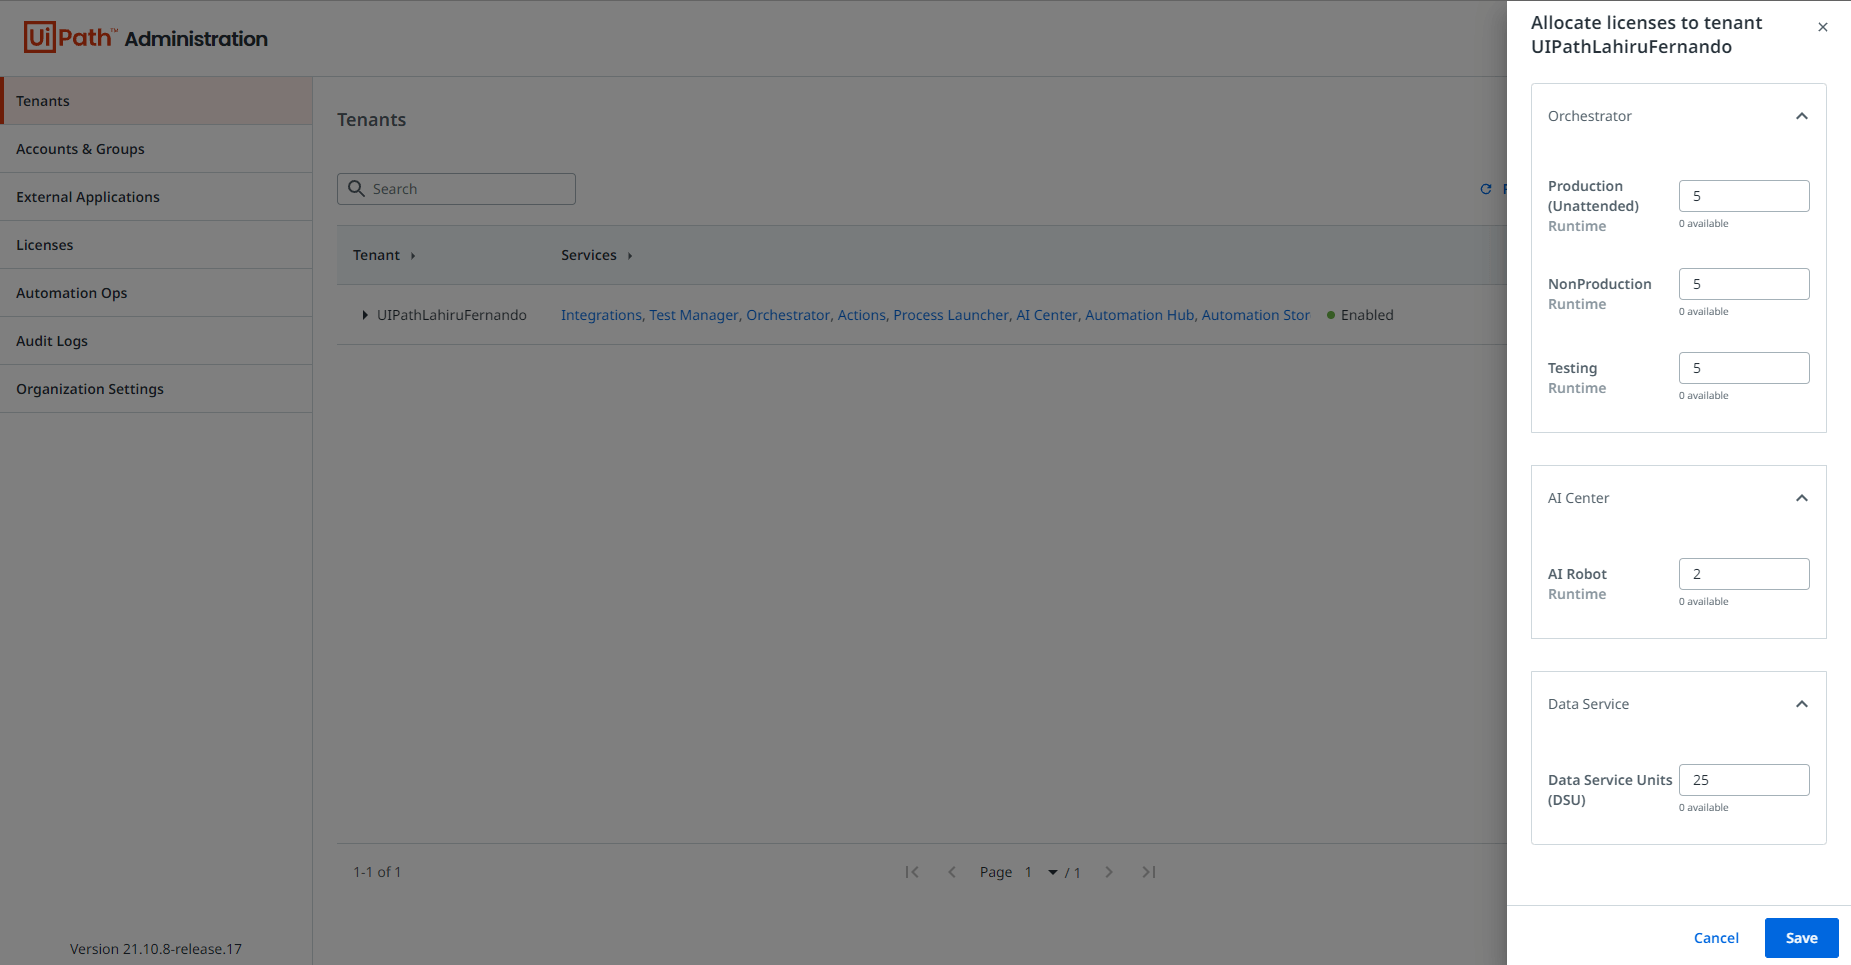
Step 1: Allocate the Available Licenses to Orchestrator Tenants
Defining how many licenses you need is one of the essential steps during setup. Having the required number of licenses enables users to access the necessary resources seamlessly. Once you Sign in to the Automation Cloud, navigate to the Admin page and click on the Tenant tab. You can click on the edit license allocation button next to your Orchestrator Tenant and edit the allocation as shown in the following screenshot.
Now you have everything you need to start onboarding your new users. Let's have a look at the User configurations in Automation Cloud.
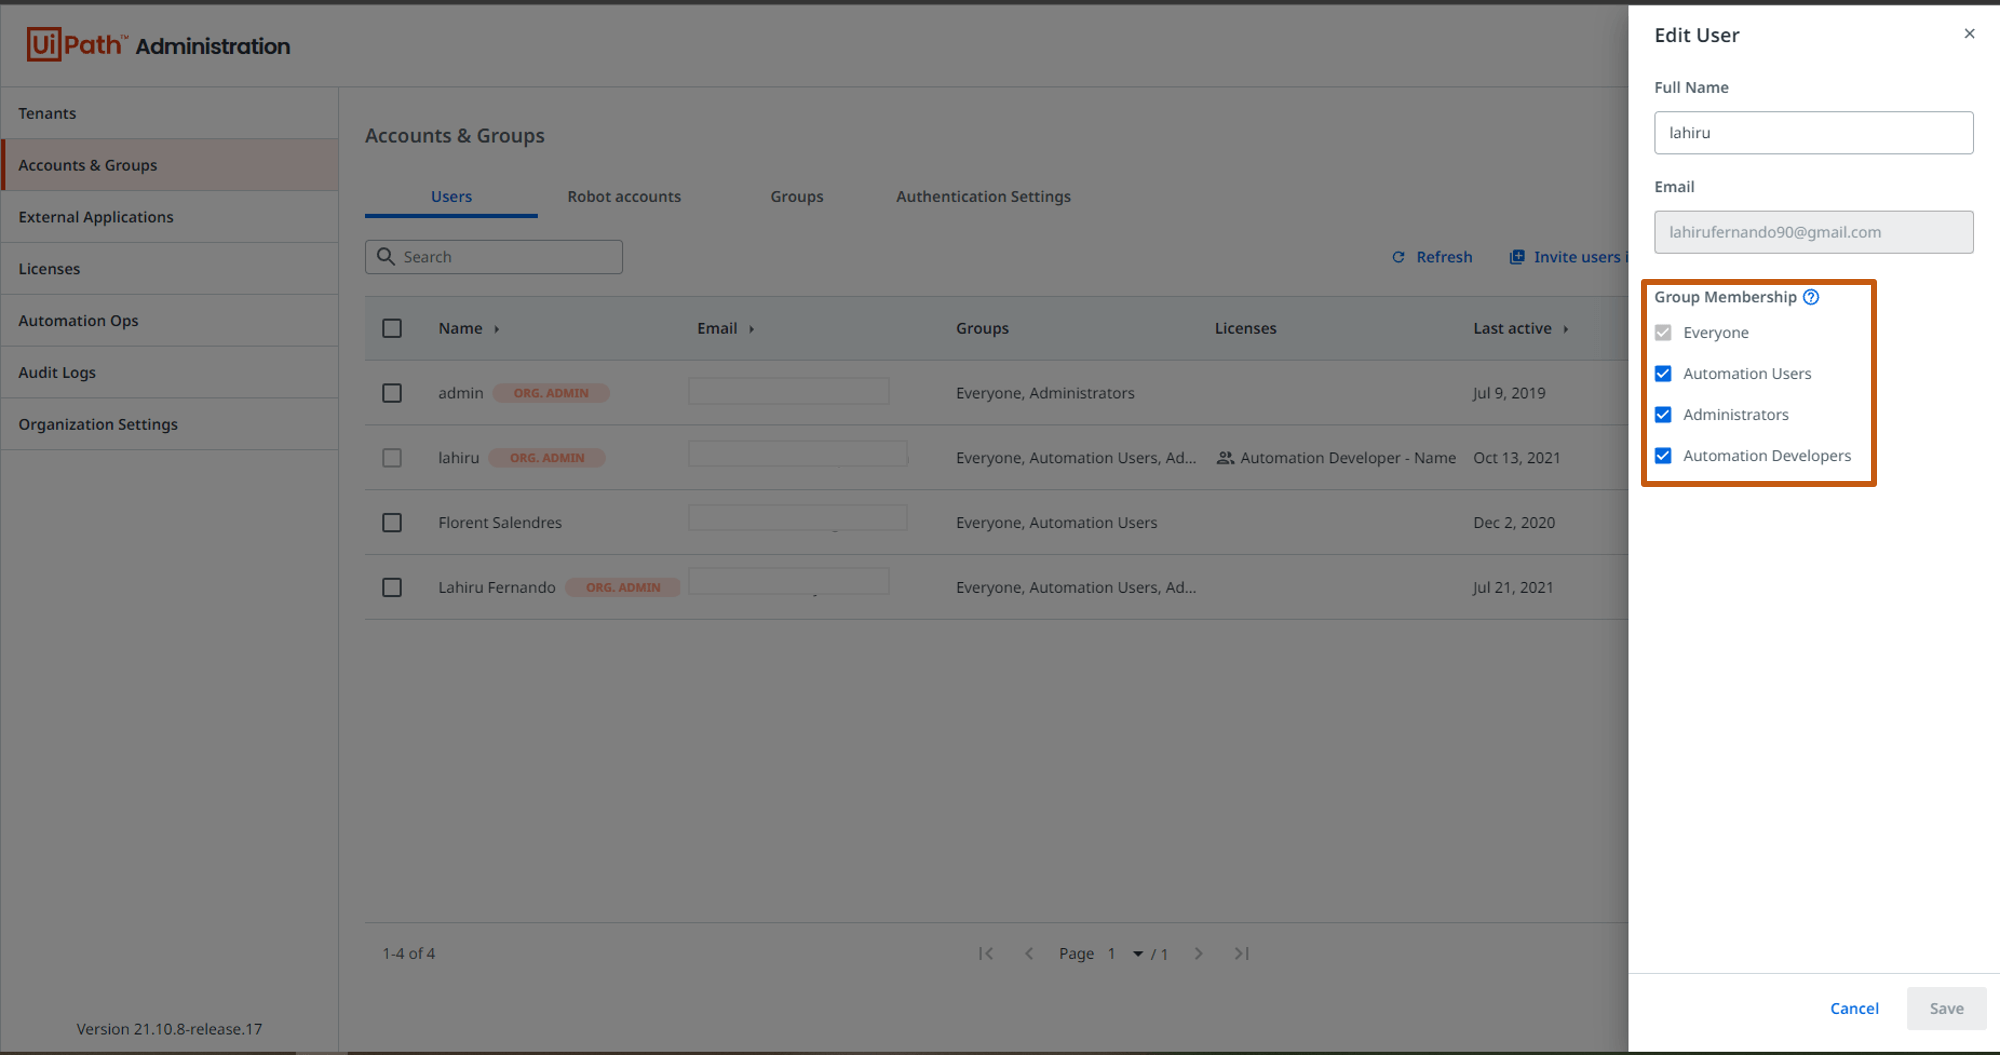
Step 2: Configuring User in Automation Cloud
Navigate to the accounts and groups section in the Admin Page. This page lists all the users who have access to the Automation Cloud along with their user group. The groups section of the page lists all the available User Groups. These User Groups define your role across the resources in the Automation Cloud (including Orchestrator). By default, you are given four groups.
Administrators
: can control and configure resources in the cloud platform. Do not have any license allocations by default.
Automation User
: the business users who can run attended processes. This group has Attended named user license.
Automation Developer
: used by developers to build automation solutions. The group has the robotic process automation RPA developer named user license.
Everyone
: users with no special permissions assigned to this group.
Based on the user's requirement, assign the user to the group by clicking the edit user button, as shown in the following screenshot.
You can also assign the users to the different groups through the groups section by providing the user's email address, as shown in the following screenshot.
Note: You can explore more about the different licenses offered by UiPath here.

Once you have completed the assignment, you have done the entry-level configuration. Go into Orchestrator and get your account and machine set up. You can find the Orchestrator on the left-hand side panel, which lists all the products in Automation Cloud.
The configuration steps are carried out here onwards depending on how the tasks get assigned to you (Attended or Unattended).
What are the tasks that you plan to perform? Are you planning to work on a schedule or on-demand whenever the user needs to run a process? These two questions answer the type of robot you need. If you plan to work on-demand, an Attended Robot is ideal. However, if the processes require execution at a scheduled time automatically without user intervention, it is an Unattended Robot.
In general, the most common use is the Attended or developer method for our community users. However, there are scenarios where we need to set up an Unattended based on the requirement. In this case, we need to perform an additional set of activities. Let’s have a closer look.
Step 3: Setting up Attended or Developer Mode
Step 3.1: Updating User Access
Click on the Tenant option on the Orchestrator and navigate to the manage access section.
Find the user you wish to configure and click on the Edit User option to navigate to the User Configuration Page. Configuration includes three pages: General Details, Robot Setup, and Robot Settings.
Updating General Details
The "General Details" page includes the basic configurations of the user. We mostly need to focus our attention on the roles section. If you are a developer, having roles assigned to you is not mandatory. However, you need roles assigned to you for any special permission to perform actions such as modifying folders, etc.
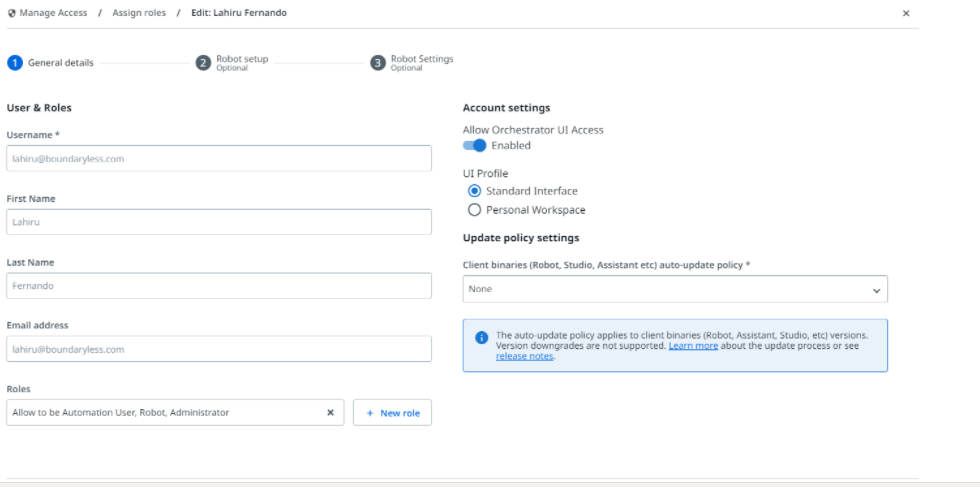
If you are using the Community Version, you can assign the following roles to yourself to perform most of the actions.
Administrator
Allow Automation User
Robot (Add this role if your account is used for unattended automation)
Personal Workspace Administrator (Add this role if you plan to manage personal workspaces)
Robot Setup
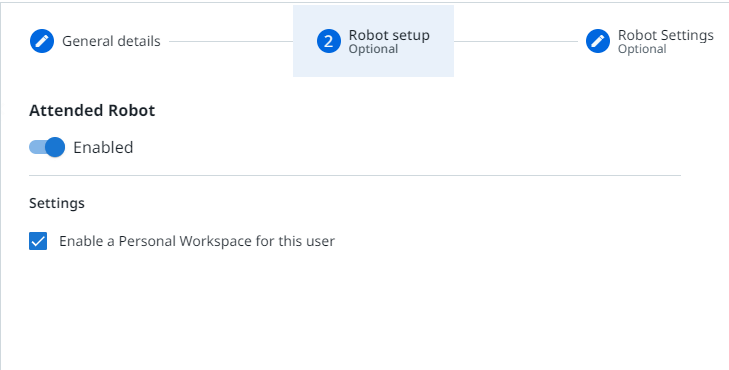
This section focuses on the type of robot you need and how to configure user settings accordingly. Let's see how we can configure an Attended Robot first.
Enabling an Attended Robot is very easy.
You just need to enable the Attended Robot option under Robot Settings, as shown in the following screenshot. You can decide whether you want to have a personal workspace for the user or not. In case the Personal Workspace is not required, you can easily disable it under the Attended Robot settings.
Now you know how the robot is allowed to work, and all we need to do is assign the user to their dedicated folders.
Step 3.2: Assigning User to Folders
According to our scenario, folders are the departments inside the company. To understand the concept of folders, let's look at an example. Think of the finance department. It can consist of small groups that handle different tasks according to the function they overlook. Now, let's apply this concept to Folders. The main folder is the finance department, and the small groups are the subfolders that you can find in the main folder. Whoever has access to the main folder will have access to its subfolders through inheritance.
Navigate to the Tenant screen and click on the folders option to navigate into the folder management screen.
Select the folder you want the robot to be assigned to and click on the assign account/group button as shown in the following screenshot.

Search the user from the search option and assign the required roles for the user. These roles you define here illustrate what permissions the user has within the folder level. Enterprise-level folder permissions may vary depending on access restrictions. However, as a community user, you can focus on adding the following roles to your account. You can confirm your changes by pressing the blue assign button.
Folder Administrator
Automation User

With the required roles assigned, you are all set to connect Studio and Assistant to the Orchestrator.
Step 3.3: Connecting Assistant with Orchestrator
The Assistant provides two connectivity options, Service URL and Machine Key options.
Connect using Service URL (Sign-in)
Connecting with Service URL is needed whenever you are connecting the robot with Orchestrator as Attended or Developer Mode. The Sign-in option that you see under Assistant user options is almost the same as the Service URL option.
Note: Wondering where to find Service URL option? You can find it by navigating to Assistant User Options and clicking on the Preferences option. This action will take you to the Preferences screen, where you will see the Orchestrator settings tab. Click on it, and you will find the connectivity methods.
To keep things simple, let’s use the Sign-in option.
You can click on the Sign-in option in the Assistant User Options, as shown in the following screenshot.
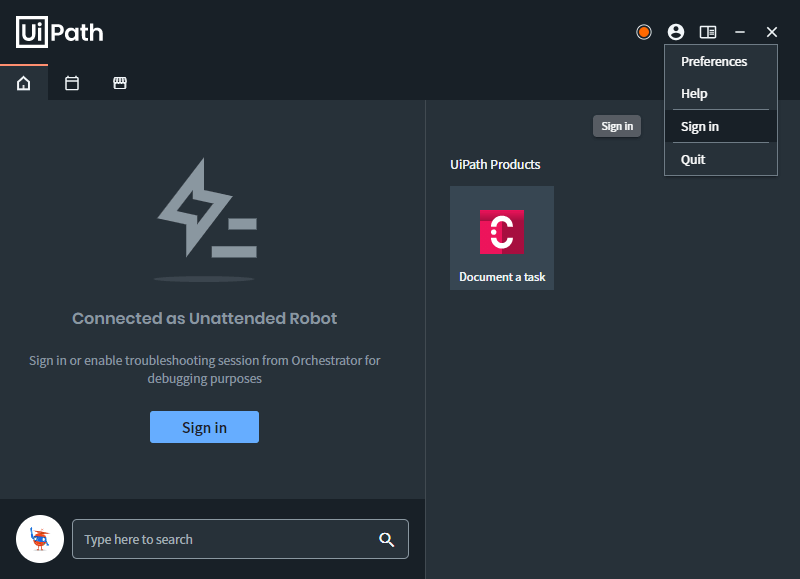
Note: We need to use either the Sign-in or Service URL option to connect UiPath Studio with Orchestrator. If you are wondering what the Service URL is, it is the same URL as the Orchestrator URL. The Sign-in requires the same email address and the password you provided to Sign into the UiPath Automation Cloud. Now, you are all set to start your first development. Open UiPath Studio, and start building.
Step 4: Setting up Unattended Mode
Setting up the Unattended mode is not mandatory. However, there are requirements for both community and enterprise users where they need to set this up for running processes without human involvement. Setting up Unattended mode requires a few additional steps other than what you already performed. Let’s look at the steps.
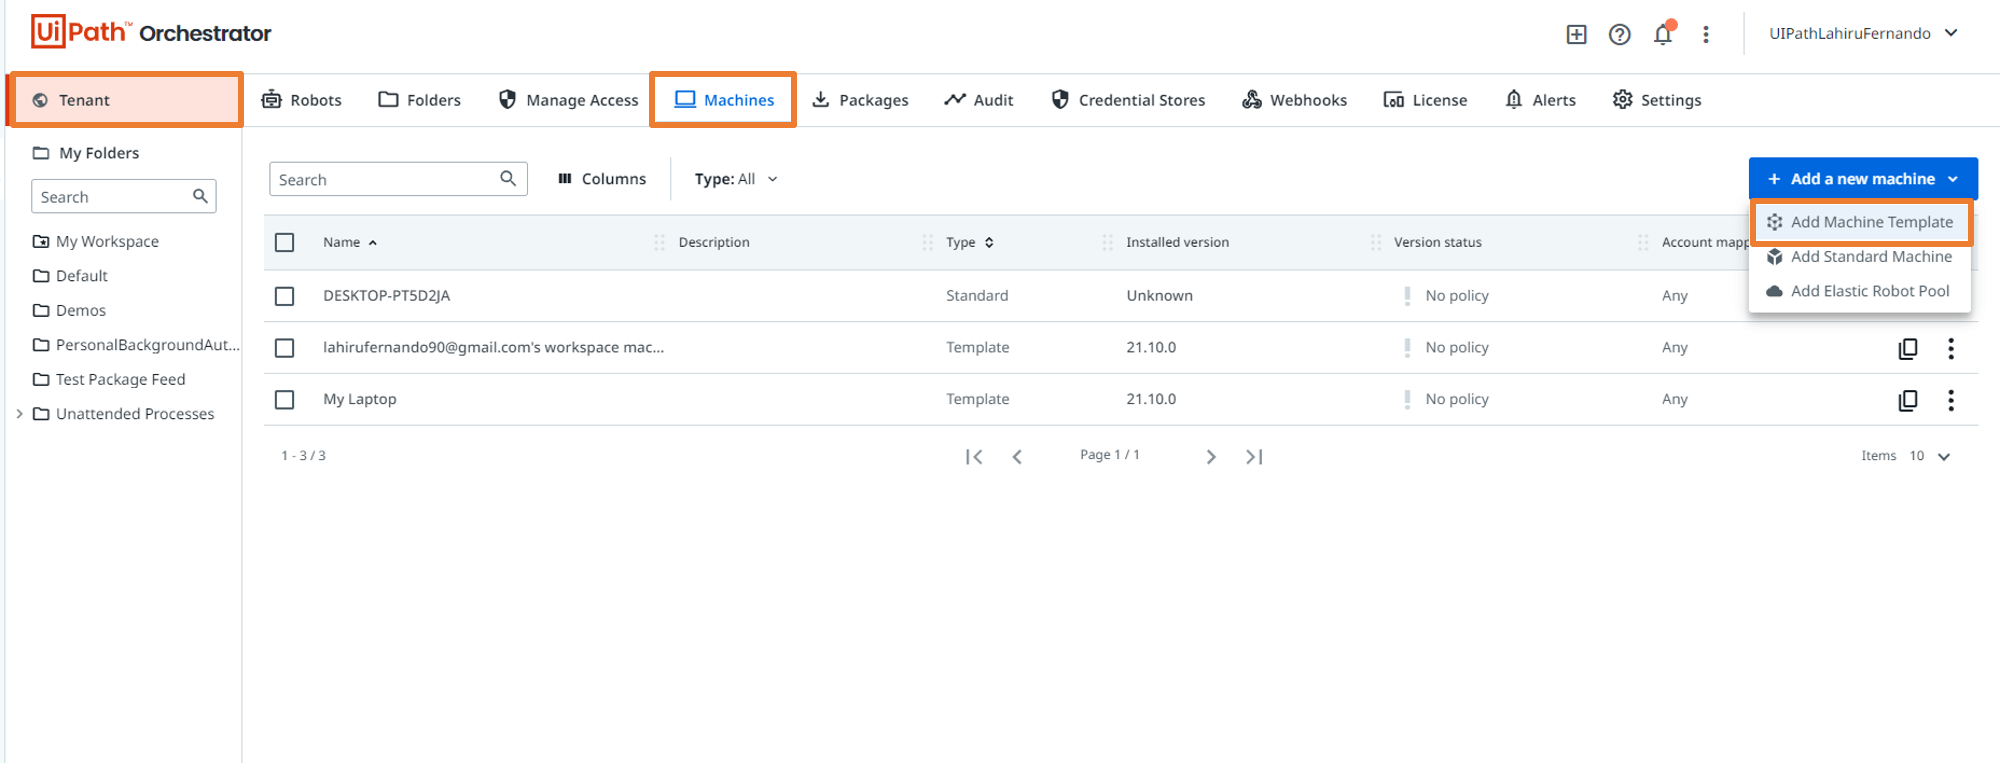
Step 4.1: Setting up Your Work Machine
Setting up your machine is easy. On the Orchestrator Tenant options, locate the machines page. Use the Template Machine option to create your first machine, as shown in the following screenshot.
It is always a good practice to provide the machine name as shown in the Assistant or in a meaningful way that allows you to figure out easily which machine is. Open Assistant and navigate to Orchestrator settings under the Preferences menu of user options.
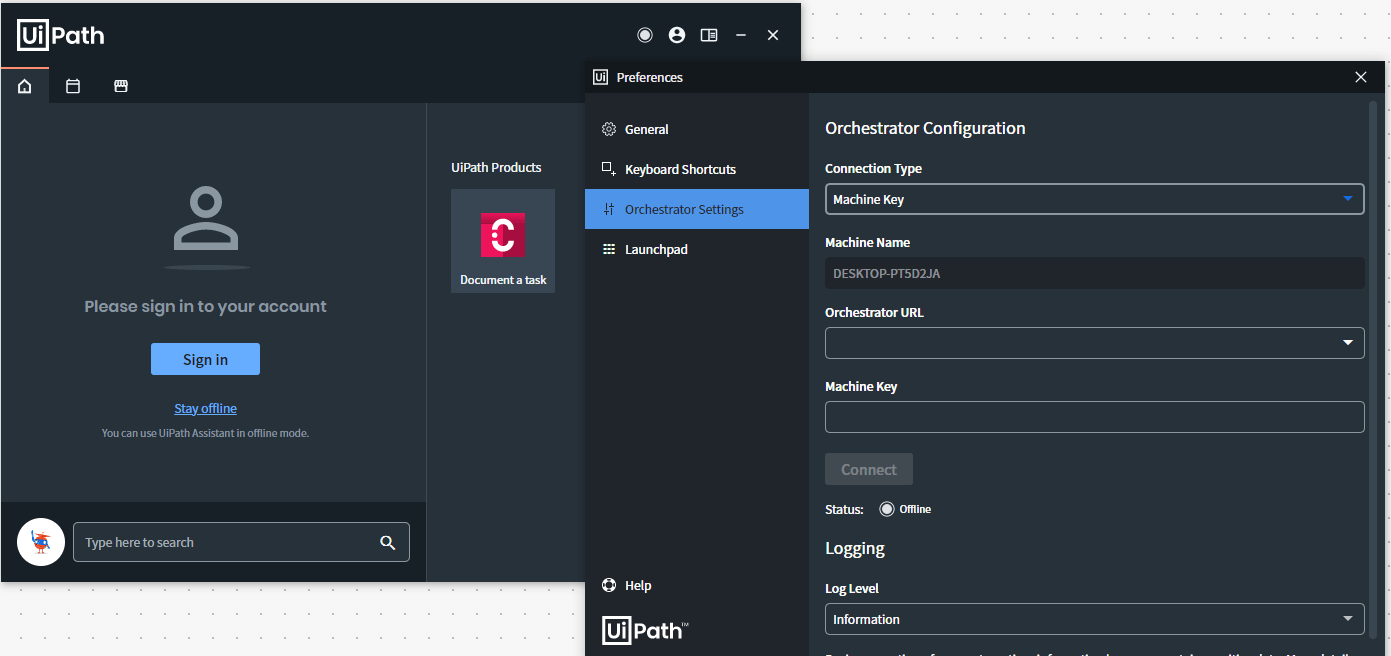
The machine name is displayed to you once you select the connect type as Machine Key from the Orchestrator settings option under Preferences, as shown in the above screenshot. Copy the machine name and add it to your machine name on the Machine Creation page. In addition, in case you plan to use the machine for Unattended Automation, testing in test environments, or for Test Automation at some point, ensure you provide the runtime licenses for the machine as shown in the screenshot below.
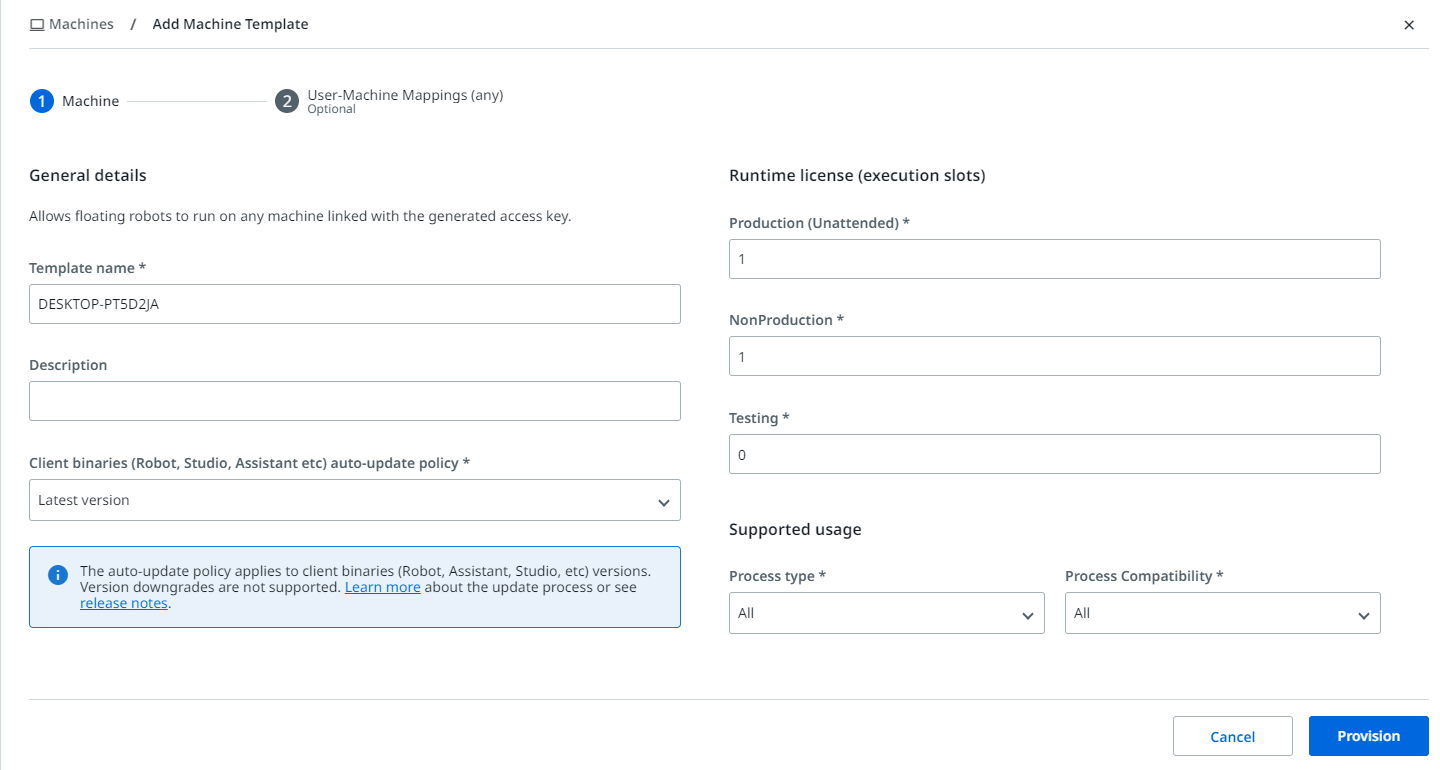
Once done with the configuration, click on the Provision button to complete the machine setup. Now, that your machine is ready, let's look at the user configuration for Unattended connectivity.
Step 4.2: User Configuration for Unattended Connectivity
You are already familiar with the Attended mode configuration for the user. Navigate to the same screen, Tenant option, and manage the Access tab. Navigate to the Edit User screen and let’s start the configuration for Unattended mode.
Updating General Details
As we did earlier, we need to focus on the roles section. For Unattended mode, we need to add a new role, Robot, to the user. Now, let’s get to the Robot Setup tab.
Robot Setup
We enabled the Attended Robot option earlier. Now our focus is on the Unattended Robot option. If you wonder whether you can have both options enabled, yes, it is possible.
Enabling the account for the Unattended robot requires a few inputs from our side. First, you need to enable the Unattended Robot option for the user. This option is located right next to the Attended Robot configuration.
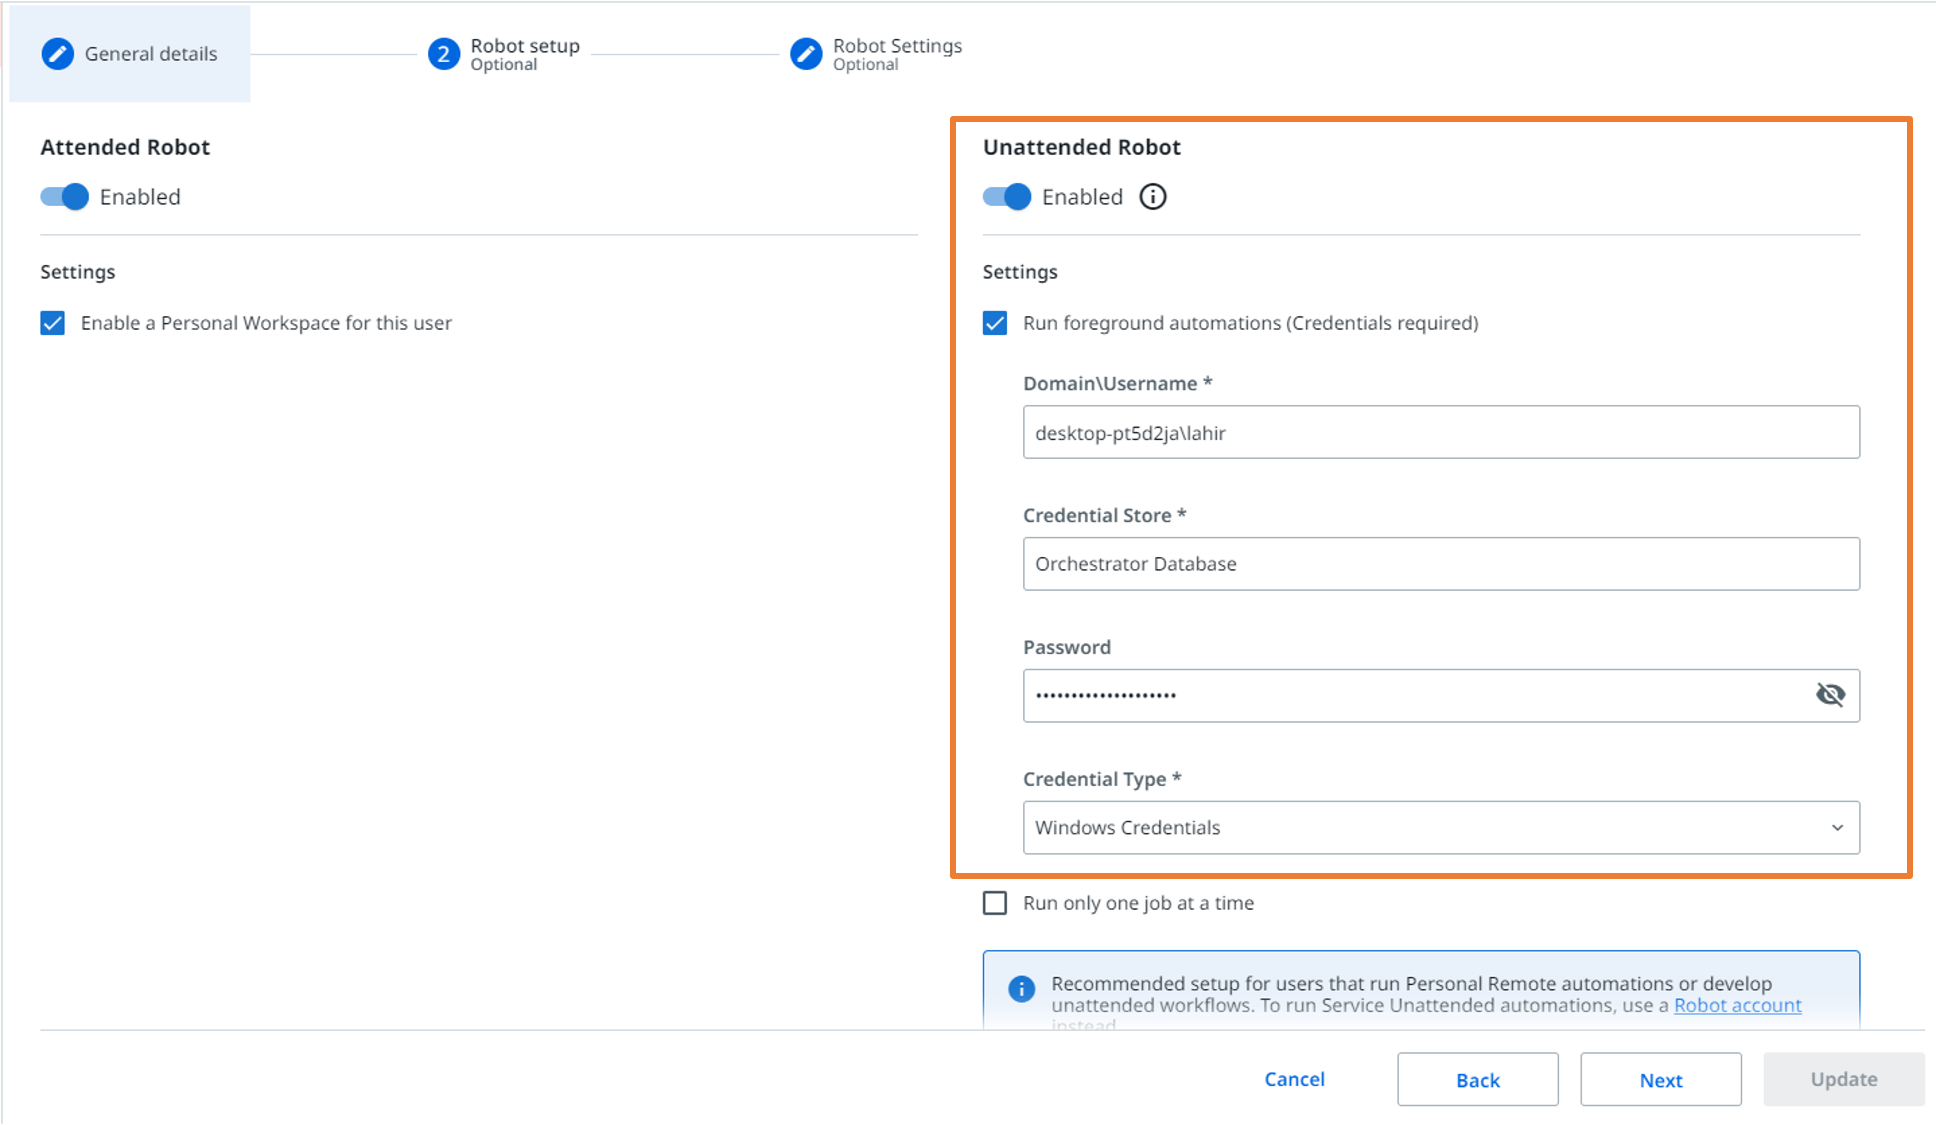
The settings include the domain, username, and password. You can quickly obtain the Domain\Username by typing the command "whoami" on Command Prompt, as shown in the following screenshot.

Copy the domain and username from the Command Prompt and paste it in the domain\username section. Lastly, provide the windows password you use to Sign in to the account you mentioned in the domain\username section and click on the Update button to complete the robot configuration. Now you know how the robot is allowed to work, and all we need to do is assign the user and the machine to their folders.
Step 4.3: Assigning User and Machine to folder
Similar to Attended mode, we need to assign the user to a folder. We performed this step already during the Attended setup. For the Unattended setup, we need to do one more step in addition to the user assignment. Unattended robots require a machine to work (the machine we set up). Hence, we need to assign the machine to the same folder as well.
Navigate to the Tenant screen and click on the Folders option to navigate into the folder Management screen.
Select the folder you want the robot to be assigned to and click on the Assign Account/ Group button as shown in the following screenshot.
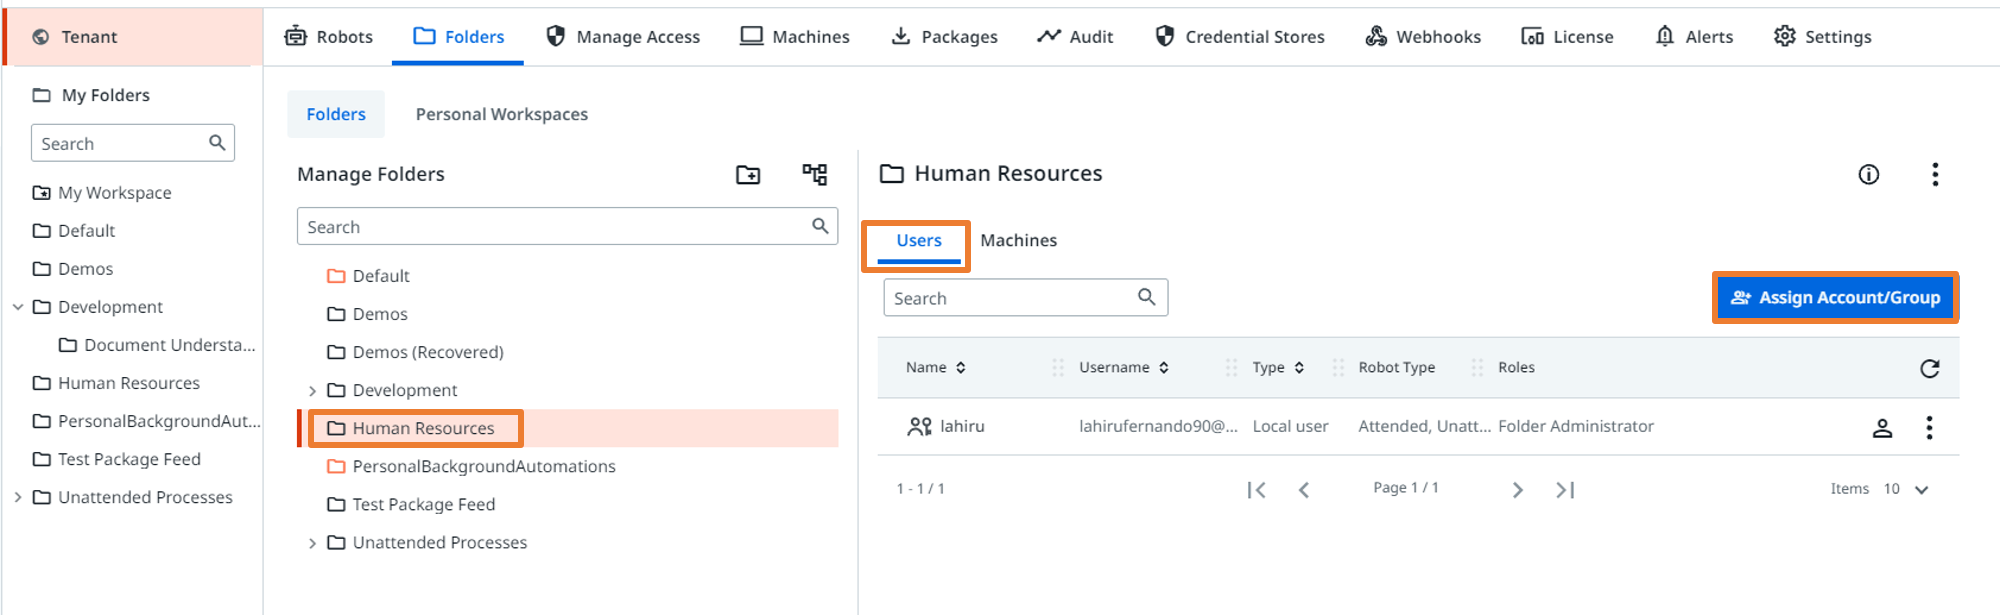
Search the user from the Search option and assign the required roles for the user. These roles you define here illustrate what permissions the user has within the folder level. Enterprise-level folder permissions may vary depending on access restrictions. However, for a community user, you can focus on adding the following role in addition to what we added earlier. You can confirm your changes by pressing the blue Assign button.
Robot (this role is specific to Unattended Robots)
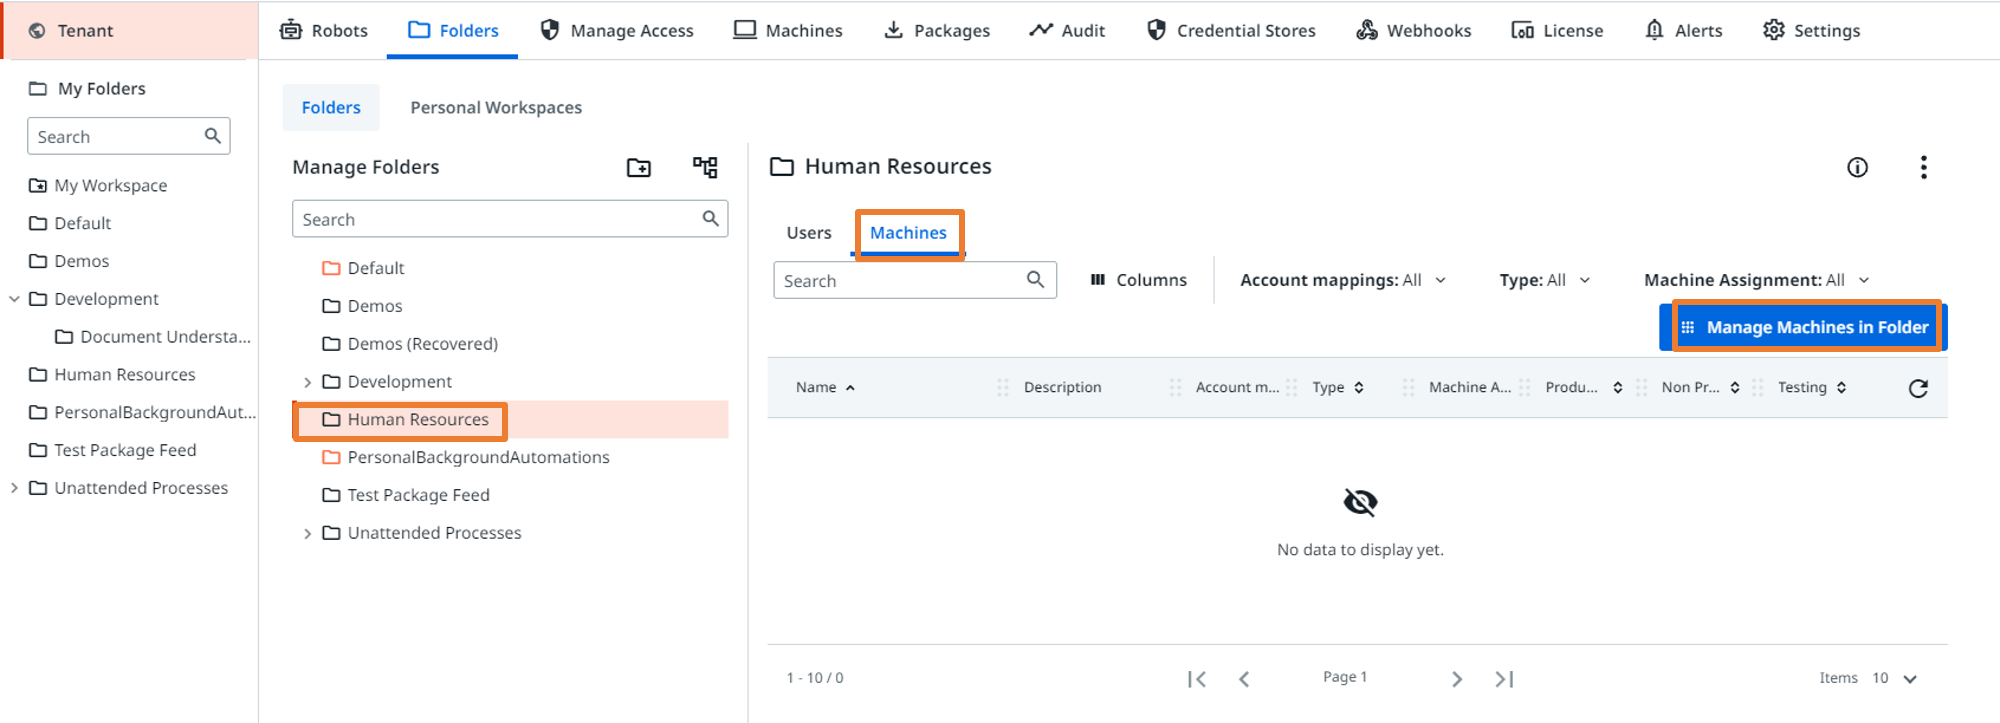
Lastly, it is time to assign the machine to the folder. Click on the Machines tab on the folder management screen of the respective folder and navigate to the Manage Machines in Folder option as shown in the following screenshot.
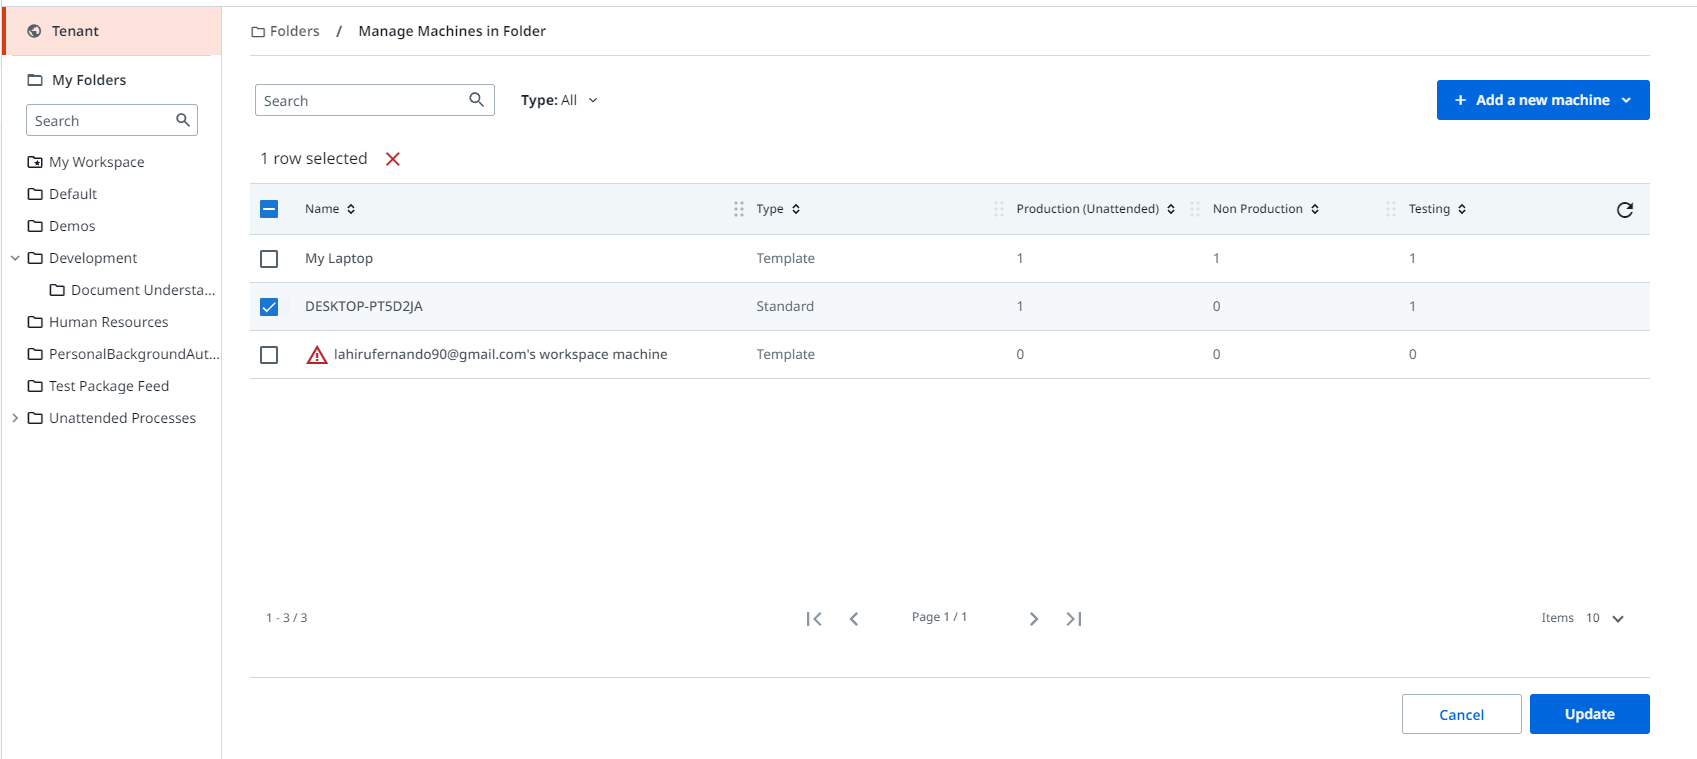
Search for the machine you just created and select it to add to the folder as shown in the following screenshot to complete the configuration steps on Orchestrator. Press the blue Update button to confirm your changes.
You have completed all the configurations necessary to connect the Unattended Robot to Orchestrator. The last step is connecting your Assistant with the Orchestrator to complete the Unattended connectivity.
Step 4.4: Connecting Assistant with Orchestrator using Machine Key
Earlier, we used the Sign-in option in Assistant to connect the robot as Attended or Developer. However, for us to connect as Unattended, we need to use a different option. Hence, let’s first sign out if you have already signed in through Assistant. To begin the Unattended connectivity, go to your machines in the Orchestrator machines page. Copy the Machine Key with the copy option you can find next to the machine you created. Now, open UiPath Assistant and navigate to the Preferences option.
Under Preferences, click on Orchestrator settings to start configuring the connectivity.
The Orchestrator settings screen provides you with two connection methods, Machine Key and Service URL. Let’s select the Machine Key option for now and start configuring as shown in the following screenshot.
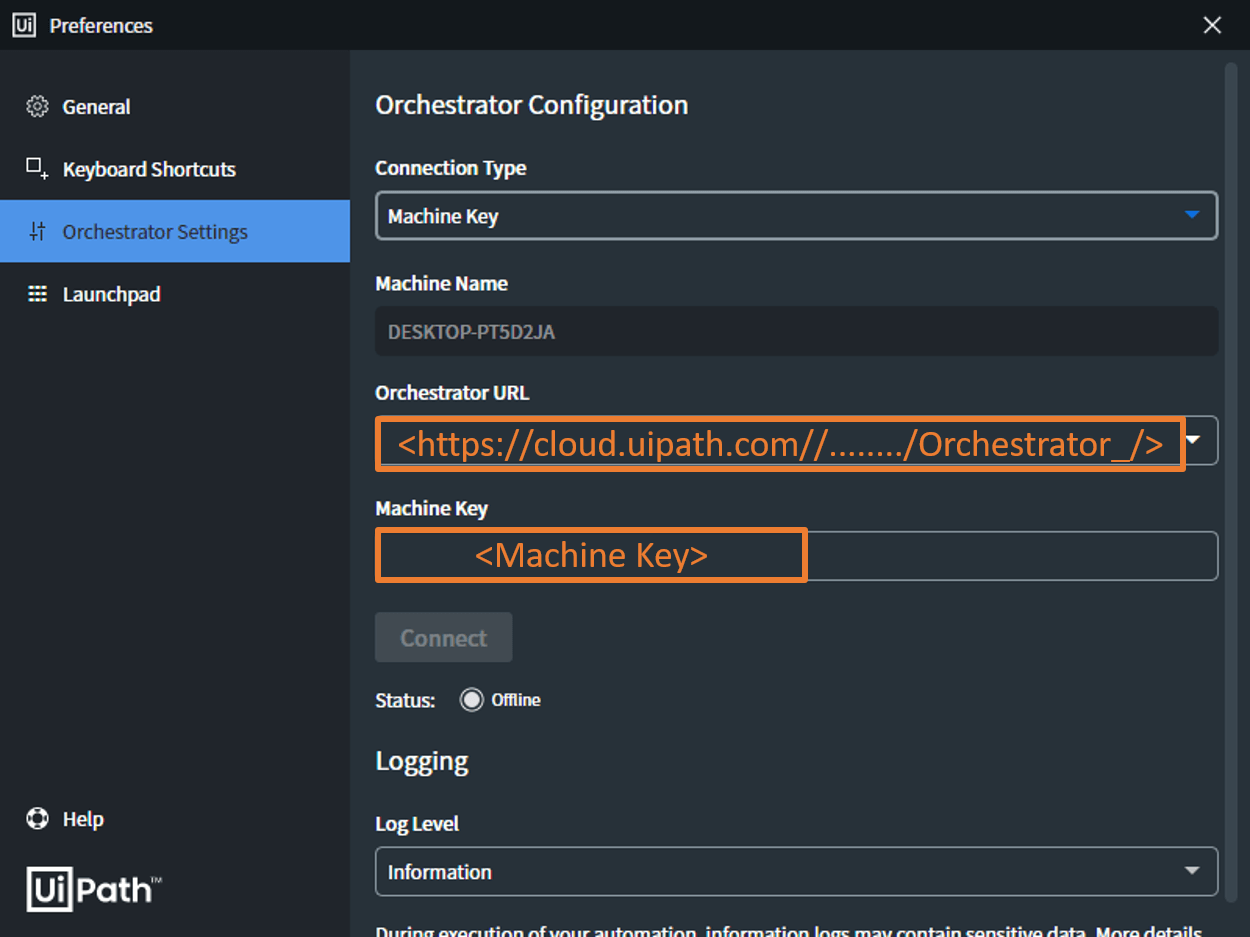
Once you paste the machine key, obtain the Orchestrator URL from the browser URL. You need to copy the first part of the URL up until Orchestrator_/ as shown in the screenshot above. Click on the "Connect" button, to connect as an Unattended Robot.
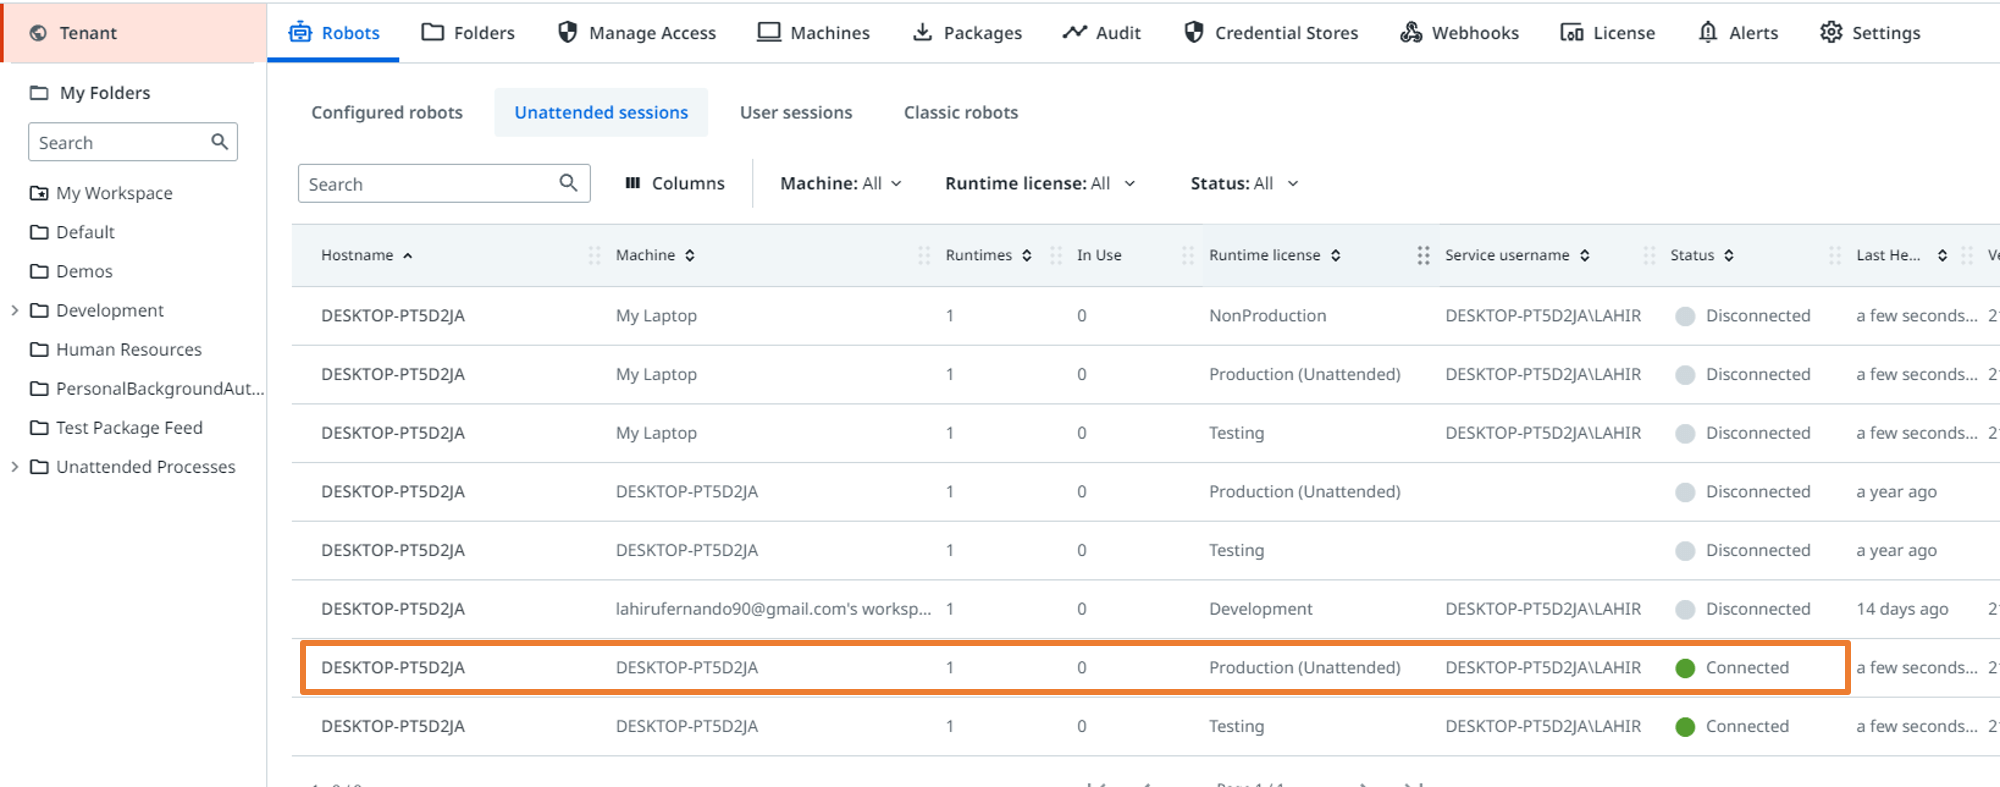
For now, the status will show as Connected, Unlicensed. The reason to show as unlicensed is that the robot will not use the license until the robot is allocated to execute a specific process. During idle time, the license will be released to other users. However, if you navigate to the Robots page under the Tenant option in Orchestrator, you should see the robot is connected and available as Unattended. The following screenshot shows how the Unattended connectivity shows on the Orchestrator robots page.
The Assistant will not show any processes on the processes feed because you connected as an Unattended robot; hence, the Orchestrator manages process execution.
Note: You may also wonder whether it is possible to use the Sign-in option after connecting with the machine key. The answer is, yes. This brings us to the end of the configuration steps.
Conclusion
Connecting the local robot with Orchestrator is one of the most important steps in any automation environment. Orchestrator connectivity provides centralized license management, unattended process execution, and access to many more resources on the Automation Cloud (on-premises or cloud). Though there are several steps to follow, it is easy to understand the concept once we relate it to day-to-day examples. The article explains the entire concept through steps that can be taken when joining a new company. These steps show you how to connect any type of Robot with any latest Orchestrator tenant versions.
Review UiPath and earn gift cards. Join us and help other professionals learn from your experience with UiPath. Your review can be anonymous.
Topics:
Orchestrator
Country Director, Boundaryless Group
Related articles


Get articles from automation experts in your inbox
SubscribeGet articles from automation experts in your inbox
Sign up today and we'll email you the newest articles every week.
Thank you for subscribing!
Thank you for subscribing! Each week, we'll send the best automation blog posts straight to your inbox.