
Automate Sending Emails With This Easy Email Robot

Summarize:
Open a new email, add the recipient’s address, paste an email template into the body of the email, attach the recipient's commission statement, and send the email. Then repeat 16 times!
Or don’t and automate it with UiPath. That's what I did after completing a few UiPath courses and searching the UiPath Forum.
I first heard of UiPath from the Director of Shared Services and the Senior Analyst of a major homebuilder where I am an Assistant Controller. Yes, Assistant Controller! I am an accountant with no prior coding experience, and I am going to walk you through how I created my first UiPath automation. This robot sends emails in a fraction of the time that it takes to send them manually.
Let’s get started
The first thing you will want to do is create the Microsoft Excel data table that will be used in the DataTable variable and the Microsoft Notepad email template that will be used in the EmailTemplate variable.
DataTable
The DataTable provides the bot with the recipient's email address and file path to the attachment. Create a table on the first sheet of an Excel workbook with columns for First Name, Last Name, Email, and FilePath. Save the DataTable file.
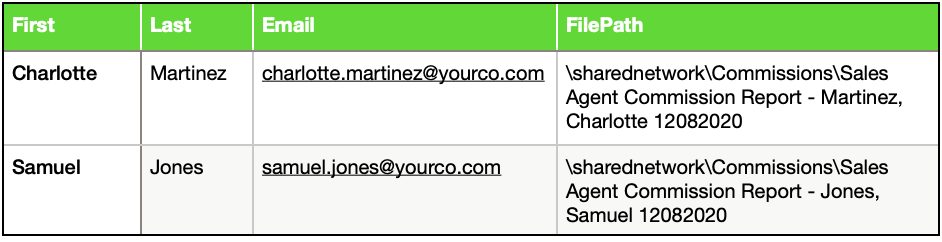
Note: The First Name and Last Name columns are not used in this bot. I created the DataTable with the idea of using those columns in the future.
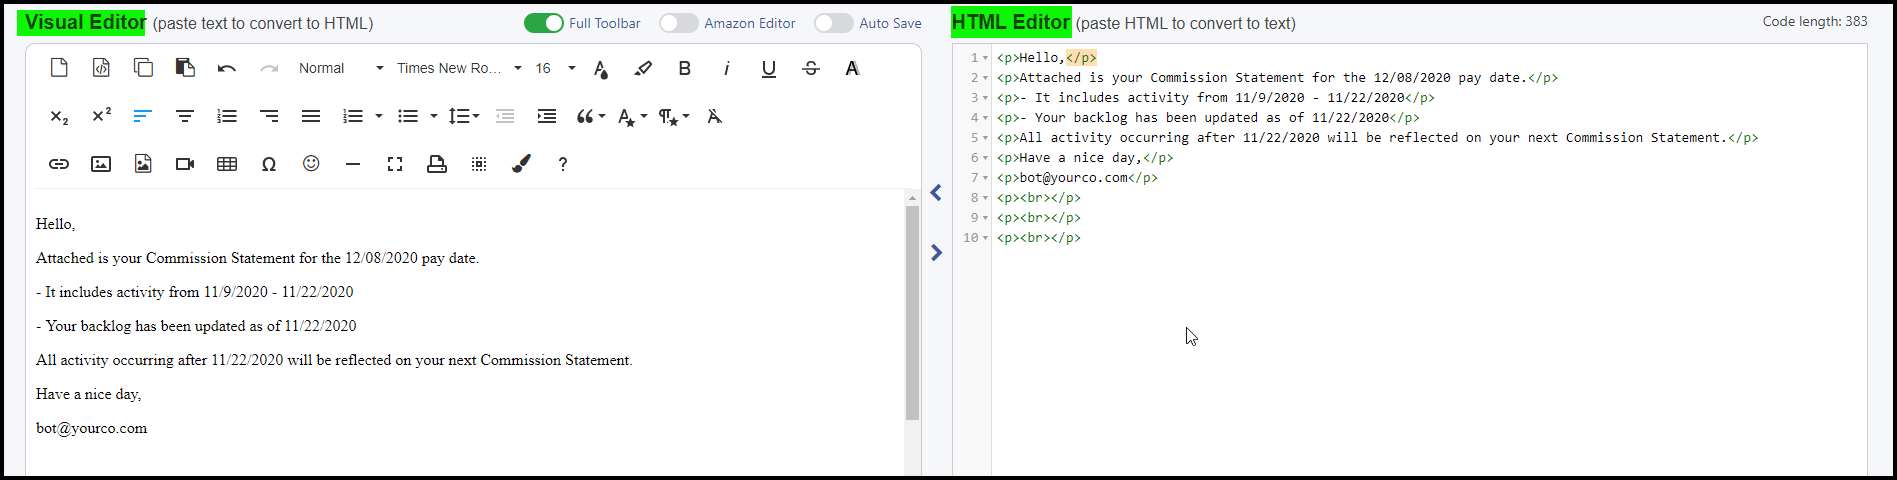
Email Template
I used wordtohtml.net to create the HTML email template. I simply typed the details in the Visual Editor (left in the image below) section of the web page and copy and paste the HTML from the HTML Editor (right in the image below) section into Notepad. Save the Notepad document.
Execution
The activities used in this project are Read Range, For Each Row, Read Text File, and Send Outlook Mail Message.
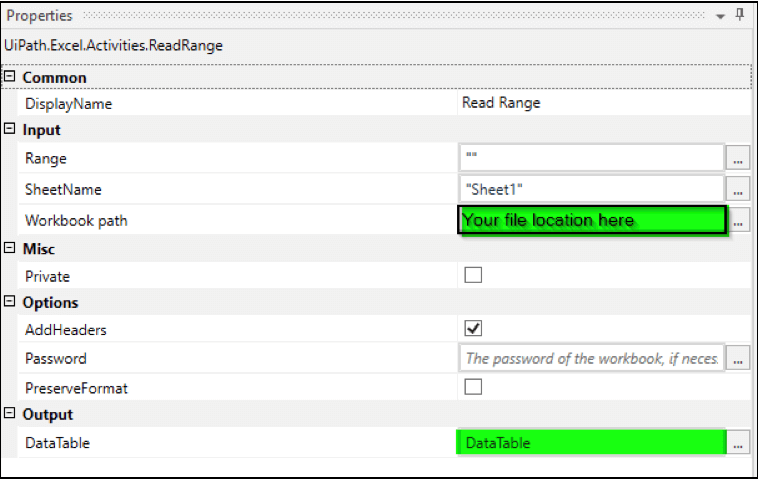
Read Range
Create a new project and drag the Read Range (UiPath.Excel.Activities.ReadRange) activity into the Designer Panel. Browse to the file location of your DataTable (created above) to assign the Workbook path property. Use the default SheetName property of “Sheet 1” and a blank Range property of “ ”.
The next step is to define the DataTable variable. Create a variable called DataTable with the type System.Data.DataTable.
Then enter DataTable into the Output DataTable property of the Read Range activity.
For Each Row
Drag in the For Each (UiPath.Core.Activities.ForEachRow) activity under the Read Range in the project and enter the DataTable variable into the DataTable property.
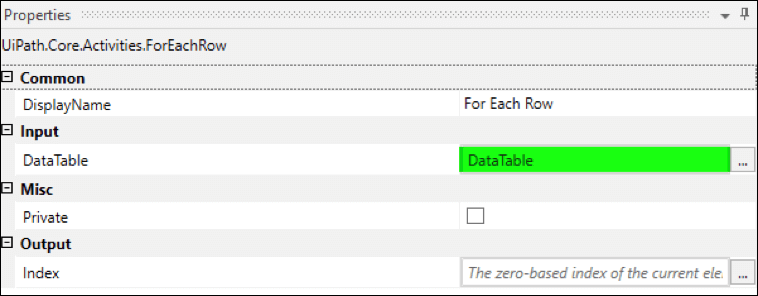
For Each will execute the subsequent activities for each row in the DataTable.
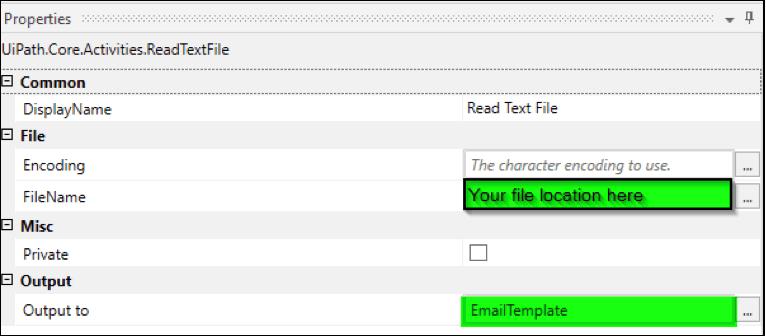
Read Text File
Drag the Read Text File activity into the Body Section of the For Each activity. Browse to your email Template location to assign the FileName property.
Create a String type Variable for the email template called EmailTemplate. Enter the variable EmailTemplate in the Output to property.
Send Outlook Mail Message
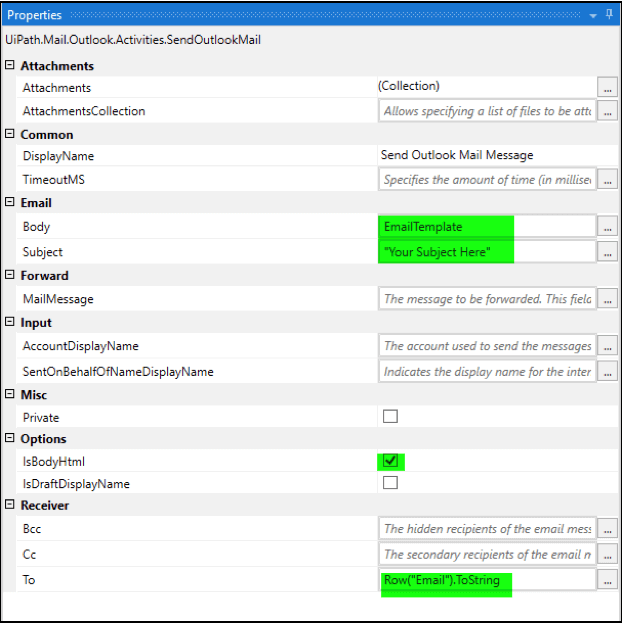
Drag the Send Outlook Mail Message into the Body section of the For Each activity under the Read Text File activity.
In the Properties Panel, enter the email subject of your email in quotes in the Subject property.
In the Body property, enter the EmailTemplate variable.
Click the IsBodyHtml property to indicate that the body of the email is HTML.
Enter Row(“Email”).ToString in the To property to grab the recipient email address from the DataTable.
Violà! The bot currently sends 131 emails in three minutes, biweekly, for five colleagues and me.
Learning robotic process automation (RPA) with UiPath is so much fun! I am learning, solving problems and challenges, and saving time—our most valuable asset.
What emails can you automate with UiPath to save time?
Lashea Hopson is an Assistant Controller at a major homebuilder.
Topics:
Learning RPARelated articles


Get articles from automation experts in your inbox
Sign up today and we'll email you the newest articles every week.
Thank you for subscribing!
Thank you for subscribing! Each week, we'll send the best automation blog posts straight to your inbox.
Get articles from automation experts in your inbox
Sign up today and we'll email you the newest articles every week.
Thank you for subscribing!
Thank you for subscribing! Each week, we'll send the best automation blog posts straight to your inbox.