
Automate Your Way to the Stars: NASA API Portal and UiPath Studio Tutorial
Share at:

From time to time we all sit back and admire the beauty of the night sky painted with tiny sparkling stars. Indeed, this universe is vast and we are just a tiny part of it. But when has this stopped us from trying to conquer it?
When talking about conquering the universe, the first name that comes to mind is the National Aeronautics and Space Administration, or, as everybody knows it, NASA. Since they launched the NASA API portal it’s so much easier to feed your curiosity and develop new ways of mastering the universe’s secrets.
Let’s talk about how you can leverage this resource and develop automations using UiPath Studio.
What is a web API?
API is an abbreviation for Application Program Interface. Webopedia defines API as “a set of routines, protocols, and tools for building software applications that specifies how software components should interact.” To put it in simple terms, API is an interface with a set of functions that allow programmers to access specific features or data from an application, operating system, or other services.
Web API, as the name suggests, is an API that can be accessed using the HTTP protocol.
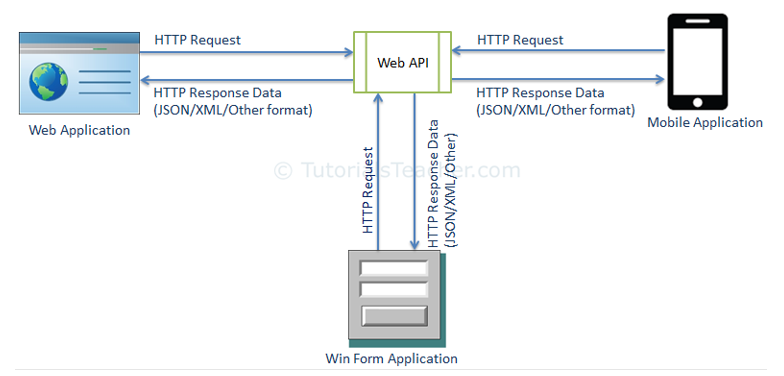
Source: Tutorials Teacher
Example: When using a mobile application, it sends a connection request to a server via the internet. The server analyzes the request and performs the processing of the request as per its programming code. It then returns the output data back to the mobile application again via the internet. The mobile application then decodes this response from the server and shows it to the user in a human-readable format.
Web API invocation in UiPath Studio
1. Install the package UiPath.Web.Activities in your UiPath Studio. Note: Check the Managing Activities Packages support documentation for information about installing activity packages.
2. Drag the HTTP Request in the designer studio.
3. The HTTP Request Wizard will pop up.
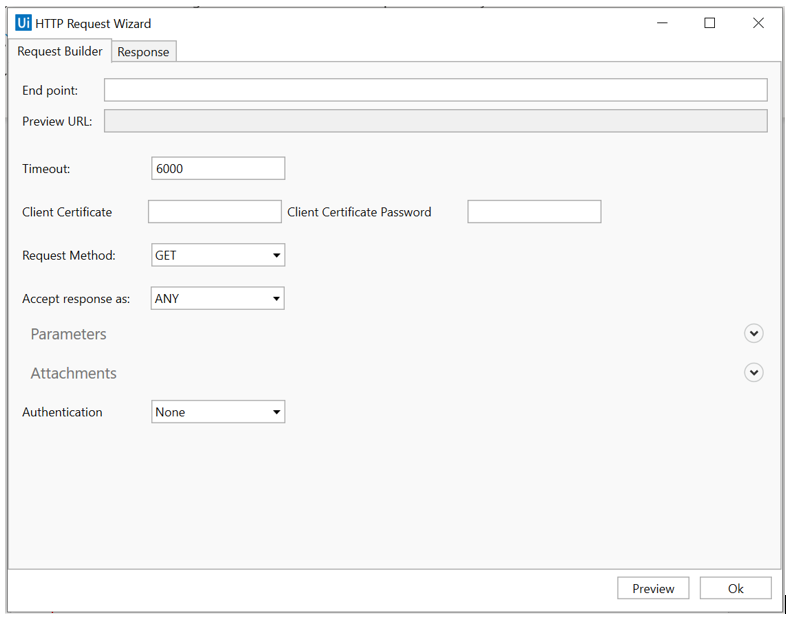
For this example, we are going to configure the NASA Astronomy Picture of the Day (APOD) API. You can check out other APIs from NASA as they can be used for fantastic automations if you have the correct approach.
4. Access the NASA API portal and fill in the registration form with your first and last name, and your email address. Check your inbox for the credentials.
5. Configure the HTTP Request Wizard as follows:
a) End Point - "https://api.nasa.gov/planetary/apod?date="+DateEntry+"&hd="+HD+"&apikey="+API_Key
Note that the Date Entry, HD, and API_Key are variables.
6. Click OK.
7. Update the httpClient Properies from the right-hand side of the screen as follows:
a) Input: AcceptFormat - JSON
b) Options: ResourcePath as Environment.CurrentDirectory+"\APOD.txt"
c) Output: Result var_ouput
8. Access the Variables tab from the lower part of the page. Set the variable type as String.
9. From the Activities tab, drag the Deserialize JSON activity in the workflow. Update its properties as follows:
a) Input: Var_output (output of HTTP Req)
b) TypeArgument: Newton.json.Linq.JObject
10. Access the Arguments tab on the lower part of the page. Update its properties as follows:
a) Argument type: J_output
11. Drag from the Activities tab the Build DataTable. Update its properties as follows:
a) DisplayName var_dt1
b) Add two columns, one for Type and the other for Value
12. Add a for each loop activity with J_output in the “in” part of the loop.
13. Drag an If activity and update its properties as follows:
a) Condition: item.ToString.Contains("hdurl") OR item.ToString.Contains("URL") OR item.ToString.Contains("title")
Note that we will split the string in the JSON based. Because these parameters have links, we will do this at the beginning.
b) For the Then condition set up the Assign Values string array variable to Split (item.tostring,":",2)
c) For the Else condition set up the Assign Values string array variable to Split (item.tostring,“:”)
14. Drag an Add Data Row activity. Update its properties as follows:
a) Input of Array row: {Values(0),Values(1)}. Note that we add index 0 (containing the type of property) and index 1 (containing the value of the property) from the Values string array.
b) DataTable: var_dt1
15. Drag a Write Range (workbook) activity. Update its properties as follows:
a) File path: ApodData.xlsx
b) Sheet name: Sheet1
c) Cell: A1
d) DataTable: var_dt1
e) Add header: True
16. Drag a Read excel cell (workbook) activity. Update its properties as follows:
a) File path: ApodData.xlsx
b) Sheet: Sheet1
c) Cell: B9
d) Output Variable: Image_Endpoint
17. Drag another HTTP Request activity. Update its properties as follows:
a) EndPoint: Image_Endpoint string variable
b) Method GET
c) Under Options, set up the Resource Path value as Environment.CurrentDirectory+"\APOD_Image.jpg"
By running this workflow, you will extract a Microsoft Excel file along with the NASA Image of the Day. Then, you will download it to your current directory, the place where the robot is running from. You can further enhance this solution by using the downloaded image and the information in the Excel file.
That's it. You are ready to reach the stars!
Access this page to find the code or check out the video tutorial:
With a little bit of luck and the right technology, you may be the next person who makes an outstanding discovery and changes the way we see this big wide universe.
Topics:
StudioSenior Associate in Technology, Re:Sources
Related articles


Get articles from automation experts in your inbox
SubscribeGet articles from automation experts in your inbox
Sign up today and we'll email you the newest articles every week.
Thank you for subscribing!
Thank you for subscribing! Each week, we'll send the best automation blog posts straight to your inbox.