
Summarize:
Introduction
UiPath StudioX is a tool that can be used for email automation and it involves a desktop Outlook application, Outlook 365, or Gmail. This tutorial will focus on Gmail automation. Take these steps to easily automate Gmail tasks that require a Word template and Excel lists.
Automation scenario
Let’s imagine a virtual event coming up. My aim is to send an email with an invite via Gmail to the potential invitees individually. Firstly, I design the invitation in Microsoft Word as a mail template, and then I prepare a mailing list in Microsoft Excel.
The mailing list data in the Excel file includes first name, last name, and email address of the invitees. In the Word template file, there's a placeholder for the invitee’s first and last name. This means I'll have to use the data from the Excel file to prepare the email invitation to be sent to each invitee.
Let's assume that my mailing list has 200 or more respondents. Obviously, if I can automate this task, it'll save time and effort. Below you can find a list of disadvantages that might appear in case you operate manually this task.
1. The drudgery involved
2. Possibility of mismatching first and last name
3. Send an invitation to the wrong email address
4. Omit some of the invitees on the list
For this automation, we built a bot to use the information of a given invitee (from a mailing list) along with a Word template to create a mail message that's sent via our Gmail account to the invitee’s email address. Doing this using Outlook 365 is pretty straightforward. Use Desktop Outlook App and the Word document directly with the Send Email Activity. For Gmail the content of the Word document it is required to be in HTML format.
Use case
Are you interested in trying out this automation? You can download here and here the zipped file containing the template and mailing list.
Here are the StudioX email capabilities with Gmail automation.
Using a Word template to create HTML content suitable for Gmail automation
Correctly configure the Send Mail activity to send mail using the HTML content as the email message body
For this scenario you'll need to have the following resources:
1. UiPath Studio application installed on your PC, and switched to the UiPath StudioX profile. 2. Microsoft Word and Microsoft Excel installed on your PC 3. Excel Add-in for StudioX installed on your PC 4. You know already how to create a new task in StudioX. 5. You have downloaded the starter_files.zip file provided above, and have unzipped the folder.
Phase 1: Create StudioX Project
Open StudioX and create the automation project using a blank task, name the process appropriately and provide a fitting description. I will use the name and description below:
Process name: SendemailInvitationusingGmail
Description: Gmail automation bot using a Word template and an Excel mailing list.
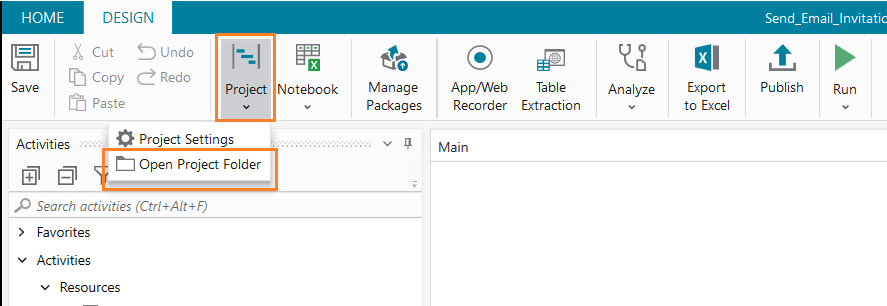
As soon as StudioX has created the base project files and setting up the workspace, open the project folder by clicking on the project icon on the ribbon, and selecting the "Open Project" folder option.
Within the project folder of the automation, create a new folder named "resources" and copy the Word template and Excel mailing list files you obtained from the zipped file you downloaded earlier.
Before we proceed, let’s take a moment to review what we need to do on StudioX. Basically, we want to replicate the data (text and images) in the Word template document as HTML content having placeholders for first and last name.
Next, we use the first and last name values on an Excel row in our mailing list to replace the corresponding placeholders within the HTML content to compose the body of the email message meant for the given invite. Then send the email to that invite via our Gmail account using the email address information on that same row. Also, we need to repeat this set of actions for each row on our Excel mailing list.
Phase 2: Add and configure an Excel file resource
We need a Use Excel file resource since our bot will need to interact with our Excel mailing list. Take the following steps:
Go to StudioX, on the Activities pane (usually on the left of the StudioX window), expand the Resources group, and double-click on the
Use Excel file resource to add it to the canvas or design area.
On the Use Excel file activity, click on the Browse for file icon to select the Excel mailing list we have in the Resources folder. Since the bot won't write into the file, uncheck the Save changes checkbox.
Since the bot will make use of a mailing list that we have provided as an Excel file, uncheck the Create.
In the Properties pane, which is on the right part of your StudioX screen, change the Display Name value to Use Excel file — Mailing List.
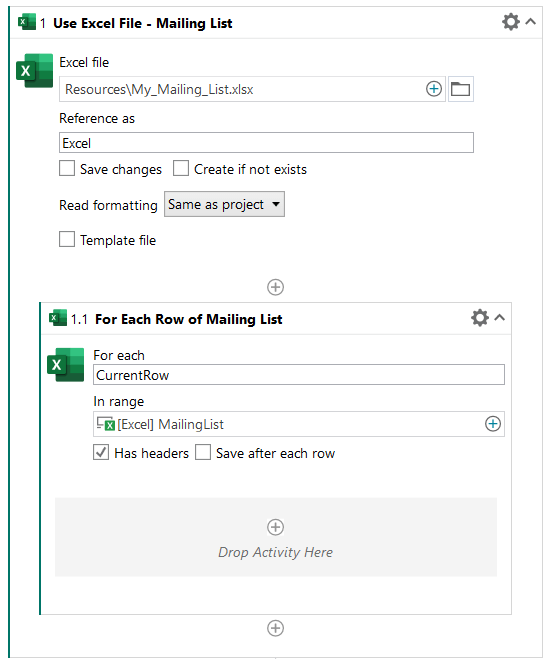
Next, search the Activities pane for a For Each Excel Row activity, drag and drop it inside the Excel resource just below the Save For Later activity, and configure it as stated below.
Click on the Plus (+) button on the in Range property field, select Excel, and select Mailing list.
Since our mailing list has headers, indicated by the first row of the MailingList worksheet, click on the
Has headers checkbox to check it.
On the Properties pane, change the Display Name value to for each row of the mailing List.
Phase 3: Create HTML content from the Word template file
As already mentioned, we need the information (both text and images) in our Word template document replicated as HTML content since our bot cannot directly use a Word document with the Gmail resource. We should also bear in mind that the HTML version of the template information must match that of the Word document exactly. This is very important especially if you aren't the creator of the Word template, you don't want to start explaining why the mail sent by your bot is looking different from what you were given.
Thankfully, StudioX provides means to easily create HTML content in our automations so you don't need to be a computer whiz or a person knowledgeable in HTML to pull off this step. The Create HTML Content activity allows the creation of rich text documents via a what you see is what you get (WYSIWYG) HTML editor.
Search the Activities pane for a Create HTML Content activity, drag and drop it inside the or Each Excel Row activity. Do you know why we need to nest the former within the latter? Because our bot will need to prepare a unique email message body for each person as it loops through our mailing list, row by row, replacing the first name and last name placeholders with the actual names of the invitees.
Configure these two properties:
In the HTML Content property field, click on the and button, and select the Save for Later Use option to open the Save value for later dialog. Next, Clear the Give Your Value a name textbox, type in email message body and click on the OK button.
Go to the Properties pane, and set the value of the Display Name to Create HTML Mail Message. Back to the activity card on the design canvas, click on the Open Editor button to display the Edit HTML Content dialog. Notice the toolbar containing a plethora of document formatting tools? Two of them are going to be useful to us for this tutorial.
Open the Word template file, copy its entire contents using Ctrl+A and then use Ctrl+V to paste the copied contents inside the Edit HTML Content editor.
Can you notice that except for the image, every other data in our file Word template has been replicated exactly in form and appearance? If you click on the section of the editor window where the image is supposed to be, you'll discover that a box-shaped placeholder is there, but just that the image isn't displayed—let’s correct this in the next step.
We need each image in our file Word template as an image file. If your template has images and the image files are already available to you, then you can skip this step—else you'll need to create the image files yourself.
Return to the file Word template document, locate the image, right-click on it, and from the context menu that appears, select the Save as Picture option.
On the file Save dialog box that opens, type Image001 in the file name field— leave the Save as type value as Portable Network Graphics, i.e. PNG—select a storage location on your computer before clicking on the Save button.
At this point, I recommend that you name the images in the order they appear in the Word document—for example, Image001, Image002, and so on.
After saving the last image, close the Word document.
Next, copy all the image files into the project folder of your automation—in our case, we copied the Image001 PNG file into the Resources folder. More often than not, it's advisable to have the images for your HTML template within your project folder as this will allow for such images to always be available to the bot regardless of the machine the bot runs on.
Also, it makes the rate of image retrieval much faster in the event your automation requires that the bot pulls the image at runtime, compared to pulling the images from a shared network drive.
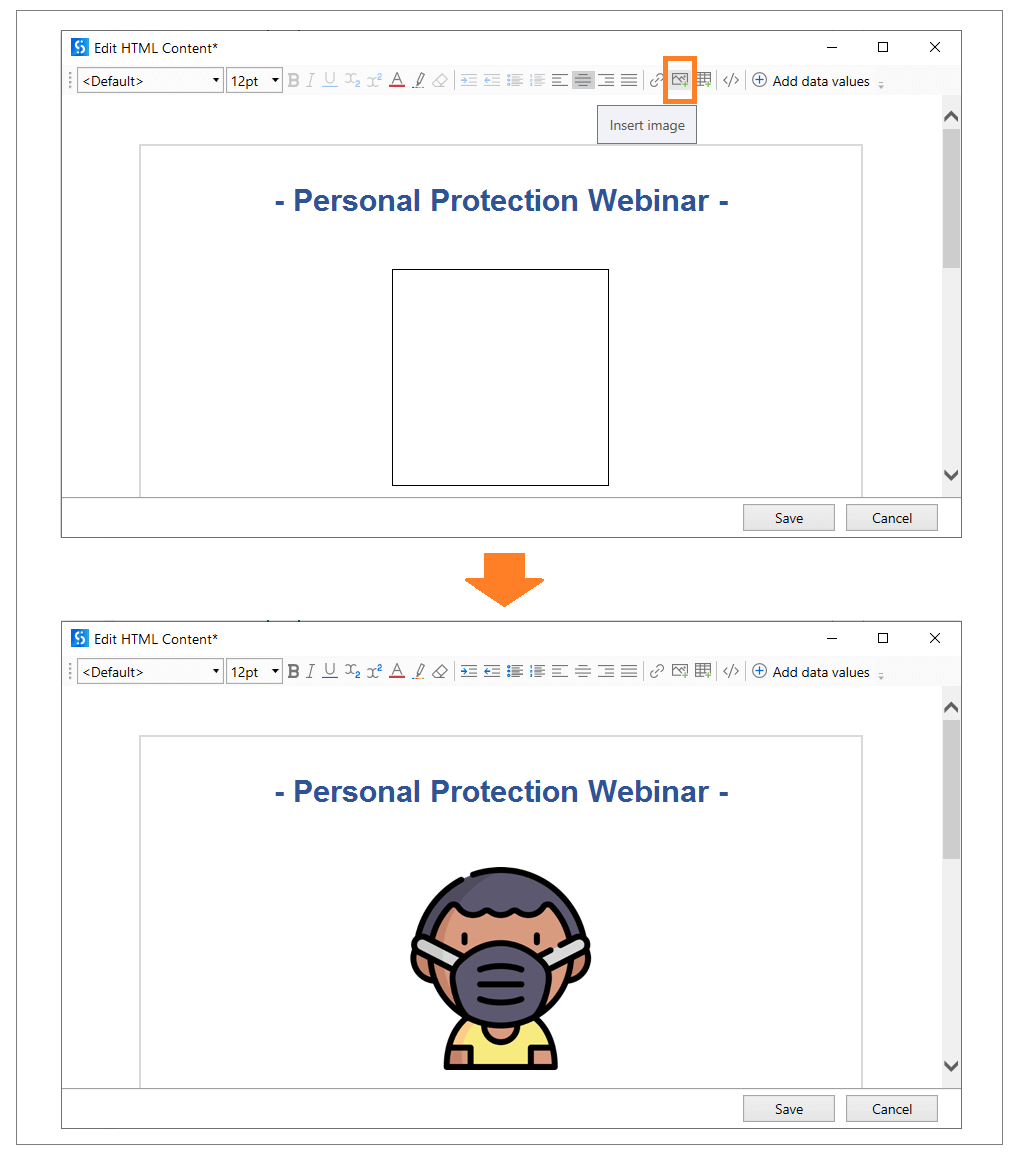
Return to the HTML Content Editor on StudioX— it is time to replace each box-shaped image placeholder with the actual image.
Click on the box currently and incorrectly representing the image.
Then click on the Insert Image tool on the formatting bar of the HTML Editor window.
On the Insert Image dialog, ensure the Insert now radio button is selected; then click on the Browse button to launch the Open dialog.
On the Open dialog, navigate to the location of the image, select it, and click on the Open button to return to the Insert image dialog.
If you like, you can choose to set the Alt text property of the image—you can also choose to add a link to the image, and modify the other properties of the image as provided in the Insert image dialog.
When you are done configuring the image to taste, click on the OK button to return to the HTML Editor window.
When you are done replacing all the images in the HTML template, you should have the HTML template looking as close as possible, if not exactly like the content in your Word template.
There's one more thing to do to out HTML template, which is to add data values in place of the placeholders originally used in the Word template, that's our source for the HTML content we now have in the Editor window. So first, we create the needed data values.
On the formatting toolbar of the HTML Content Editor window, click on the Add data values button and then click on Map data values button, too, to open the Map Data Values dialog. Since we had two placeholders in the original Word template content, then it implies, we must have two data values in our HTML content, one for first name and the other for last name.
On the Map Data Values dialog, click on the Add Value button and select Single value from the dropdown—a name-value pair of fields will appear. Clear what is in the Name field and type in First Name.
Then in the Value field, click on the and button, select CurrentRow, and then FirstName from the list.
Next, we need to add the second value. Click on the Add Value button again, and select Single value from the dropdown. Clear the Name field and type in LastName. Then in the Value field, click on the and button, select CurrentRow and then LastName from the list.
And next, click on the OK button to return to the HTML Content Editor window.
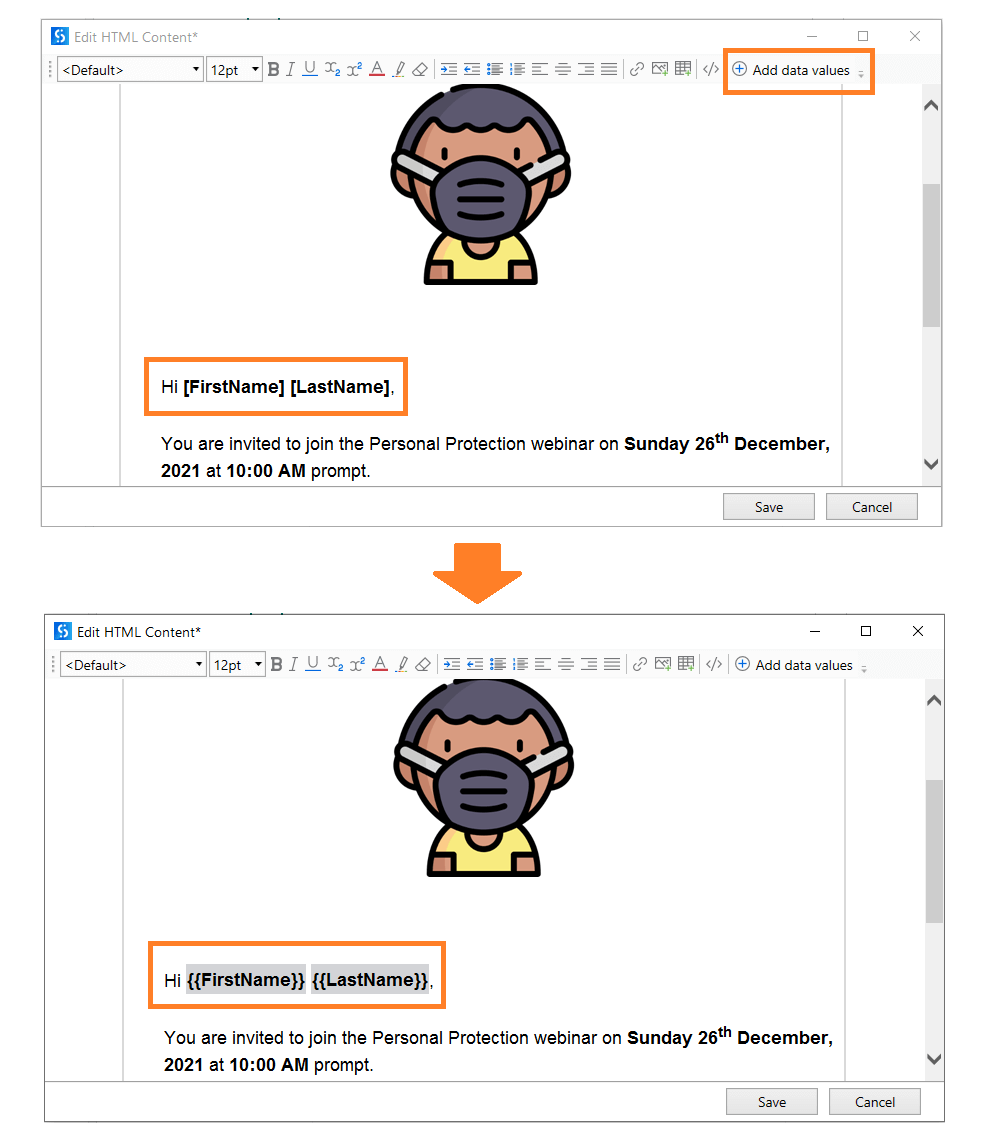
Having created the data values that we need—we have to position them within the HTML content. Select the current first name placeholder, that is, [First name]. Click on the Add data values button, and from the list that appears, select FirstName.
If you've replaced correctly, you should have as the new placeholder for first name.
We repeat the same steps above for the last name placeholder to replace [Last name] with.
Finally, click on the Save button to save the HTML content and exit the Editor.
Phase 4: Add and Configure a Use Gmail Resource
So far, what we've built will make our bot loop through the row records on our Excel mailing list, and then insert the first name and last name values on each row to generate an HTML based email message body. At this point, what is lacking is email functionality—the ability of our bot to send mails using each of the mail messages. So let’s go ahead and add this part of the automation design.
Inside the For Each Excel Row activity, add a Use Gmail resource below the Use Word file resource, and configure it as follows:
In the Account property field, click on the drop down— if the desired account isn't on the list, click on Add new account to open the Add Gmail Account dialog— skip this step if the account you need is on the list.
An easy way to quickly add a Gmail account to StudioX is to click on the OK button on the Add Gmail Account dialog, a Google OAuth browser window opens so you can choose an account to allow you to continue to UiPath GSuite. If the desired account isn't listed, click on the Use another account option, and sign in with the Gmail account you want.
Return to StudioX once you are successfully signed in, you should see the Gmail account in the dropdown of the Account property field. Click on the Account dropdown and select the Gmail account you want the bot to use. Leave the value in the Reference as property field as Gmail. Add a Send email activity inside the Use Gmail resource. Leave the value in the Account property field as Gmail.
In the To property field, click on the and button, select Current row, and then email address. In the Subject property field, click on the and button, select Text, and in the Text Builder dialog, type Event Invitation: Personal Protection webinar and click Save. In the Body property field, select the HTML radio button.
Go to the Properties pane, set the value of HTML body from file to (null).
Still on the Properties pane, set the value of the HTML body from text property by clicking on the and button, select Use Saved Value, then select EmailMessageBody.
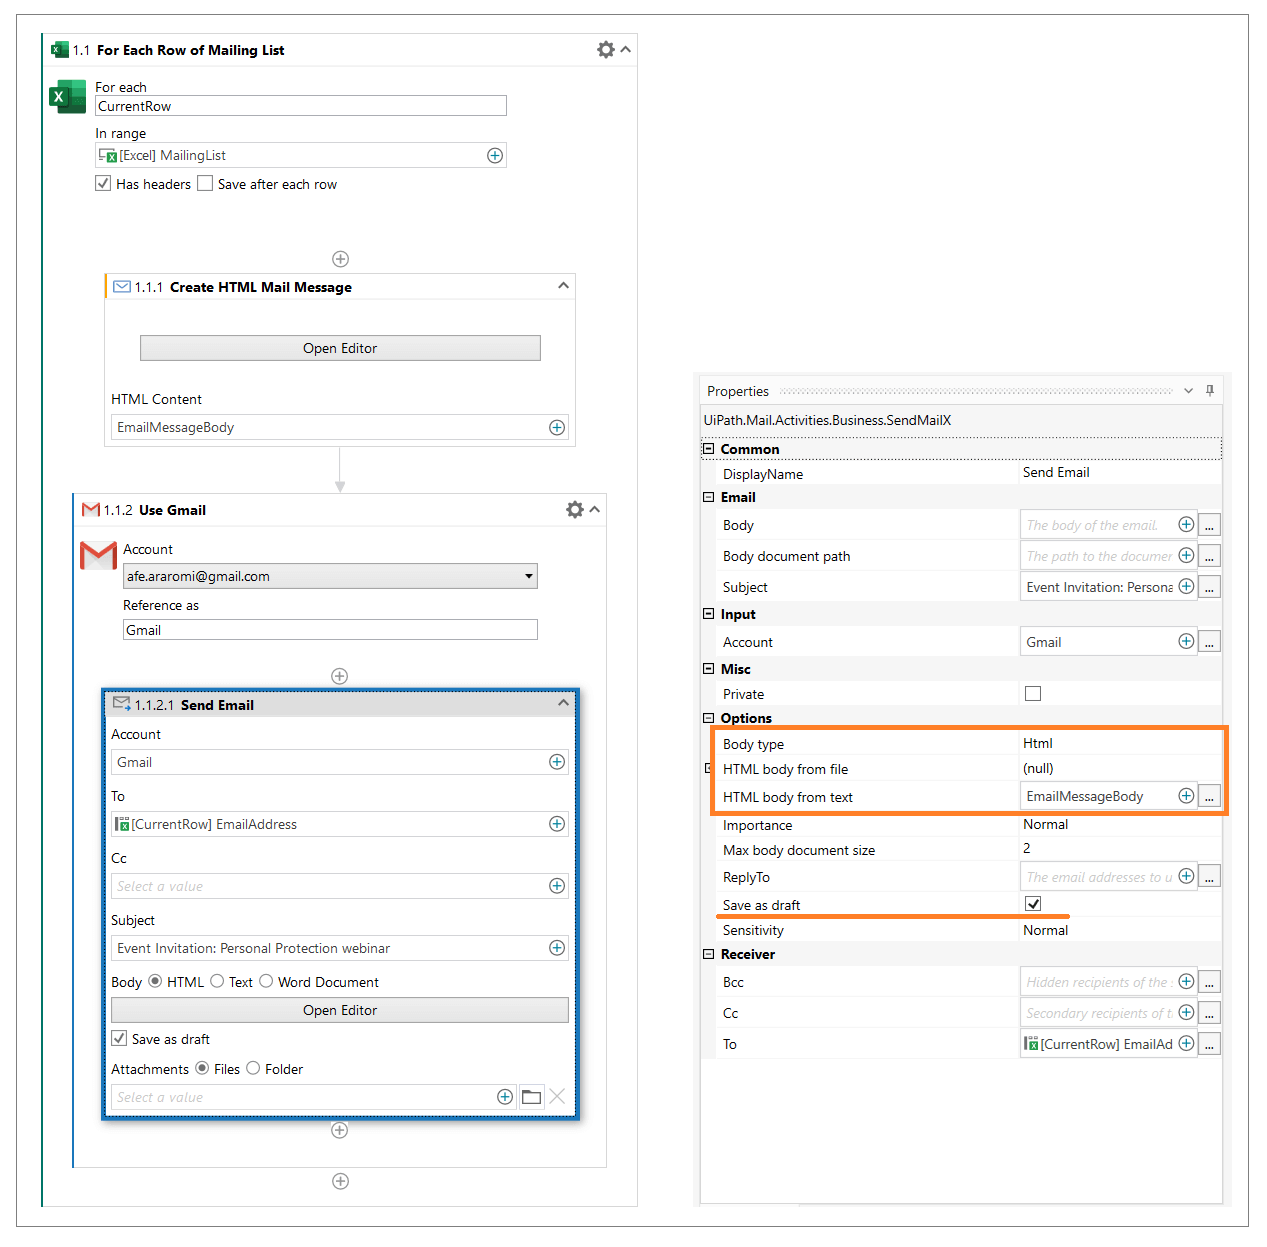
Make sure the Save as Draft checkbox is checked. Note that this allows us to run and test our automation while we build it without the bot sending unnecessary emails to people on our mailing list. Uncheck this checkbox when you are sure your automation is complete and ready to use.
Test run the automation and check the Drafts folder of the Gmail account you used in the automation to see if the draft mails were successfully created.
Conclusion
In this tutorial, we used a Word template to automate a personalized mail invitation and sent it to a desired mailing list.
Firstly, we used a For Each Excel Row activity nested in a Use Excel file resource to loop through the rows of contact data in our mailing list. Then we used a Create HTML Content activity nested inside the For Each Excel Row activity to help us automate the conversion of the text content of our Word template into HTML format to serve as the email message body for each contact on our mailing list. Next, we nested a Use Gmail resource within the For Each Excel Row activity, and configured it to use a Gmail account. And lastly, we configured a Send email activity nested in a Use Gmail resource to send the generated HTML invitation to each contact on our mailing list.
Happy Automation!
Consultant, dipoleDIAMOND
Related articles


Get articles from automation experts in your inbox
Sign up today and we'll email you the newest articles every week.
Thank you for subscribing!
Thank you for subscribing! Each week, we'll send the best automation blog posts straight to your inbox.
Get articles from automation experts in your inbox
Sign up today and we'll email you the newest articles every week.
Thank you for subscribing!
Thank you for subscribing! Each week, we'll send the best automation blog posts straight to your inbox.